I have not visited Tensorflow for quite a while and recently had a use case where I need to do some classification and want to give deep learning a whirl. I am surprised to find the number of tutorials/examples that have been added in the past few month. Today, I am going to give the “Tensorflow Linear Model Tutorial” an overhaul and carefully study the functions that have been used in this tutorial.
The use case has been well explained at the beginning of the tutorial but the sample code, for example, the input_fn is a bit daunting for the people, at least me, at a first glance. Here is a list of study notes that I have taken regarding each of the functions that have been used in input_fn.
tf.gfile(.Exists)
Within the module of tf.gfile, there are so many utility functions not only limited to Exists, for example, Copy, Remove, ..etc. In this way, you can do everything using tensorflow without having to dabble with the os.path library and others, which might be a good option for developers who prefer minimizing the amount of dependent libraries in his/her code.
I have created a Jupyter notebook where demonstrate some of the functionalities using the gfile. Hopefully the code and message can give you a more intuitive feeling of how to use those functions.
Parse_CSV
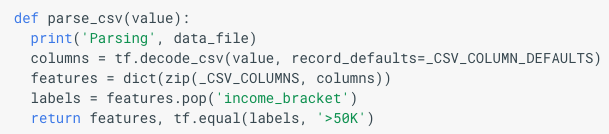
tf.decode_csv
The parse_csv function actually too me a while to understand. The input to this function has the variable name “value”. And then it got used to be the input to the function tensorflow.decode_csv. The one liner description for decode_csv is as followed:
Convert CSV records to tensors. Each column maps to one tensor.
And the record_defaults argument is definitely something you need to know if you got so spoiled by calling pd.read_csv a lot.
record_defaults: A list ofTensorobjects with types from:float32,int32,int64,string. One tensor per column of the input record, with either a scalar default value for that column or empty if the column is required.
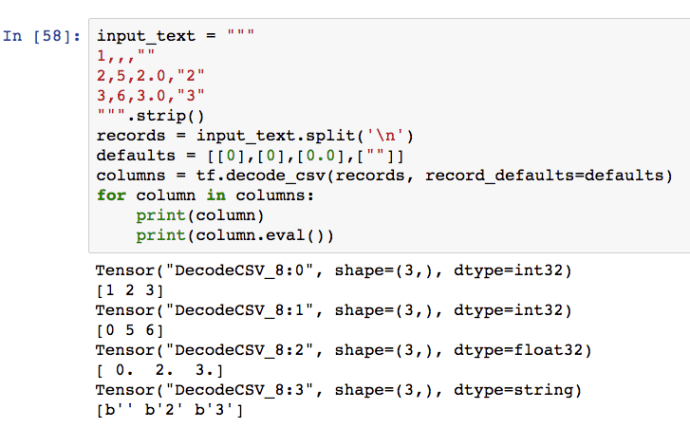
For example, this is how a record_defaults could look like, in the example that we are looking at:
_CSV_COLUMN_DEFAULTS = [[0], [”], [0], [”], [0], [”], [”], [”], [”], [”], [0], [0], [0], [”], [”]]
You can tell we have 15 elements in this list, and the first element is a list which has only one element 0, the second element is also a list that has only one element which is an empty string, so on and so forth. The value provided here is basically saying, for the first column of the CSV file, if there need to use a default value, like missing values, use 0 as the default. You can find the raw dataset from here. By reading the adult.names file, you can tell the first column of the data is the field “age”, which is a numeric field which has values like 21, 50, etc. In this case, using 0 as a default value for numeric field makes perfect sense. The second column is “workclass” with values like “self-employed”, ..etc that an empty string is a legit default value for strings/categorical variables.
Here is another example from tensorflow source code using the decode_csv function. You can find the dataset used in the example by visiting here and the records_default is now defined as:
defaults = collections.OrderedDict([
    ("symboling", [0]),
    ("normalized-losses", [0.0]),
    ("make", [""]),
    ...
    ("price", [0.0])
])
types = collections.OrderedDict((key, type(value[0]))
                                for key, value in defaults.items())

#types = OrderedDict([
#    ('symboling', <class 'int'>),
#    ('normalized-losses', <class 'float'>),
#    ('make', <class 'str'>),
#    ...
#    ('price', <class 'float'>)
#])
As you can see, now the record_defaults argument is list(defaults.values()) which is basically the same as the previous example [[0], [0.0], [”], …, [0.0]]. The second example is very helpful because it shows you how to use an ordered list to manage the column types and column names so you can reuse it again and again after manually creating it once.
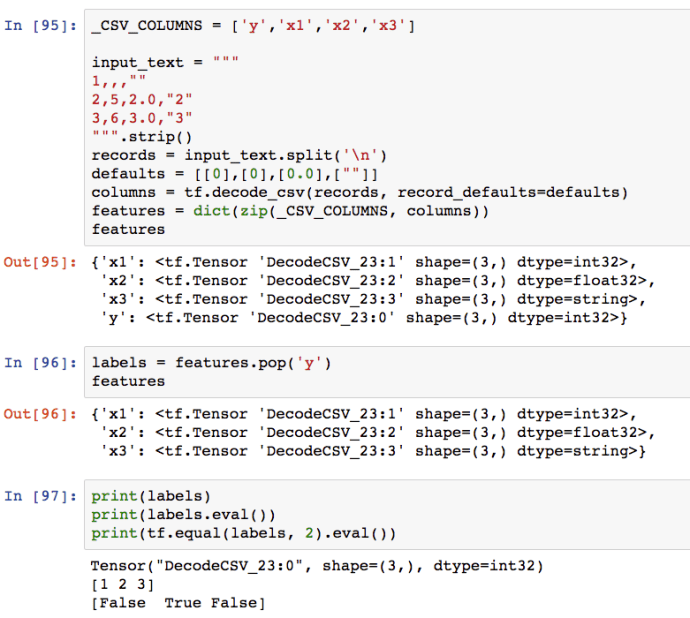
The example above perfectly demonstrated how to use decode_csv in a minimal fashion. Since I am using tensorflow.interactive_session, I can simply call .eval() operation on any tensor object to print out for debugging purpose.
Features Dictionary
I want to briefly discuss how the features variable got generated. Clearly, it is a dictionary and the fascinating part is not only how it is constructed, but also how to exclude the labels(y) field.
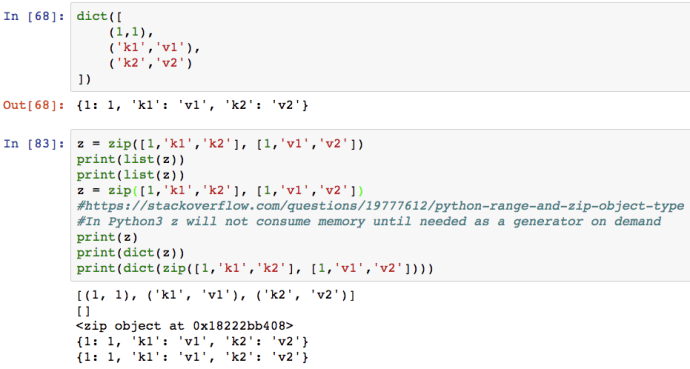
The zip function is quite a useful function that many people underutilize. The following few lines of code not only demonstrated how to use zip, but also showed you how it is different from Python 2.7 and also how to construct a dict.
After all of that, here is an example that might captured everything that you need to know about parse_csv but in a more complete context.