Docker – Build A Docker Container to run Selenium Grid

I found a project on github contributed by Lewis Zhang and Mohammed Omer(momer), momer has not only written a Nutch plugin to make http request using Selenium,Firefox, but also finished another plugin on top of Selenium Grid which will not only improve the performance if running in parallel, but also leverage the grid to handle the hanging process if any. He also offered two docker images to help get started. Since I have not really used docker and think this would be great chance to learn how to use. So this post is about my experience building his project using docker.

You can clone the github repositories locally and run docker build. However, there is an easier way which you can just run docker build command directly against the github project. In that case, it will treat the files from the URL as a whole and actually pull the content first locally, then send it to the docker daemon using as the `context` to build the container.docker_build_git_url

Two things that worth mentioning, first, you can pass a tar ball to the build command from stdin and docker will decompress and use it as the context. second, there are many staging or intermediate containers along the way to build the final container that you expected. Those will be deleted as default but you can keep them if you set the –rm=false. docker_build_remove_intermediate_containers When I build the hub container, I realized the repository name is missing and the same thing happens again when I redo it. I ended up using the 12 digits image id to start the container, and at least it works.

docker_run_hub

Now the challenging part is how to start the node, momer mentioned that you gonna use a tool called MaestroNG to make it work.

TO BE CONTINUED


Selenium – Side Effect. Bot or Human

Whenever you want to run Selenium against a site, please understand it will trigger all the javascript and act like a fully functional browser, it will trigger all kinds of services that might impact target website.

For example, while I was playing around with Selenium this morning to hit against my own website. It actually totally mess up the monitoring tool comes with wordpress and now, my poor traffic has been heavily skewed by the traffic that caused by Selenium. In another way, if you did this to some business, there google analytics might be totally screwed and it is not beneficial to any one.

selenium_boost_traffic

Selenium – Selenium Grid 2 in Java

If you have used Selenium before, you might be amazed at how easy it is to manipulate a fully functioning browser in just a few lines of code. On the other hand, if you have used Selenium before to run a long test, i.e., to scrape a long list of URLs that require javascript. You will be also disappointed that how slow it could be, comparing with non-javascript calls. Here, Selenium Grid is will scale Selenium Test easily and run Selenium Test in parallel. 

In this post, I basically followed the Selenium Grid 2 tutorial, and got the Selenium grid working. One thing that worth mentioning is you had better download a standalone Selenium server that will be compatible with you browser version. Low hanging fruit might just be going after the latest Selenium build. 

selenium_grid_setup

selenium_grid_javaapi

As you can see, instead of do `new Firefoxdriver`, you can just describe your browser capability, and the hub will assign the right resource to you. 

Also, you don’t have to write Java code and there is a great tool called Selenium IDE that will track your activity inside a browser and generate test script based on that recording, and it can the exported to all different types of languages and format. Junit, Python Test ..etc.

selenium_ide

Here is a video from youtube by Ghafran helped me a lot! 

Selenium – How to use selenium in Java

Selenium is a browser automation framework. There is a getstarted tutorial at Selenium wiki that looks like a good place to get started. Since firefoxdriver is a more complete solution comparing with HtmlUnitDriver due to the fact that javascript will get executed in a browser, I will just skip the HtmlUnitDriver part.

Of course, we need to find the maven dependency for Selenium where you can find it here. I am planning to use 2.39.0 in this case because it seems like it has the highest adoption rate.

Here I created a Java class, which has a method that will take in an URL and return the HTML source code of that page. Of course, since Javascript execution will take time and you have to give the browser a signal of when should be the success of the fetching, in my case, is when the browser is able to find an element that matches a customized xpath. If not, it will try to wait for a certain amount of time.


java_selenium_client

And here is how you can grab a webpage in one line using Selenium.java_selenium_client_main


Of course, there are tons of things that need to add into this protocol like error handling etc.

But at least, we have a straw man right now!

Nutch – Plugin – How Nutch Makes Http Request

There are more than more websitse populating web content using dynamic methosd like making Ajax calls, executing Javascript..etc. And Nutch doesn’t have the mechanism built in at this moment to handle those pages. I am planning to figure out a way to integrate Selenium with Nutch, I saw momer has written a Nutch plugin for Selenium, however, it is need some effort to make it work since it is not maintained actively. Since now, everything is new to me, like how to write a plugin, how to use selenium in Java, how to optimize the selenium performance..etc. I am planning to write a few posts to share my progress on this part.

First I have to figure out, under the hood, how Nutch is fetching the content. Maybe after I understand how it works. I am replace the fetching part with selenium. I set up the debug mode for Nutch in my virtualbox following these tutorials, NutchInEclipse and NutchTutorial(trunk).

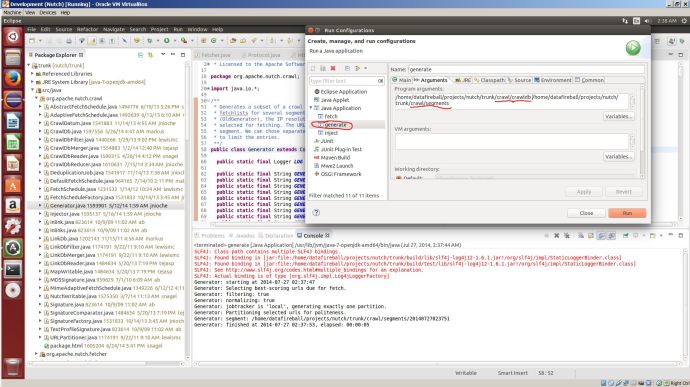
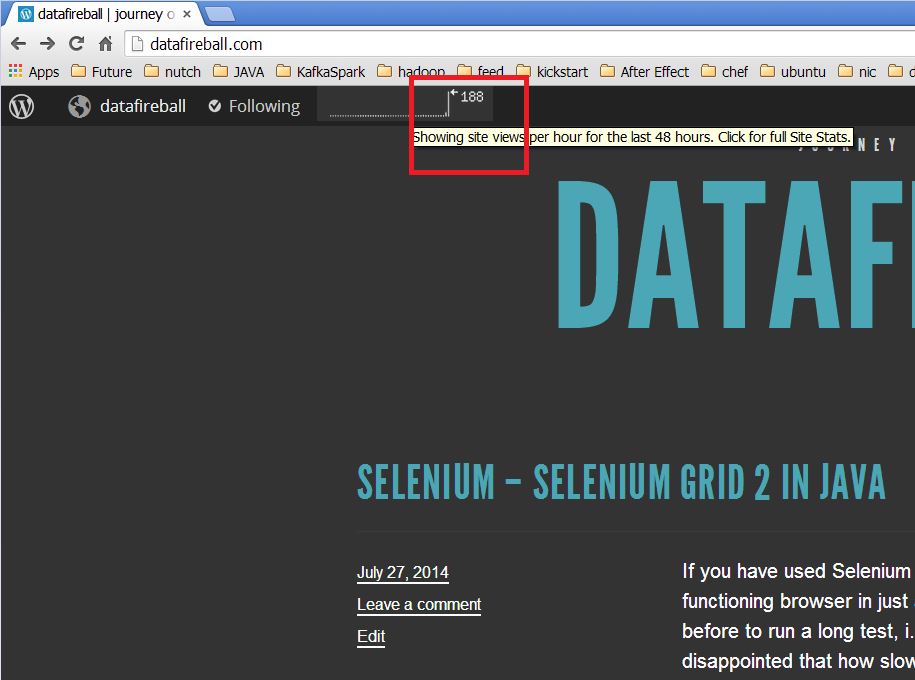
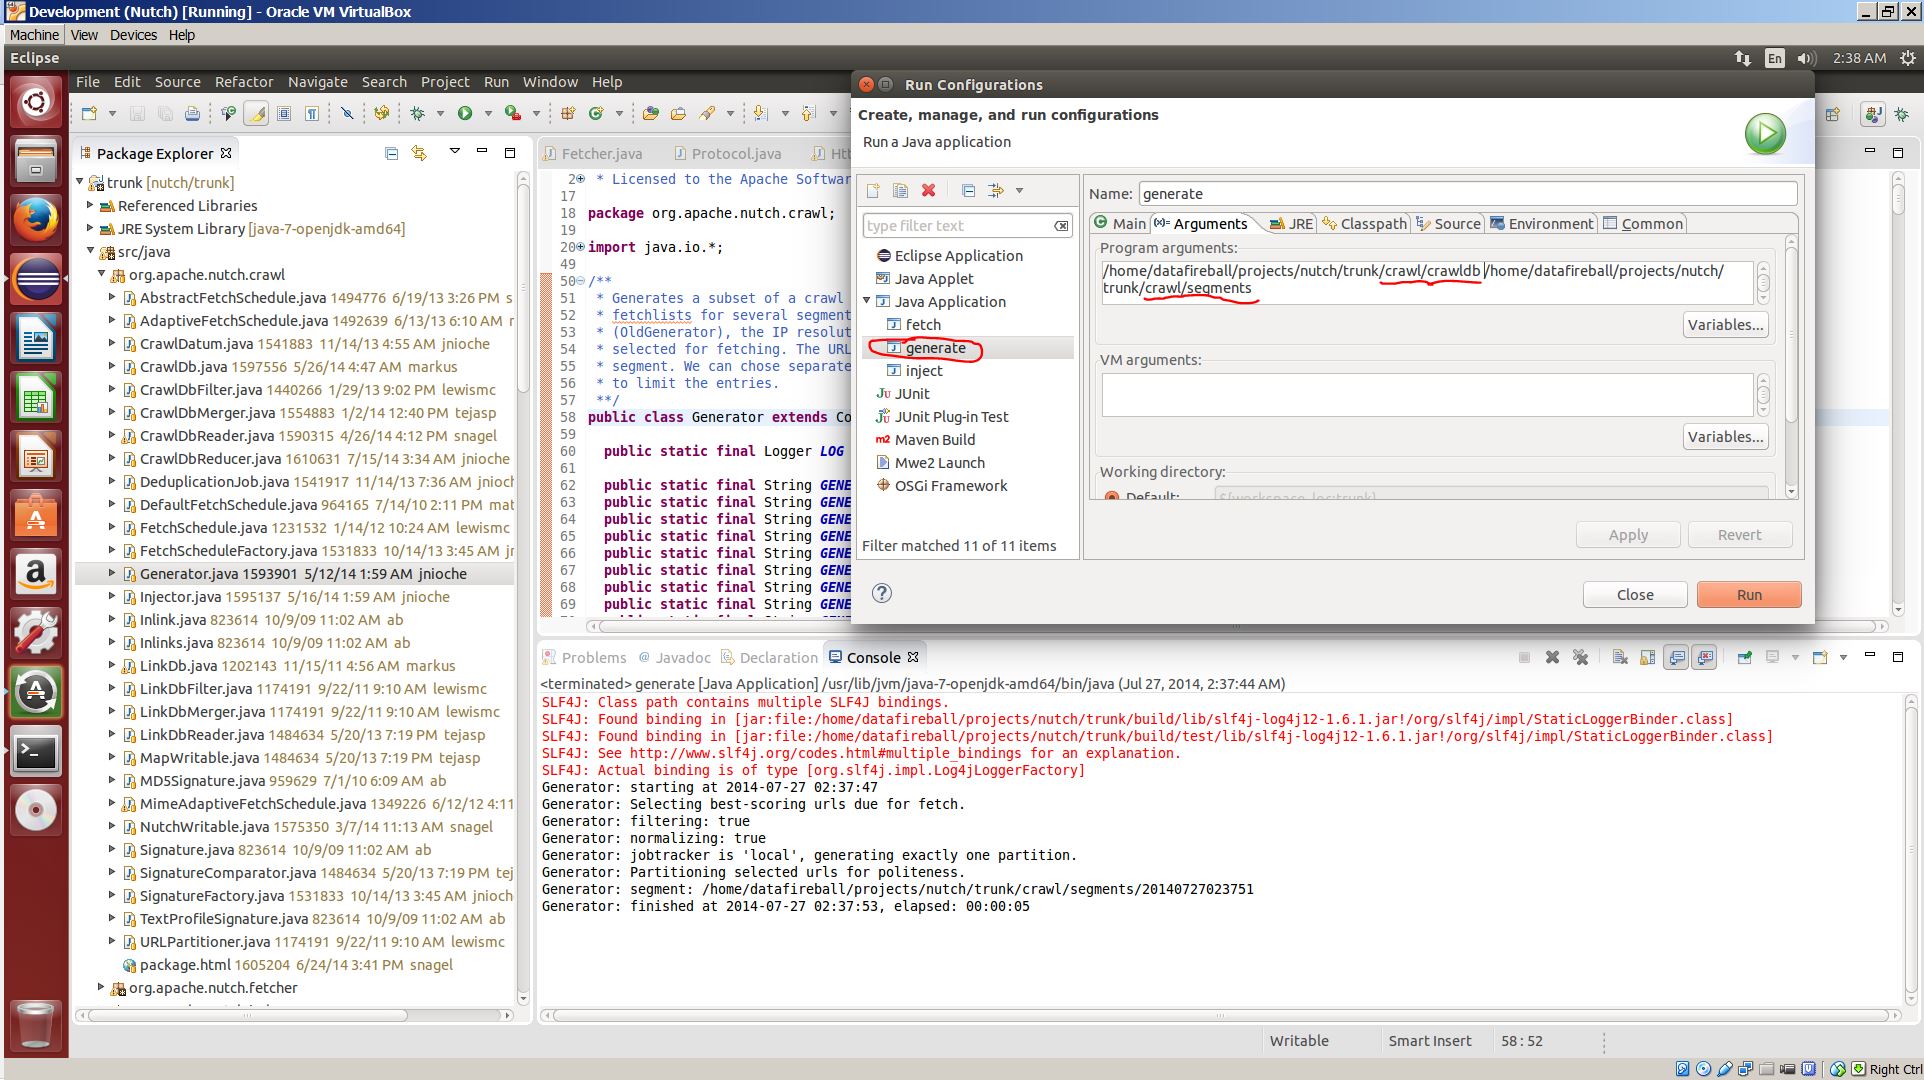
I injected one URL(http://datafireball.com) into crawldb following Tejas tutorial. Then I generated the fetchlist by running “org.apache.nutch.crawl.Generator” as the Main class and pass the crawldb and segments folder as the program arguments.

nutch_generate

Now we have the fetchlist generated and we need to run the fetch step in debug mode, in that way, we can step through the process and accurately locate which part actually did the fetching. Of course, I created a new run configuration in Eclipse and set the main class as org.apache.nutch.fetcher.Fetcher and pass the newly generated fetchlist, `/home/datafireball/projects/nutch/trunk/crawl/segments/20140727023751` in this case as the program argument. Before you hit the DEBUG button, there is one thing that we need to do: set the breaking point! Going through the source code of the Fetcher class, you can have a brief idea of where the fetching might happen. Here I set the break point at line 675 since there is line of comment “fetch the page” :). Hit the debug button and the program will run for a few seconds and then pause at the line 675.

nutch_fetch_debug_675

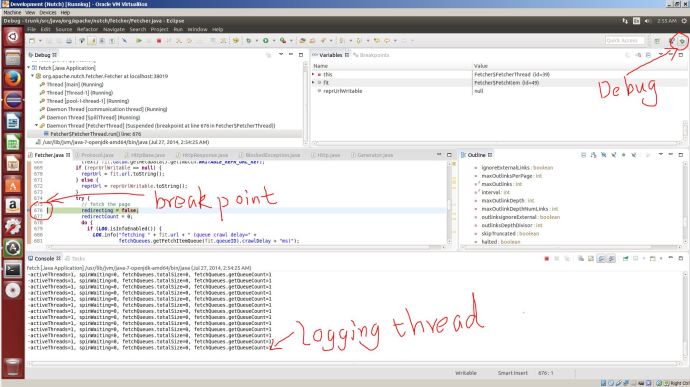
From here, we can use the Step Into (F5) and Step Over (F6) button to run the program step by step. The thing that matters the most is the Variable window in the top right corner. There you will see a list of all the variables and the corresponding value.

nutch_fetch_debug_715

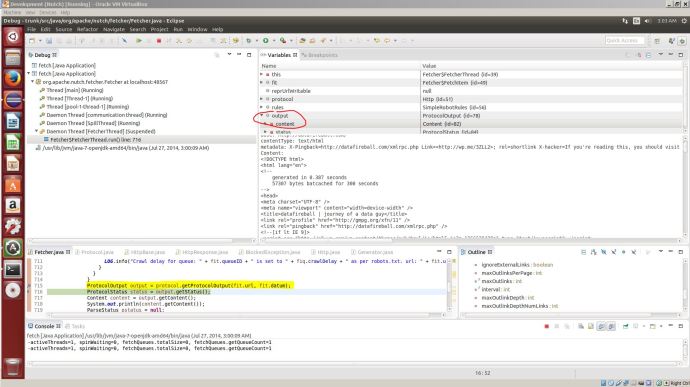
Now we found that, after finish running the line `ProtocolOutput output = protocol.getProtocolOutput(fit.url, fit.datum)`. There is a new variable called output generated in the variable window and the content attribute of output contains the raw HTML page! Now I know that is exactly the right path that I need to chase after, but using F3(Open Declaration) will go to the definition of the interface instead of the implementation. Right click the function (Open Type Hierarchy) or just simply hit F4 will show you which classes implement this interface.

nutch_fetch_debug_715_hierarchy


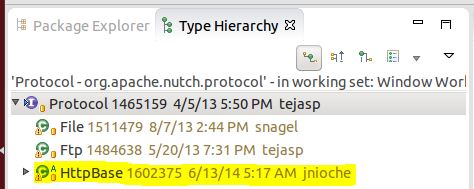
we know exactly that in this case, HttpBase is what we are interested in, but instead of diving into the source code I would prefer running the same debug again, and see what those code actually does. To keep the configuration settings the same, you need to remove all the directories in the crawl folder except for the crawl_generate. Then you set a breakpoint at the getProtocalOutput and step into that function.

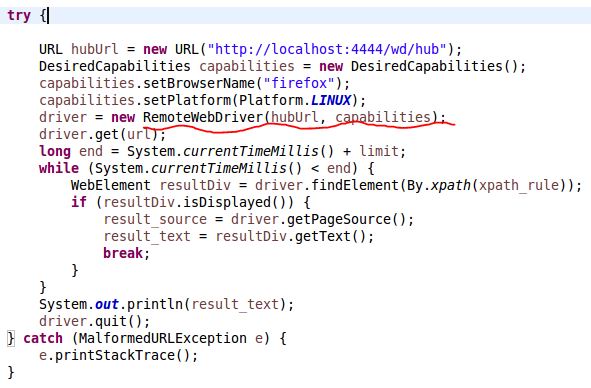
Inside the function getProtocolOutput, we can locate it is the getResponse method of HttpBase that get the response and later assign it to the variable content. Keep going down this path, you have to take a look at the class HttpResonse. The code there is pretty exciting and inspiring. It basically describes the process of the nuts and bolts of a simple HTTP request. Building request header, create socket, get response…etc.

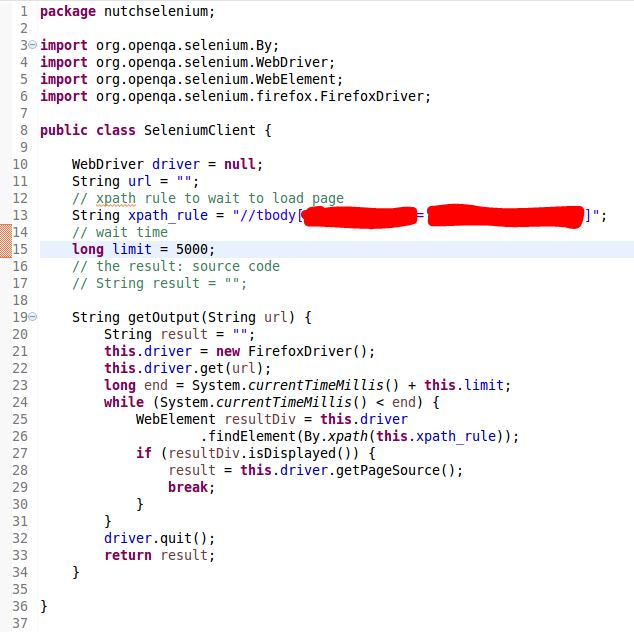
At this stage, we know that we can just simply replace the getProtocolOutput/getResponse/HttpResponse,  method with a customized function that take a url and return the HTML using Selenium. Also the protocol-http, protocol-httpclient and lib-http are all in the plugin folder, then they are supposed to be easily pluggable and replaceable. In another way, we don’t have to modify any existing code, we can just simply create a new plugin, probably with most similar code as the http plugin but using Selenium.
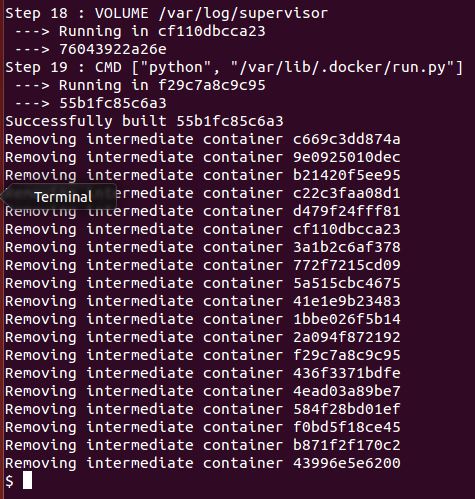
ANT – Use Reference as Property Values OR NOT

Looking at the source code of Apache Nutch, you can see it is built by Ant and except for the build.xml who defines all the targets..etc. There is another file in the project root folder called default.properties. This is the place where people declare the project variables and later will be referred to i the build.xml using a format like ${variable}. You can click here for more information about Ant properties.

Those variables won’t be included until it got called by

 <property file="${basedir}/default.properties" />

A interesting test you can do is trying to print the variable after each line of code in the build.xml. And you can see the variable won’t be valid until read in the configuration file.

ant_propertiesfile_debug

Also, as you can see from the screenshot below, whatever you declared properties won’t take effect until Ant load in the default.properties file. Or in another way, if you reference it too early, the variable has not been initialized and then will be printed as the plain text. As you can see when we tried to build the project, it failed to read in the name variable as the project name, then even if we pass the name variable in the ant command line, why it is still not working!nutch_ant_property_file_debug_print It is actually the way how Ant got implemented. When you look at the source code of Ant, for the attributes in the project tag like name and default attribute, it won’t parse and try to get the reference, but instead of passing the raw string directly.

Here is a screenshot of the setname function of Ant Project class, but you will get a pretty good idea that Ant treats property and project attribute differently.

And_Project

Guess the conclusion is we have to hard code the project attributes without using references. 🙂


JAVA – HELLWORLD using Command line

I was following this tutorial, trying to understand how the build process works for Java. I first ran the hellworld example and then package the program into a jar file purely using command line.

First, here are a few arguments in command javac and jar that will be used.

Usage: javac <options> <source files>
-sourcepath <path>     Specify where to find input source files
-d <directory>         Specify where to place generate class files
Usage: jar {ctxui}[vfm0Me] [jar-file] [manifest-file] [entry-point] [-C dir] files ... 
-c create new archive
-f specify archive filename
-m include manifest information from specified manifest file
-C change to the specified directory and include the following file
(The . following -C images directs the Jar tool to archive all the contents of that directory)

# compile
javac -sourcepath src/ -d build/classes/ src/datafireball/HelloWorld.java
# package
jar cfm build/jar/HelloWorld.jar myManifest -C build/classes/ .

Terminal – My Terminal Prompt Is Too Long

When I created my virtualbox ubuntu machine, I happened to have a long user name, datafireball, which is 12 characters long, and again, I happened to have a long host name too which is datafireball-VirtualBox, which is 12+1+10=23 characters long. So whenever I open up a terminal, the prompt is at least username+@+hostname+:+currentdirectory+$+ space, which is 40 characters in this case… it totally take over more than half of my terminal available space. I did some google search and this post from nixcraft helped me a lot.

In the end, it is all about customizing the environment variable PS1 (prompt setting), in my case, I only need to run the command PS1=, four letters only and I won’t even have a prompt! Since I am doing that only in my session, so I can still get my settings back whenever I open another session. You can also make that change permanently by adding your own settings to profile.

terminalpromptps1

VI – why arrow keys not working properly in insert mode?

I use VI a lot to edit configuration file or modify code sometime. After I set up the Ubuntu box in virtualbox, I found that the arrow keys (up, down, left, right) are not working properly. Instead of navigating the cursor through the text, they are actually trying to insert characters letters like A,B… or..whatever letters that I don’t want.

Turned out that the VI that I am comfortable with is actually VIM, and usually VI is a softlink to VIM if they have VIM installed. In my case, VIM is not installed, then you just need to run “sudo apt-get install vim”. And problem solved. Here is the stackoverflow question that helped me.

VI_VIM

HBase – Set up HBase in Ubuntu and play with HBase Java API

To set up HBase on ubuntu, I would say the hardest part is to set JAVA_HOME. (Dude, there is nothing easier than setting up JAVA_HOME, yes, to make HBase work is that easy). What I did in the end is using openjdk-7 and added this line to my ~/.bashrc file, you can find your java home by tracing down those soft links of `which java` or `which javac.`. Also, what you just did only set up the environment variable for your user account, if you run HBase as root..etc. Make sure JAVA_HOME is set correctly. Also, make sure there is a bin folder within the path and you can see java and javac there.

export JAVA_HOME=/usr/lib/jvm/java-7-openjdk-amd64

After you start your hbase server, and probably checked it is working properly by running /bin/hbase shell to interactively play with HBase. Then you can start writing your java code to interact with HBase. Here is a screenshot that I took in my virtualbox 🙂 (lovely new development environment). Also, in Lars George’s github, who is the author of the O’Reily book “HBase The Definitive Guide“, there are a whole lot of Java code to help you get started with HBase API.

hbase_put_getGood Luck!