Small Chat Room using Kafka and Flask

I have always been interested in learning more about consumer applications like building a chat room, this weekend, I managed to build a chat room using Kafka and Python flask just in a few hours.

The technology stack is very simple. It is primarily using Pytho Flask, very limited HTML and JavaScript. I had to use Redit to get the flask SSE working and Kafka as the message queue system, that both of those two components requires close to minimal set up.

The architecture is very straightforward too. When the client entered a message and clicked submit, a JavaScript function will be trigger, pass on the username and message to a python flask endpoint. There must be a JavaScript library to directly connect to Kafka but I feel it is cleaner to keep JavaScript separated from the backend like database directly, rather to hit the middleware API endpoints. That will for sure free the clients from having visibility into any backend structure from the security perspective, also created some flexibility of any modification to the backend without impacting any front end work. Then the Flask Sendmsg endpoint will use the python kafka library to produce a message into Kafka.

As you can tell from a consumer who has been subscribing to the topic, all the messages are now in the queue. The idea is whenever there is a new message, there is a mechanism to detect and then “broadcast” or “publish” to all the “subscribers”, or all corresponding clients who happened to be in the same chat room.

At this moment, I don’t know how to create a long running process within Flask so I created a small Python consumer running in another script. It listens to the topic and push any new message to another Flask endpoint called “broadcast”.

The broadcast endpoints does nothing more than taking in the new message, but it will publish it via server side event. There are plenty of benefits of using server side event comparing with polling or sometimes even a open websocket.

Now, all the clients have an event listener to the SSE stream. The any received new message from the stream will trigger the newly received message be appended to the chat history.

More work can be done around the Kafka part as the user’s chat history could be retrieved from a database or we use Kafka as the database directly. And the offset will determine to how long a history that we will go back.

Anyway, it is a pretty fun project overall. 🙂

Excel – Workday

Today I learned a few tricks in Excel which are pretty fascinating.

WORKDAY

Today my coworker need to add some delay to an existing date (more like adding the number of days processing the order on top of the order receiving date). It could work as a simple addition by adding a number to any date cell. However, my coworker insisted on using a function called WORKDAY which I have never seen before. It turned out to be such a simple concept while providing a scenario more realistic – most people don’t work during weekends 🙂

Format Weekday

Another thing that I realized in Excel is the various ways of formatting dates. One way to extract day of the week is by simply using the format and use ddd (Wed) or dddd (Wednesday).

Observable

Today I came across Observable and really like it at first glance. It gave me the impression as being an online IDE like Jupyter Notebook but for JavaScript.

Javascript tend not to be the first programming language that schools teach. For most engineering related majors, they tend to start with strong typed programming language like C++, Java, C and now maybe more schools start by teaching Python too. However, JavaScript gained huge adoption in the community as it is the most popular scripting language for the Internet. However, the first question for all the beginners is “where should I write code”. I frowned upon when my friend opened up the Chrome browser and start writing code there. It was powerful and all but somehow it just did not feel right to me. There was no canvas like Jupyter notebook, you have to add the graph to an existing DOM etc.

In the observable notebook, everything become so much easier to test and visualize, also the code can be executed and the output is reactive in a way that you can execute a block of code and see the output immediately.

You can not only write JavaScript code straight into block, but also use Markdown language to format in a way that you will like.

I am still learning it but I highly recommend people check it out. You might have heard of D3.js, they even use observable to host all their gallery examples. This further demonstrated its popularity in the JavaScript visualization community.

Windows WSL Vim CopyPaste and Auto indent

Recently I changed my work laptop from the old 2015 Macbook Pro to a new DELL XPS 15 7590. The overall experience has been positive despite a few glitches here and there, mostly related to habit of changing rather than subpar functionalities. One of them is the WSL Vim copy and paste.

In Windows, there is no the commonly used Command Key as a Mac. The previously Command+C/Command+V works as Ctrl+C/Ctrl+V in Windows. However, Ctrl keys in the terminal especially the WSL (Ubuntu Linux) means something very different. In that case, I had to get used to use right click as copy and paste, also change the default property of the WSL terminal to use Ctrl+Shift+C and Ctrl+Shift+V as the key combo to copy paste.

As a Python developer, I copy and paste code into Vim quite a lot. However, in the new workflow, this happened quite a few times.

At the beginning, I thought it was some invisible internet whitespaces that mess this up but it worked fine when I pasted it into notepad.

By looking through content in Vim character by character, I realize that there were 8 spaces at the first indent. My first reaction was “not tab/space again!”

Video By None GIF | Gfycat
Silicon Valley Girl Friend Prefers Spaces over Tabs Scene

However, the debate between tab versus space was mostly for aesthetic reasons but both convention, as long as they are consistent, should work, rather than lead to this tilted ladder shape. Then, I took another look and quickly realize that they is an incremental extra four spaces for every indentation. This turned out to be a great default feature Vim provided for Python as it will auto populate four spaces on behalf of Python developers when needed but a nightmare default selection for paste (as spaces already included).

This Stackoverflow posted touched on many solutions by changing the editing mode as:

:set no autoindent
:set noai
:set paste

I tried all three solutions and they all seem to work but the setnoai/set no autoindent somehow still introduces some unwanted whitespaces but the set paste always work as expected.

Happy copy and paste!

Server Side Event – MDN example

One of the best ways to have server side communicate to the front end is the server side event, relatively to other options like a websocket, short/long polling. In this example provided on MDN (source code here), they have implemented a small backend by hosting a php application on a nginx server.

I have very limited experience with either technology but by following this great tutorial, I am able to get php working with a nginx server. After that, you drop both the backend (sse.php) and frontend (index.htmml) script to the same folder, you should be able to recreate the example as below.

Server Side

In the php code, it is surprising to me how easy it is to read through the code as the basic syntax is extremely similar to other programming languages. The echo ping statement will be executed every second and the echo data will be executed every counter time which is a random number between 1 and 10.

The only places to watch out is

header(“Content-Type: text/event-stream”)

php made it pretty clear that header must be set before any output is set. In the documentation of SSE

The server-side script that sends events needs to respond using the MIME type text/event-stream. Each notification is sent as a block of text terminated by a pair of newlines (“\n\n”). For details on the format of the event stream, see Event stream format.

ob_get_level()

Return the nesting level of output buffering which is 0 only when it is inactive.

ob_end_flush()

This function will send the topmost buffer content off and turn off the buffer. The flush command afterwards will flush the system output buffer.

Client Side

The code on the server side is even simpler. There are two functions that demonstrated the power of server side event. One is called onmessage and the other called addEventListener. The only difference is that the onmessage will be called literally every time there is a message from the server side and the addEventListener will only be called when there is a message with an event field.

The addEventListener makes it easier to build several different listeners based on different event types. Otherwise, we will need to use the onmessage method to write more logic inside to tell one event from the other which could add more overhead.

Long story short, the onmessage is a superset of the addEventListener.

XPath Builder – a small snippet

As far as I can tell, there is not a build in function within JavaScript to get the XPath of any element easily. However, there are plenty of code snippet out there but this one code snippet from Stackoverflow totally caught my eyes!

xpath_builder

This small paragraph of code is like a feast for people new to JavaScript like me. Not only because of the functional programming style as the author has mentioned, but also the concise and compact writing style, building anonymous functions, some of the latest programming operators but it is also using recursive functions almost as a one liner!

In this blog post, we will patiently walk through it line by line, character by character and appreciate the beauty together. So bring some popcorn and let’s get started.


const func = () => {}

Functions in JavaScript can be defined in many ways. Just like getXPathForElement is created in a function declaration in a traditional way as below:

function func() {}

However, using arrow sign, you can create an anonymous function and then assigned to func via an expression. Here is a great Stackoverflow questions that highlighted the difference between two approaches. In my personal view, inside a function, it is probably better to use const with arrow operator but if you are writing a function that will be called somewhere else. It is the best to create a function declaration so it works in the scope of the whole script.

= condition ? then : else

This is such a concise way to write a if statement. However, once you wrap your head around the syntax and become comfortable with what it means. Just like any language operator, like Python list comprehension, it can make your code more concise, instead of 10 lines, it is now a 1 liner that is not necessarily more difficult to read.

idx logic

idx looks like a recursive function to construt the index for a given element. For any given element, if there is no previous sibling, then it is the first child, or only child, it will return 1. However, if there exists any sibling, or siblings, it will calculate the index of its previous sibling and add a value of sib.localName == name on top of it.

name||sib.localName will check if the element has a tag name or if the name variable has been provided, likely be true in most of the case.

sib.localName == name will check if the element localname will match the variable name, for regular DOM element, localname is simply the tag name.

Let’s just ahead a bit and find how idx gets called in the end, idx(elm). In this case, it is actually only passing in one variable which leaves the name variable to be undefined.

function_undefinedundefined_or

By testing, we and find that undefined or with any defined variable will result in the value of the defined variable. And the equal condition will like not be true so the code likely will be interpreted as

idx = sib ? idx(sib.previousElementSibling, sib.localName) : 1

And the next round will be

idx = previousElementSibling ? idx(sib.previouspreviousElementSibling, previousElementSibling.localName || previousElementSibling.localName) + (previouspreviousElementSibling.localName == previousElementSibling.name) : 1

whenever the previousElementSibling shared the same tag

idx = … ? idx () + 1 : 1

This is a very intelligent way constructing the index due to the XPath definition.

xpath_tag_index

I know the logic might sounds a bit complex but in short, it basically find how many other sibling ahead of its share the same tag name. Much easier to understand right?

!elm || elm.nodeType !== 1

This is like the stop condition for the segs function. It will stop only when the elm doesn’t exist or the elm node type is no longer element, for example, text node, .etc. When this condition happens, it will return an empty string.

id(${elm.id})

The next condition check is to find if a given element has an id, in XPath, id is a very unique way to unique locate an element. If the id exists and also if the element found using that id can match the element (I assume there could be invalid id or duplicated id which are invalid). Then it will return id(${elm.id}). This small text is enclosed within the tick sign where ${} will be evaluated and replace with the value of the variable. For example, if the element has an id and the id’s value is abc. The return string will be id(abc).

… rest, spread

Triple dot is a special operator in JavaScript that can be used to capture of the rest of the input arguments, used as a rest operator, or spread the list like variables.

spread_operator

Now we know that […first_part, second_part] will do the job by having the first_part calculating the XPath for its parent and the second_part be the tag and the index of its siblings.

Anatomy of Selection inside a Browser

One will be so humbled if you don’t take everything for granted. In this post, we will look into a basic yet fundamental Browser operation – Selection.

Selection is probably an operation that most people learned even when they were a child, literally. You were taught to use the mouse to select the area of content by starting to hold the left key, move to cover the area that you like to select and end by releasing the left key.

devmoz_selection

Your selected text is an object called Selection and there are so many ways to access it and one way is by calling getSelection.

By reading the definition of Selection, we also learned that it not only covered the pointer selected range, can also include the text selected by moving the caretdevmoz_getselection

Based on the definition, there are two key concepts that constitute a Selection, one is called the anchor (start) and the other is called the focus (end). And here, we are going to disassemble a selection object and learn that way.

selection_anchor_focus

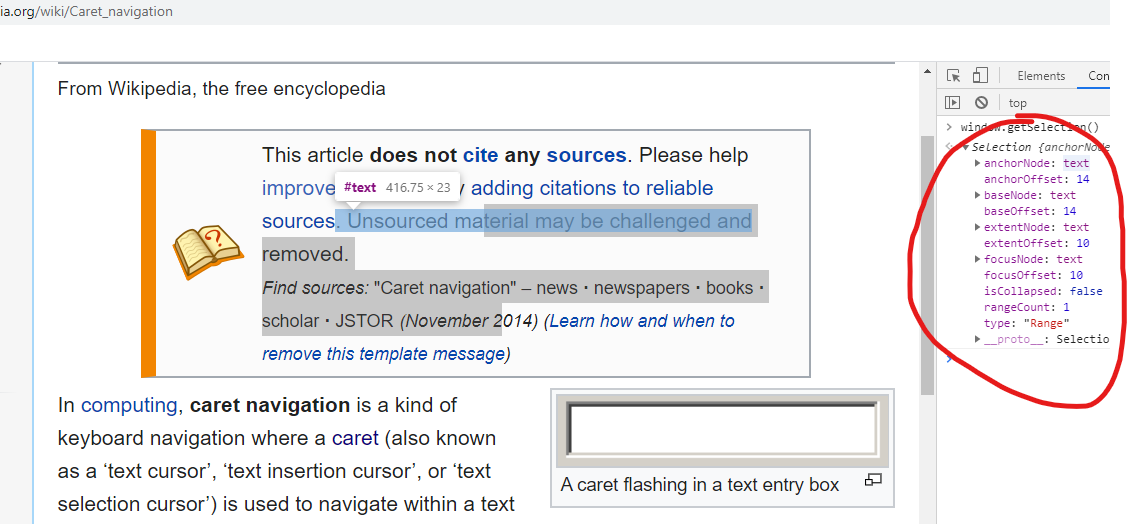
Here I highlighted some text in Wikipedia (grey area as now the focus is in the developer console from “terial may..” to “November 2”.

anchor

anchor

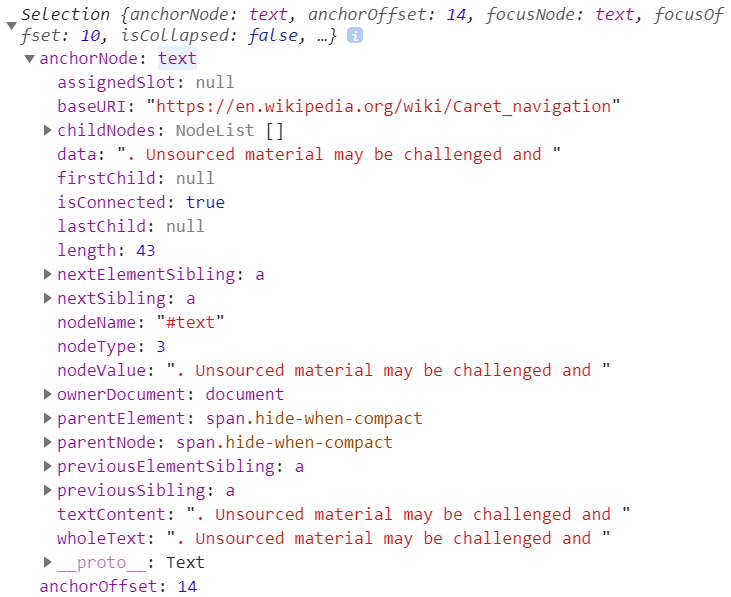
At first glance, there might seem like overwhelming amount of information but just like any class, once you have seen it more, things become easier and easier. Actually, archorNode is a simple object of the most common class – Node.

Also, anchorOffset stores the value of 14. Because our anchorNode is a text, 14 is simply the number of characters inside the text, to mark the exact position. As previously mentioned, our selected text starts at the charcter “terial..” and the character before it “a” is the 14th character in the string so that makes sense.

anchor_offset

focus

selection_focus

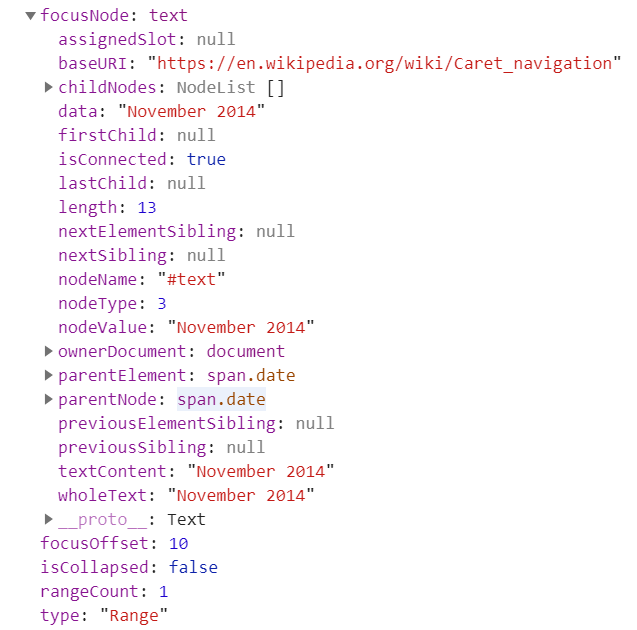
for baseNode and extendNode, they look like concepts only available in Chrome and just aliases for anchor and focus [source].

HTML

Here I took a screenshot of the snippet of the HTML code. The anchor node and focus node are both highlighted in yellow. Now it is even easier to put the previous concepts into the context, like why the anchor node is a text, that its previous and next siblings are both hyperlinks and its parent is a span, etc.

selection_html

Dynamic

One interesting observation when playing with the Selection is that the Selection objection is dynamic or always referenced to the current selection by the user.

For example, in the following exercise, I create a variable called s by calling window.getSelection(). All of attributes are either null or 0 as the default value because I have not selected any content. Then I start clicking around on the web page and the selection object got updated to the position where I clicked.

As I have mentioned previously, a caret movement is also a type of selection and a click will move the focus to certain position, and you can almost think it as a area of selection where the anchor is the same as the focus.

Of course, when I select an area, all the attributes of the selection object got updated accordingly.

selection_dynamic

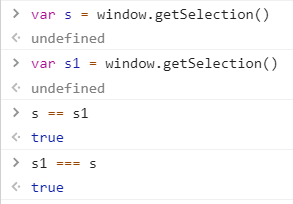
So do all the roads lead to Rome? I created two variables s and s1 and by using the equal and strict equal, clearly they are referencing to the same object as both condition are true.

“If both operands are objects, return true only if they refer to the same object.”

Mozilla

selection_reference

Selection Constructor

At first glance, it looks like Selection only needs a anchor, focus and the corresponding offsets if they are texts. To confirm our understanding is right, let’s try if we will be able to code a Selection object from scratch, rather than select by mouse.

In the following screenshot. I select a position and stored the anchorNode and its offset as anchor and anchor_offset. They two variables preserve the start position so I can use it later. Then I did the same thing to store the ending positions into focus and focus_offset. In the end, I called the setBaseAndExtent to assign the selection start and end to be those two positions and magically, all the content between those two positions got highlighted. It is working!

selection_setbaseandextend

Through this exercise, clearly there are two types of variables that worth mentioning, variables like s that will change as the user change, instead of the value, it preserves the reference, a linkage to another variable or object that constantly changes. There is another type of variables like anchor, anchor_offset, focus and focus_offset that once being created, it took a “deep copy” of the start and end position, and regardless of how s changes, those variables are intact.

The explanation of that question goes beyond the scope of this article but here are two blog posts that helped explain assign and copy.

Now we have a good idea of how Selection work, even able to recreate a Selection ourselves programmatically, the next question will be can we memorize the selections and store it somewhere for future use? Almost use selection like a highlighter?

Multiple Selection

Multiple selection appear in several scenarios, like you can select multiple icons on your Desktop by holding the Ctrl key and then operate in a batch fashion. In Microsoft Excel, you can do something similar too. In a Browser, can you remember if you have ever selected multiple paragraphs at once? If your answer is no, you are not alone.

A selection object represents the Ranges that the user has selected. Typically, it holds only one range, accessed as follows:

var selObj = window.getSelection();
var range  = selObj.getRangeAt(0);
  • selObj is a Selection object
  • range is a Range object

As the Selection API specification notes, the Selection API was initially created by Netscape and allowed multiple ranges (for instance, to allow the user to select a column from a <table>). However, browsers other than Gecko did not implement multiple ranges, and the specification also requires the selection to always have a single range.

Firefox is a Gecko based Browser and by holding the control key, you are actually able to select multiple ranges and access the different ranges through getRangeat(index) method.

selection_multirange

Given that, we probably need to be careful of how we frame our discovery, in this case, I still will prefer to say that there can only be one Selection at a time, it is updated automatically as the user changes. However, one selection can includes multiple ranges.

Range

Now we understand that Selection is almost a set of Ranges, it can include none, one or many.

The Range interface represents a fragment of a document that can contain nodes and parts of text nodes.

A range can be created by using the Document.createRange() method. Range objects can also be retrieved by using the getRangeAt() method of the Selection object or the caretRangeFromPoint() method of the Document object.

There also is the Range() constructor available.  <- highly recommended example

By reading through the documentation of Range, we see the Range has more methods than just Selection, it not only has the methods of start and end, instead of anchor and focus but also methods related to clone, insert, rectangular and many others. This is to demonstrate that we could store the Range instead due to the benefit that the Selection got auto updated all the time but the Range that it includes can be easily copied.

However, we copy the state of range not only for preservation across the lifecycle of the active tab. We want to put it into a database on disk, send to an API and want to store it for eternity.

range_serialize

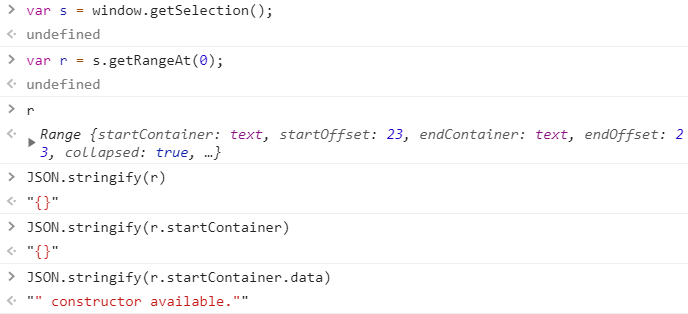
Here, we not only have a difficult time preserve the Range object, even the startContainer cannot be serialized. This is new and interesting to me. In my opinion, there should be a way to just save the object as is, all the attributes, everything. It means next time, I don’t even have to worry about the construction process and can just use AS-IS (like Python Pickle). Is it efficient, of course not, is it easy? to certain degree.

The second approach is to keep going down the dependency tree.

Can we easily store Selection? No, let’s go Range.
Can we easily store Range? No, let’s go startContainer.
Can we easily store startContainer? Maybe.

By reading through the documentation, we know that a container is a node itself. Once you can store the node, you can even by pass range and build the Selection directly. It is such a fundamental concept now and it might even worth to go through the documentation of Node and research what is the unique identifier for a node that we can use to recreate it from stored data.

Node

Node is a very important concept in Javascript. All the Browser operations center around locating and manipulating certain objects within the page. That can be translated into locating certain nodes and do something with it. By reading through the documentation, the Node interface sort of got abstracted further, to a level where most regular end users (like the regular Joes who use Internet Explorer) won’t recognize it has anything to do with Browsing, because it is closely coupled to the underlying data structure, tree navigation.

node

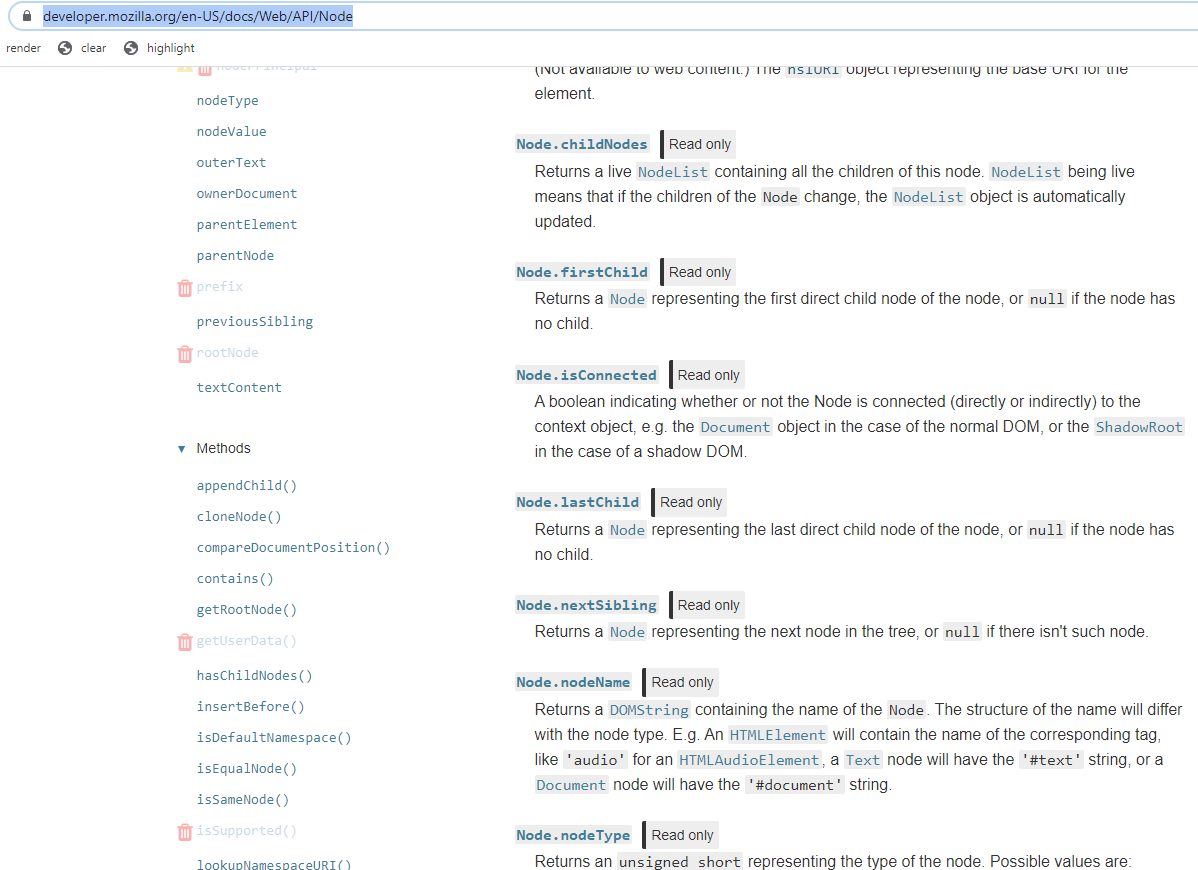
Most of its methods are related to its relative position within the tree, the parent, the children, the sibling, etc.

The good news is that there are many ways to locate a Node within the DOM tree, like by its path from root, like by its tag name, by its relative position, by its class name, by its unique id, by its text, ..etc. I don’t believe there exists a way to uniquely identify a node because the DOM tree itself can get rendered differently based on different situations.

There are many ways of construction a XPath from an Element and also many ways of locating an Element from a given XPath. The content related to XPath is fascinating but the amount of information required to cover easily exceed the scope of this blog post. We will have a separate article related to XPath but for now, let’s assume that we are in a good shape.

Conclusion

The XPath was built using the Chrome Web Developer Console as there is an option called copy xpath for any inspected element.

Hopefully this post has helped some of you better understand how the selection and range object works.

xpath_getselection