ToStringHelper(guava) – SimpleResponse

I came across a handy Java class that is from Google Commons named ToStringHelper. This is where I found the usage of ToStringHelper by reading openscoring source code.

Villu was wrote this tiny SimpleResponse class in openscoring.common which is serializable and only one attribute, three methods, the getter, setter and the toString method, which is implemented using the MoreObjects.toStringHelper class.

First, we need to cover something basic about “toString“.  It is a method that comes with class Object, basically means every class in Java is kind of a object and it should always inherit this default toString method unless overwritten. However, who need a hashcode, right?!. User tend to need something that is more informative and concise, like you might want the first name and last name out of a person object? a title, author in the textual format of a book class so on and so forth. You can overwrite toString in whatever way you prefer, but using the toStringHelper really made this part easy and consistent.

toStringHelper

using tostringhelper

toStringHelper_default

default tostring

Keep this little trick in your toolbox and hopefully it is helpful sometime.


Restful Java with Jax-rs 2.0 – How to run Shop App

I am reading this Oreilly book RESTful Java with JAX-RS2.0 from Bill Bourke. I am trying to following the example in Chapter three of how to to deploy a naíve web API that can create/update and get customer information. The book comes with some sample code where you can find from this Github repo. (If you cannot locate the right project, the project should reside in “restful_java_jax-rs_2_0-master/resteasy-jaxrs-3.0.5.Final/examples/oreilly-jaxrs-2.0-workbook/ex03_1″). I tried to run the code in several ways like command line, Eclipse and also tested it out using Junit and tools like postman, I want to list my experience here so others can save some time and get it up and running fast.

There is a README file under the project directory telling you “mvn clean install” is the way to go. Clearly, the author put lots of thoughts into the pom.xml and it will build the war file and deploy the war using jetty maven plugin and run a few unit tests as the client to ensure you can do all the CRUD operations as it supposed to. Here is how the final junit test look like:

ex3_1junit As you can see, it “looks like” the application is working fine, however, after the maven build, it will not keep a server running and you really cannot have a hands-on experience playing around with the app. In that case, we need to deploy the application and keep it running as long as we want. And potentially test it using your own tool set instead that Junit test.

1. Jetty-runner.jar

A few words about jetty if you are new to the whole Java web app thing, like me. Jetty is a web server and servlet container in one sentences, was first created in 1995 and open sourced and has been in sourceforge, codehaus, eclipse and now Github. Instead of diving too much into the installation, integration of how to get a jetty server working, they have a easy version of jetty-runner that packages everything you need into a jar file and you can use it to run java web applications. Here is a more detailed tutorial of how you use jetty-runner. I first went to the target folder of that shop app where there is a ex03_1.war file got generated after the mvn clean install in the previous section. I downloaded the jetty-runner to the target folder so the jar and war file are at the same directory. Then you simply need to run command

java -jar jetty-runner*.jar ex03_1.war

Screen Shot 2016-06-12 at 10.35.14 AM

And you should have the web application running on your localhost at port 8080. Now lets test out without using the Junit test.

2. POSTMAN

In the idea scenario, I want to use a browser to show you this, however, to make the post command in vanilla browser, you cannot do it AFAIK, however, there are tons of browser extensions you can use and the one that I am going to use today is called postman. First, lets take a quick look at how that junit test created a user.

ex3_1juniteclipse

The logic is pretty straightforward, first create a customer in the xml format, and then make a post request to the highlighted URL and you should get the 201 status for successfully creating a user. Now, lets try to do it in our postman.

postman_createuser.png

As you can see, when you run jettyrunner, the default behavior is pretty good and the postman also 100% reenforced the fact that our API creation is running properly, here is another screenshot of GET the newly created user.

postman_get

Jetty runner has also some extra arguments for you to customize, here are two screenshots of how I changed the port, the default root path and I am even running it against the folder instead of the war file.

jettyextrafeaturesnewpostman

3. Eclipse

IDE like Eclipse or IntellJ is always good to have. It not only gives you a heavy duty text editor, but also provides you with all the development features that a plain text editor lacks. Also, all the features that we described above using Jetty to deploy could be configured as one button click, this makes a few difference when you need to do the same thing 100 times!

In this case, I am planning to learn more about Tomcat, so I download Tomcat and uncompressed it to a folder. Since all the examples in the Github repo are maven projects, you can easily import projects as existing maven projects. Then you simply need to right click the jaxrs-2.0-workbook-ex03_1 projects and “run on server”. Find the right Tomcat version and point to the installation folder and you are good to go.

eclipse_tomcat_ex03_01.png

There is only one thing I did not fully understand is why the URL root turned out to be the project folder name, which is “ex03_01”, if you happen to know the answer, please leave a comment below.

Kerberos – Create New User

I followed this tutorial and managed to install Kerberos on an AWS ubuntu box. I did not notice anything extra but until I need to create users.

In the origital Ubuntu environment, creating new users is nothing but two lines of code, useradd and passwd, this will create a new user and change the password if you have root access or the sudoer. However, in a Kerberized environment, you not only need to create a user at the Linux system level, but also need to create a principle in the Kerberos database and set up the password there.

Here is a screenshot of how to create a new user and the extra steps are simply login to the kerberos admin server and add the principals there. For some people, you might be wondering what those extra steps bring us, you are right, if you are talking about one machine, this will add zero benefit. However, consider you have a network of hosts/servers, when you change your password, do you really need to go to every machine and change them one by one? Having a centralized third party authentication software like Kerberos will totally save the time.

keberosadduser

Jenkins – Continuous Integration for Python Flask

Jenkins is the leading automation server where it will automate certain parts of the lifecycle of software development, for example, most people use Github to store the code, after the initial set up, Jenkins can “automatically” pull the code from Github, build it, test it, and deploy it. That part is not rocket science and can save lots of time and inconsistency if can be automated.

Here, I used a brand new Jenkins version to show you how Jenkins does all of that from bitbucket.

The Python application that we are pulling is pretty short, but is using Flask, Pandas and Anaconda Conda virtual environment, so I think it should be a good experience to share with.

First of all, you need to go the deployment server and set up a virtual environment in your home folder, I think this part could also be integrated into the job but in this case, I did it manually. Then Jenkins will take care of the rest of it.

This slideshow requires JavaScript.

Bash – process scheduling sleep & at

There is this one really interesting page from introduction to linux that discussed a few ways to schedule processes, of course, the most commonly used one is crontab which is like the oozie for hadoop, the go-to scheduler. Besides of that, they talked about a command called “at” and a few fun use cases of using “sleep”.

First start with sleep command, it does nothing but sleep. Using it with other commands in combo running in the background kind of built a naive working timer. Like “in 5 minutes, I need to head to the other building”. Then you can type the following command

(sleep 5m; echo "you need to go now!") &

will actually first sleep for 5 minutes and then print out a message to stdout for your reminder. I know you have your iPhone but.. this is kind of cool right? but do you think you iPhone can kick out a map reduce job maybe two hours later? this sure can 🙂

Second, there is a command called “at”, where it is actually not installed as default on Redhat, you can easily install it by using “sudo yum install at”. Before you do anything, first you need to run “sudo atd” so the daemon is working and listening. Otherwise, you run at command and it won’t work. Once you are done with that, you can simply run the command like “at HH:MM”, here is the screenshot of how it is working:

at

A few notes regarding the small test:

  1. atq: list all the existing at commands waiting in the queue, empty in this case
  2. after the second echo command, you need to hit Ctrl+D to exit
  3. after 00:29:00, there is a file got generated named output.txt!

After learning this command, I can totally imagine how many pranks I have play for the April Fool’s day next year, ahaha!

Bash – tee and “Here Document”

I was reading some documentation and came across this block of bash code:

$ sudo tee /etc/yum.repos.d/docker.repo <<-EOF 
[dockerrepo] 
name=Docker Repository 
baseurl=https://yum.dockerproject.org/repo/main/centos/7 
enabled=1 
gpgcheck=1 
gpgkey=https://yum.dockerproject.org/gpg 
EOF

It is so intriguing that, first it is using the tee command which I don’t use it in my daily life, second, it has that weird “<<” that I have never seen!

tee:

read from standard input and write to standard output and files

tee

As you can tell, after I entered the command “tee output.txt”, it started waiting for my input, when I typed in “line1”, hit enter, it “tee” out the line1 back to the standard input and so does line 2. Then I hit Ctrl+C to stop the input. Then all my previous inputs have been captured and “tee”ed out to the output.txt.

<< Here document

Someone pointed me to this documentation and I realized there is a professional name assigned to this double smaller than symbol called “Here document”, in one sentence, it will use IO redirection to feed a list of commands(stdin) to a command, including interactive ones.

heredocument

eof is simply a convention for indicate the begining and ending, you can use any character or string you want.

Kerberos – Installation and configuration for KDC5

There is a fantastic tutorial here from spinlocksolutions that walked you through how to set up a Kerberos server and service on a Debian based box.

Kerberos is critical for building a robust and secure environment where it has been giving me a hard time since day one. I am planning to follow up with the tutorial as much as I can on a few Ubuntu VMs on AWS and hopefully in the end understand all the Kerberos or Security jargon and solve the problem.

HBase – Contribution – mvn site

In the previous post, I created a patch without really testing as required in the recommended workflow. Actually, I was running the command mvn site as suggested and failed to build successfully without knowing why. Today, I spent sometime and noticed it was due to the lack of memory for the Virtualbox Ubuntu box 2G (only 1 G for the OS and barely any left for the build). After I upgrade the memory allocation to be 4G, it managed to build successfully and, actually the performance of the VM generally was much better in general :). More details are included in the following content.

First off, I was trying to reproduce the build fail by git cloning a brand new HBase master branch. Without any modification, I ran mvn site in the home directory and it failed after 10 minutes of build with the error message clearly in the log.

Then I did a quick check by calling the ‘free -m’ command and we only had 2GB memory in total allocated to this VM and 1.3G at that time available.

This slideshow requires JavaScript.

After I smoothly shutdown the VM, I went to the setting of the Ubuntu VM and changed the memory from 2048MB to 4096MB.

mvnsitememory3

Then I booted the VM back and double checked the memory was upgraded. Then the rest is simply to run the same command ‘mvn site’ in the HBase home directory and this time, it finished without any problem, and actually the whole process took about 36 minutes to finish the complete site build.

After the site built, one can go to the target/ folder in the HBase home directory and you can actually see the complete site there. For example, since I have only modified the documentation, actually only a few places in the REST chapter of HBase Book. You can see the typos have been successfully fixed in the web version.

This slideshow requires JavaScript.

In the end, I updated my progress in the HBase ticket letting them know the typos have been fixed. And now is just a matter of waiting for any committer to come in, review and apply the patch. 🙂

HBase – Contribute to JIRA documentation

Today I was following the Apache HBase documentation, nowadays rebranded to be Apache HBase Book. It was a really good documentation but like any other documentation, I ran into a few typos in the documentation which I would love to be fixed.

Then I quickly noticed that there is actually a section in the documentation regarding how you should report an issue in the JIRA system and at the same time, you can assign the ticket to yourself, DIY and potentially integrate into the master branch.

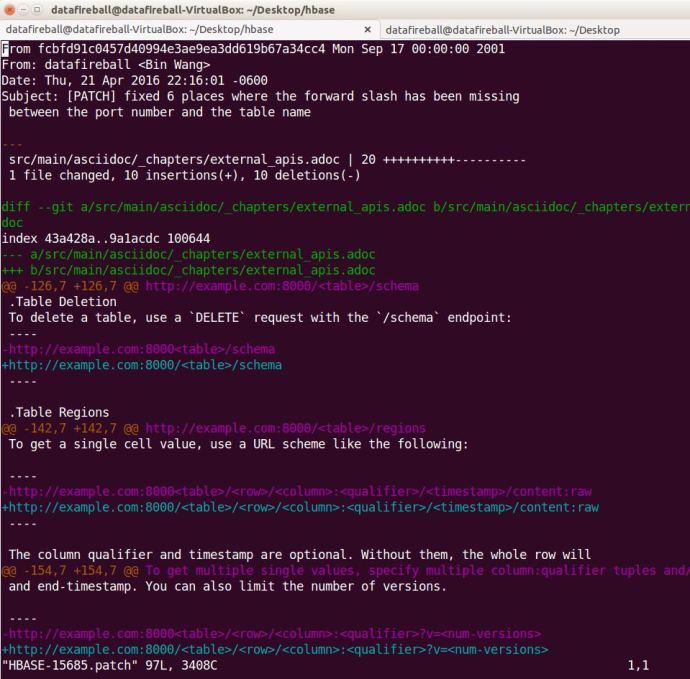
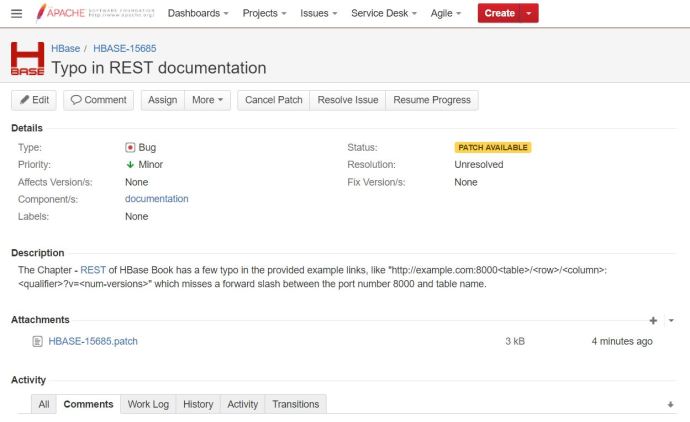
Here is a ticket that I have created regarding a few typos in the REST chapter in the book where a few forward slashes are missing between the port and table name. Then a guy asked me do I have my patch, ok, so the first question is “what on earth is a patch?” 🙂

After carefully reading this documentation,  I realize that it is a fork, a changed version of the Apache HBase source code. Then I started the journey of following the suggested workflows trying to get my first patch.

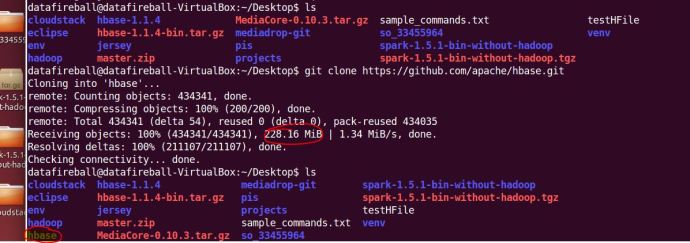
The first step is to git clone the master branch of HBase source code, it is nothing more complex than copy a link from github and run a git clone command anywhere on your local file system. That process was pretty time consuming for the first time. It almost took me around 5 minutes to download 228MB source code to the Ubuntu VM that is running on my Windows gaming machine.

gitclonehbasemaster

After downloading all the files, I took a quick look at the source code and realize one can easily get lost there and it will be really hard to locate what you want, even the folder where contains the source code of the HBase book.

I did a quick Google search and a grep command really helped me out locating where the REST chapter is located in the source code. I took a slice of a fairly unique text in the REST chapter and hopefully loop through all the files and locate the one that contains it, which supposed to be the file that I need to edit.

greprnw

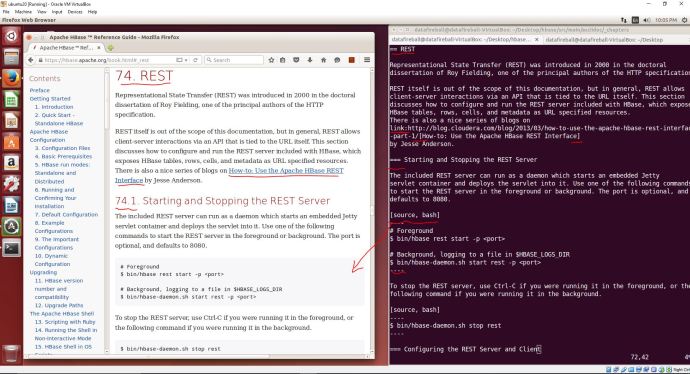
Now, one can easily tell that the REST section is located in a file that is under the hbase/src/main/asciidoc folder. Inside that folder, there are a folder for each chapter and the one that I am interested in under the external_apis.adoc file.

Hoorey! The moment I opened up this file, I realized it is another thing that I have to learn because this documentation is using a slight different text document format called “asciidoc“.  I am amazed at how powerful, or how complex this whole asciidoc syntax is but my first reaction is. I pulled up the web version of the book and put it side by side with the asciidoc and it should help you quickly have an idea what ASCIIdoc is.

asciidoc_rest

I have a question that why not use something that is more mainstream or straighforward like Markdown or Latex, but anyway, it is another day thing and lets fix our problem first.

It is not a rocket science project to really add in 6 slashes to the right place :), I quickly did that and did a git add and git commit with a commitment message.

Going through the checklist one by one, it says “If you have made documentation changes, be sure the documentation and website builds by running mvn clean site.”

I then switch back to the home directory of HBase and run mvn clean site with the “.” (dot). However, it gave me an build failure error after two minutes and then I reran the command mvn clean site without the dot. I learned from maven’s website that we have three stages in the lifecycle of a project, deployment, clean and site which I guess the mvn clean site is just to make sure we are in a good shape.

And then again, it took me ONE hour to run into another problem:

mvncleansitefail

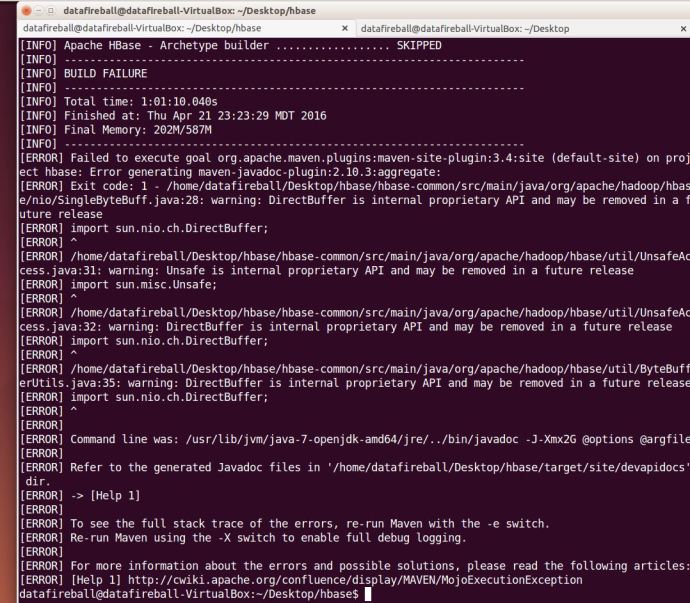
I am so surprised that I have only changed a few slashes but there problems i constantly ran into, I have a concern that it might just be the build environment that I have which is different comparing with the build system that HBase is using. in this case, I will simply assume it is a correct fix and add a patch.

The patch is simply a delta/diff file that shows what you have changed and what is different.

hbase15685path

After following a tutorial, I attached that patch file to the JIRA ticket and it changed the status to “Patch Available” which I assume people will review and let me know if I made it or not.
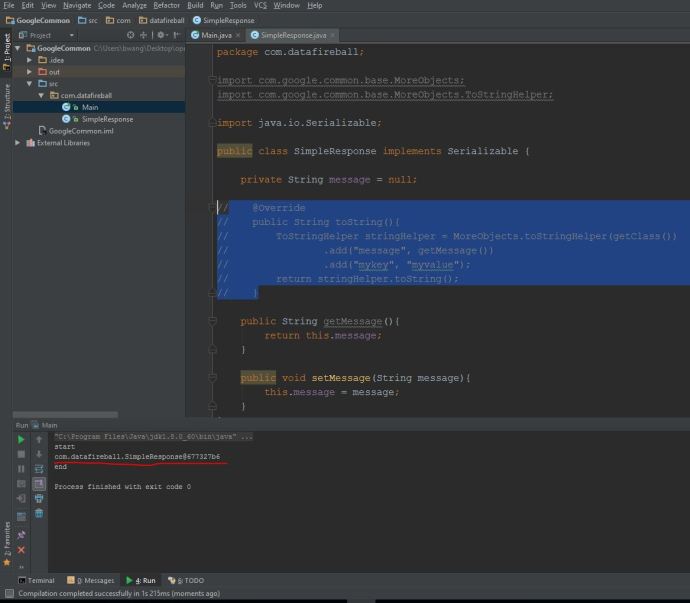
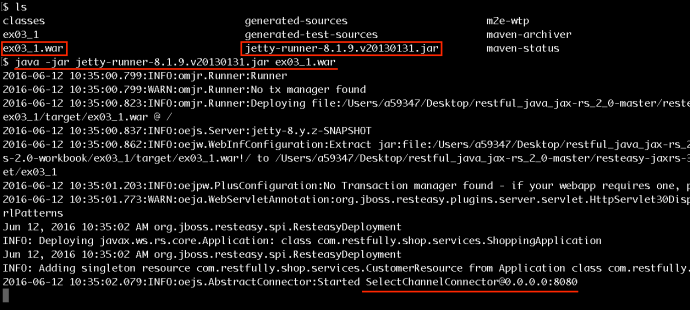
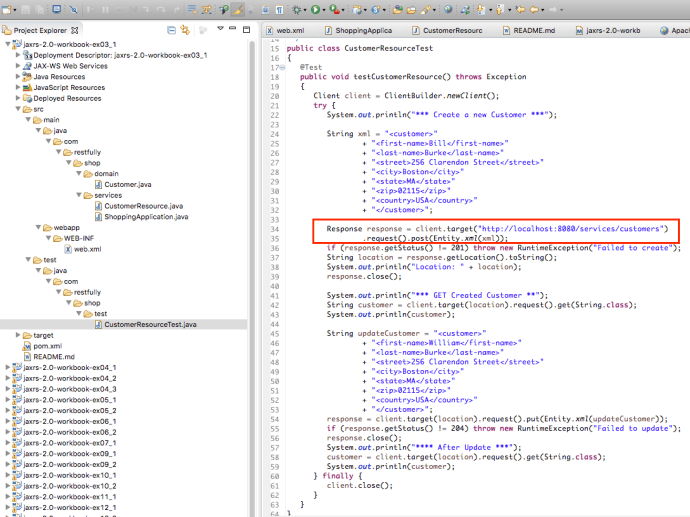
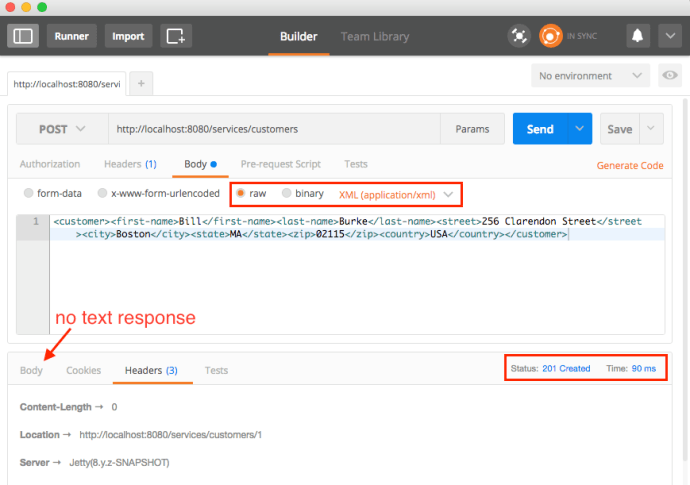
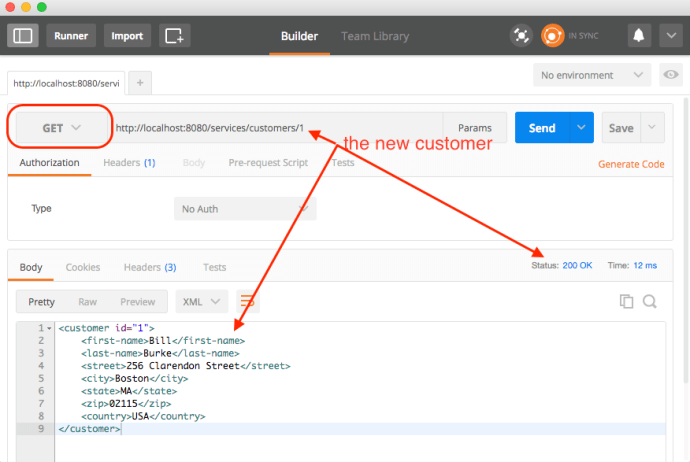
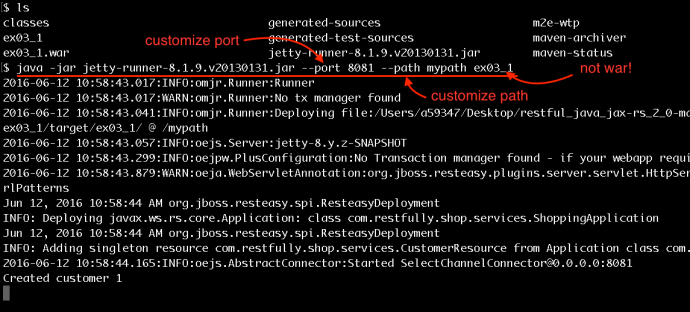
patchavailable