“SolrCloud is designed to provide a highly available, fault tolerant environment for distributing your indexed content and query requests across multiple servers. It’s a system in which data is organized into multiple pieces, or shards, that can be hosted on multiple machines, with replicas providing redundancy for both scalability and fault tolerance, and a ZooKeeper server that helps manage the overall structure so that both indexing and search requests can be routed properly.” – Solr Wiki
I am following the tutorial “Getting Started with Solr Cloud” and felt it will be beneficial to add a few images with some comments to help the ones like me who feels like “driving”.
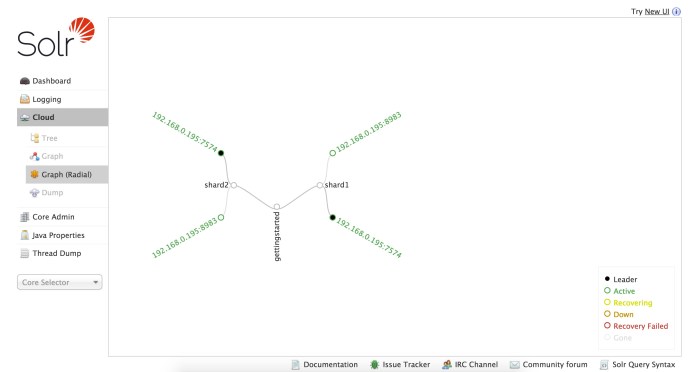
When you first started the two nodes Solr Cloud, you can see a topology graph of the Cloud by visiting the web admin. In the graph below, starting from the root – “gettingstarted”, one can easily see that collection got split into two shards, shard1 and shard2. And each shard, instead of split, got replicated twice and each replication is sitting on a different node. And out of the two replications/nodes/servers, one out of two has been marked as Leader while the other one is active. In this case, it happens to be the Leaders of both shards happen to be on the same machine 7574.
Since we are simulating a Solr Cloud using once machine, behind the scene it is actually running two separate JVMs.
You can even extract more information from the process like port number, jvm memory size, time out time and even zoo keeper information. 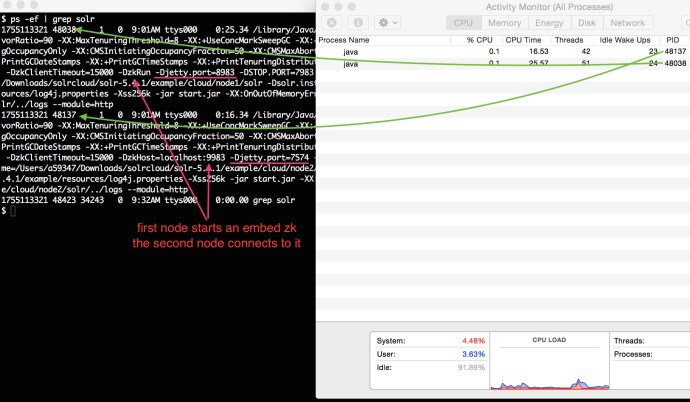
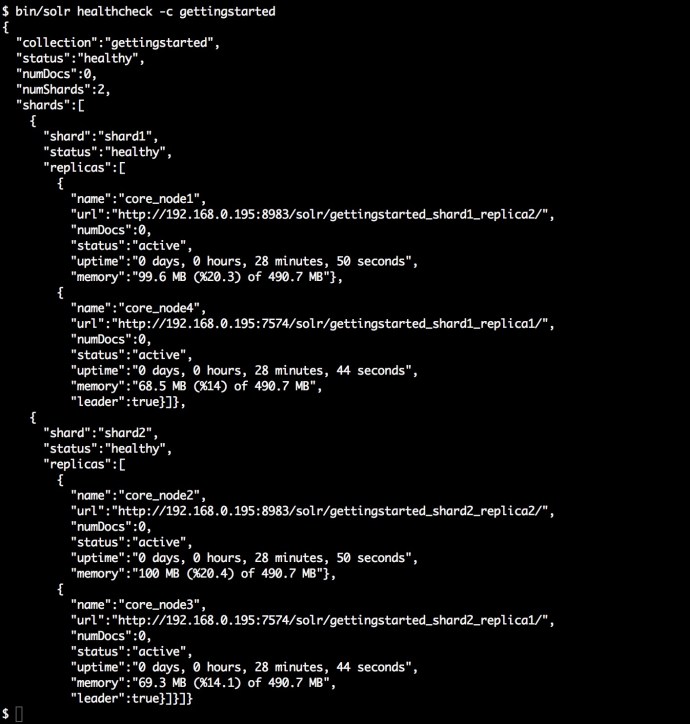
The following screenshot is the output of the command “bin/solr healthcheck” where gives you a quick summary of what is going on about the cluster at a high level.
The next step is to index a few documents and see how it looks like in the SolrCloud.
$ bin/post -c gettingstarted docs/
/Library/Java/JavaVirtualMachines/jdk1.8.0_66.jdk/Contents/Home//bin/java
-classpath <solrpath>/dist/solr-core-5.4.1.jar
-Dauto=yes
-Dc=gettingstarted
-Ddata=files
-Drecursive=yes
org.apache.solr.util.SimplePostTool docs/
SimplePostTool version 5.0.0
Posting files to [base] url http://localhost:8983/solr/gettingstarted/update...
Entering auto mode. File endings considered are xml,json,csv,pdf,doc,docx,ppt,pptx,xls,xlsx,odt,odp,ods,ott,otp,ots,rtf,htm,html,txt,log
Entering recursive mode, max depth=999, delay=0s
Indexing directory docs (3 files, depth=0)
POSTing file index.html (text/html) to [base]/extract
...
POSTing file VelocityResponseWriter.html (text/html) to [base]/extract
Indexing directory docs/solr-velocity/resources (0 files, depth=2)
3853 files indexed.
COMMITting Solr index changes to http://localhost:8983/solr/gettingstarted/update...
Time spent: 0:00:44.416
Using the bin/post SimplePostTool, I easily indexed 3853 documents. And now lets see how it looks like SolrCloud.


http://localhost:8983/solr/gettingstarted_shard2_replica1/select?q=*%3A*&wt=json&indent=true
This is really interesting, what is really going on here after I ran the post command:
- When the SimplePostTool was issued, we really did not specify how to split the documents and which shard it need to go. And the only thing you need to specify is the collection name. Cloudera really hide the complexities from the end users.
- After all the 3853 documents got properly indexed, I went to the Leader of each shard and from the overview window, you can see how the documents got split into each shard, Shard1: 1918, Shard2: 1935 and they add up to (1918+1935) = 3853.
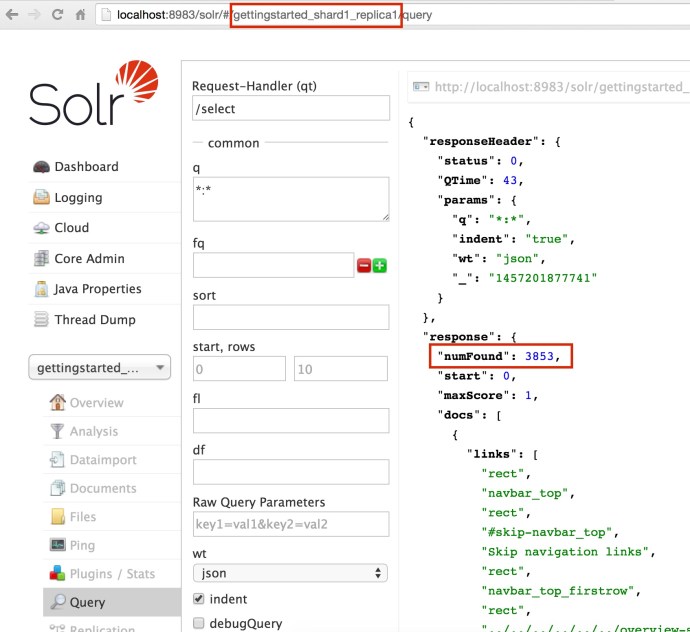
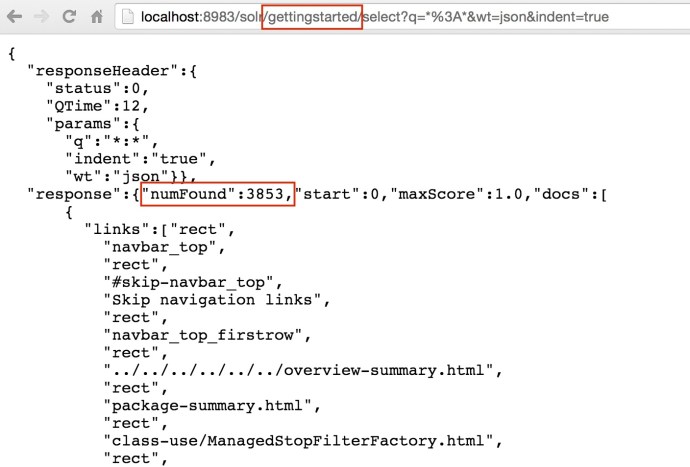
- When I issued a query from the webapp inside one of the cores, it actually make an API call to that specific core – localhost:8983/solr/gettingstarted_shard2_replica1, however, the returned result are 3853! that is everything in this collection. Clearly, even if your query are issued against one shard, the query are actually across the whole SolrCloud.
- I also tried to change the core name to be the collection name because end user really don’t know how many replications or how many shards we have behind the scene. And actually most people probably don’t care at all. After I change it from core name to the collection name, it still returned the complete result correctly.
http://localhost:8983/solr/gettingstarted/select?q=*%3A*&wt=json&indent=true
Now we have started a two node Solr Cloud, indexed some documents and saw how it got split into shards and how to query against individual core or even the whole collection.
Now lets try to add one extra node to the solrcloud and see what happens.
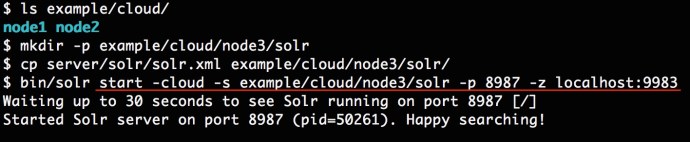
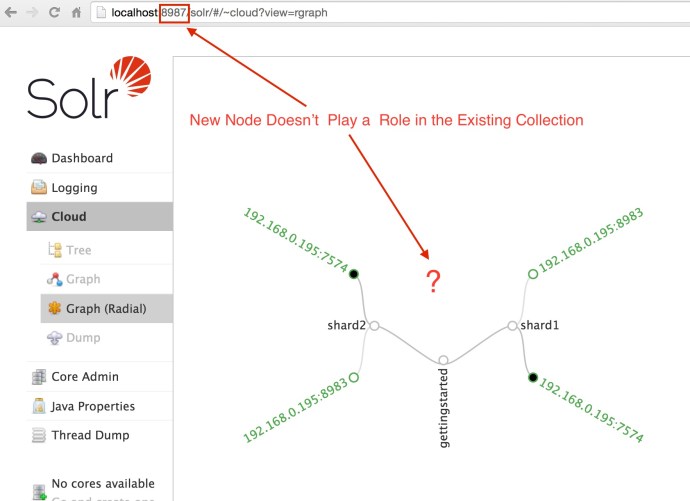
Now we have a new node up and running and we now can see 3 Solr java processes from the top command. However, if you have worked with Hadoop before, when you add a new node to the cluster, there is some logic going in the background will slowly rebalance the whole cluster, and propagate the data from the existing node to newly added nodes. However, if you think add new node in SolrCloud will do that type of rebalance out of box, you might be wrong.
As you can see, when you log into the new node, there is not a single core there, and when you look at the collection graph, the new node was not added as default and it is still the same graph we have seen before.
To some people, they don’t really care about shard, core, node…etc. And the only thing they want if when the service is slow, I will add more servers to it and that should solve the problem.
Again, thanks to the community who came up with such a fantastic tutorial. It was really informative and fun. Hopefully this post is helpful to someone. In the coming posts, we will look more into:
- how the sharding and routing part really works in SolrCloud
- if there is a hands-free solution like the Hadoop auto-balancing
- how map reduce fit into the picture to bulk load large amount of indexes.
🙂
