Grammar – Backus Naur Form

I was reading through this Java doc about regular expression and got totally confused by the format and symbol the author uses across that page including pipe (|) and :==. At the beginning, I thought it was just a format thing that people use all the characters to help make things look more organized.

However, after posting a question on Stackoverflow, I realized that is something totally professional called “BNF” or Backus Naur Form.

This form was named after John Backus and Peter Naur from IBM around 1960s.

In a nutshell, it looks like the recursion in math or cs. Here are two examples:

word :== letter | word + letter
phrase :== word | phrase + '' + word

I won’t even show off my understand here but please take five minutes watching this youtube video and that dude did a much better job explaining this in an easy way.

Solr – Unit Test -ea

If you have ever considered to contribute to some open source projects and add your name to the committer list one day, this is a good documentation for the Solr community where you can get yourself kickstarted.

I downloaded Lucene and Solr source code locally by issuing the command:

git clone http://git-wip-us.apache.org/repos/asf/lucene-solr.git

Where http is the read-only version and you can change it to https if you are committer.

Now I have a folder called lucene-solr, and change the directory to that folder and run the command ‘ant test’ which is supposed to run all the test cases in both of the solr and lucene folder. The first downloaded folder is only 300MB-ish.

It took me literally 40 minutes to run all the test cases! And the folder exploded from 300MB to 700MB!

solr_test

Then you can run the command `ant eclipse` and it is just a matter of a few seconds, you have a directory that can be loaded into Eclipse.

TestRegexpQuery_junit
I located to the TestRegexpQuery.java and tried to run the junit test and somehow it failed..

Solr FAQ and this Stackoverflow question helped solve my problem by:

  1. checking the -ea in Eclipse preference
    TestRegexpQuery_junit_preference
  2. add -ea to the vm argument in project setting
    TestRegexpQuery_junit_runconfigIn the end, everything works out of box 🙂 TestRegexpQuery_junit_success

Solr – DIH Batchsize

I have written a post that the DIH’s import performance was horrible 27 minutes to index 1 million rows while CSV post took only 22 seconds.

We realized that there is an attribute for the datasource tag called “batchsize” which is supposed to change something.

Here is a page that contains a lot of DIH FAQ which covers a lot. However, here is a quote that worth mentioning:

DataImportHandler is designed to stream row one-by-one. It passes a fetch size value (default: 500) to Statement#setFetchSize which some drivers do not honor. For MySQL, add batchSize property to dataSource configuration with value -1. This will pass Integer.MIN_VALUE to the driver as the fetch size and keep it from going out of memory for large tables.”

If you think about batchsize, in the extreme scenario, when you set batchsize to be super small, like 1, it basically means SQL will fetch one record at a time and the back and forth, commit and network will be amplified linearly. In the other extreme scenario, if you turn batchsize to be a huge number, it will try to load everything from database into a big batch first, hold into memory and then send over the network to Solr. This could easily go wrong where either runs into memory issue or network issue. Is there supposed to be a sweet spot somewhere in the middle, ideally yes, however, it doesn’t looks that obvious considering this dummy experiment.

I have a MySQL table that has 1 millions rows where I change the batch size to be different values and run a full-import and I am trying to analyze indexing speed. Here are a few screenshots.

batchsize_10batchsize_10000batchsize_100000batchsize_n1

Clearly, change the batchsize to -1 completely did the magic and load 1 million records in half an minute, however, changing it to any other numbers really didn’t make a huge difference and regardless of the number that I put there, 10, 1E4, 10E5 all ended up loading the in the time of like half an hour.

If we really want to come up with some sort of conclusion, I will still say increase the batchsize will increase the number of index rates, by really not that much.

In the end, set the batchsize to be negative one (batchsize=”-1″) 🙂


Solrcloud – get started

Solrcloud is a cluster of solr servers which combines fault tolerance and high availability. It can be coordinated by zookeeper and store all the index files into HDFS which makes it almos feasible to index any data, big and even huge data.

You can run Solr in the cloud mode just by downloading the plain Apache Solr, and if you are already using some sort of big data platform, like Cloudera Hadoop (CDH), Solr Cloud is already preinstalled and it has even been packaged/integrated into Cloudera Search.

In CDH, they use a command line utility solrctl. Here is a dummy example where it shows the idea of how to use solrctl to get something into Solr.

solrctl instancedir --generate $HOME/<solr_config_dir>

solrctl instancedir will manipulate the instance directory where contains the configuration files for certain solr collection, something like the conf folder. This command will create a directory called “<solr_config_dir>” in your home directory.

This is how the generated <solr_config_dir> looks like and then we need to upload the instance directory to zookeeper and create a collection based on that.

solr_configs

$ solrctl instancedir --create <collection_name> $HOME/<solr_config_dir> 
Uploading configs from /home/<user>/<solr_config_dir>/conf to node1.datafireball.com:2181,node2.datafireball.com:2181,node3.datafireball.com:2181,node4.datafireball.com:2181,node5.datafireball.com:2181/solr. This may take up to a minute.

In the end, you need to create a collection using the instance directory you uploaded. Here I am going to create a collection with number of shards to be two.

solrctl collection --create <collection_name> -s 2

In the end, you can run the list command to see the created collections…

$ solrctl collection --list
collection1 (2)
collection3 (2)

After you created the collection, you can upload a few documents by using the built in post command

cd /opt/cloudera/parcels/CDH/share/doc/solr-doc-4.10.3+cdh5.5.1+325/example/exampledocs
java -Durl=http://$SOLRHOST:8983/solr/collection1/update -jar post.jar *.xml

In the end, you should have something similar like this:

solrcloud_console.jpg


Solr – Data Import Request Handler

If the data that you are trying to search/index is already in some sort of database that support JDBC, then you are in good shape.

I was once thinking that I can export the into into CSV-ish file and then use CSV uploader or even simpleposttool to help me upload those data into Solr. Clearly, this is such a common use case they even have a function that connect Solr directly with database to avoid this uploading and uploading process, and this functionality is called “Data Import Request Handler”. 

This post is about quick and dirty tutorial where I was trying to load 1 million records into MySQL and then use the data import request handler to feed to Solr to index.

Believe it or not, I have not quite fully understood how to create a brand new core from scratch, in this tutorial, I completely forked the example project – techproducts where all the project structure has been well laid out. Then it is just a matter to change a few parameters here and there, add a few dependencies and that is it.

In the end, there are three places that I need to change:

First is schema.xml: since we are going to index our own data, I have to add in all the fields into schema.xml to make sure all the necessary sql table columns have a corresponding field in the schema.

Then, it is the solrconfig.xml: there are two places in solrconfig.xml where we need to modify. The first one is to add data import request handler

solrconfig_requesthandler

Then the second one is to include necessary dependencies to make sure they know where the jdbc driver is (MySQL in this case) and where the dataimporthandler is.

The dataimporthandler was included as default under the dist directory where I had to download the MYSQL jdbc driver myself to the dist directory and included in solrconfig.xml.

solrconfig_dataimporthandler.jpg

In the end, it is the file data-config.xml where all the mysql credentials and sql query and column name mapping are defined.

In the end, restart your project and you are good to go, you can either by calling the dataimport by issuing an http call or you can log in solr dashboard and click the execute “Button” there, here is how it looks like in the end including the data-config.xml content.

solrdataimport.jpg

In the end, I have to say that the process was pretty easy, however, the out of box performance was not as satisfactory as I expected. It took almost half an hour to index only 1 million rows, and the bin/post command can upload 1 million rows in 24 seconds!

More research need to be done but this quick experiment is very meaningful since this solution could potentially seamlessly tie different types of relation databases all together (MYSQL, SQL server, Teradata, and even Hive, Impala…) without too much hassle. 🙂


Lucene – Run Indexer and Searcher

You have to buy Lucene in Action! I personally think Lucene in Action and Solr in Action are the best two technology book that I have read. I am trying to follow the example Sample Application 1.4.

You can download and run the example code here. I don’t have that much experience working with Java, most of the projects that I have worked with use the build tool Maven, looks like the POM file will take care of all the dependencies and the build process. This time, the author of Lucene in Action decided to use Ant.

At the beginning, I thought it might be another headache, however, it turned out to be so easy to follow the tutorial, simply download the source code, navigate to the project root directory where build.xml is located. And run the command:

 ant Indexer

And you just type in a few input arguments through the command line and the program will locate the example and everything finishes smoothly.

I was super surprised at how easy this is and looking at the build.xml, we see how this happens:

ant_target
the name attribute of target defines why ant Indexer will locate this build block. Then we have an info tag. Following the info, we have two input blocks where defined the prompt message, variable name. In the name, the run-main block is very interesting, where class defines where to look for the main class in the package and passes the two arguments to the program.

After running the Indexer and Searcher, you will see there is a folder that we specified,  indexes/MeetLucene that got generated. And there is the folder where all the indexes have been stored.

$ ls
_0.cfs       segments.gen segments_2

There are are three files under the index folder and they are all binary files which is not that straightforward to interpret. I even did not find a good place in the book explaining what those files are for.

After a quick Google search, you can find Lucene Index File formats here.

CFS: compound files

Segment_N: active segment file

Here is a screenshot of the first few lines of the cfs file. And clearly we can see it is a compound file of a few different smaller files.

cfs

  • _0.tii The index into the Term Infos file
  • _0.tis Part of the term dictionary, stores term info
  • _0.fdx Contains pointers to field data
  • _0.nrm Encodes length and boost factors for docs and fields
  • _0.fdt The stored fields for documents
  • _0.prx Stores position information about where a term occurs in the index
  • _0.frq Contains the list of docs which contain each term along with frequency
  • _0.fnm Stores information about the fields

Solr – Suggester – FileDictionaryFactory

Autocomplete is a feature that dramatically improves users searching experience. So what is autocomplete or suggester if you have never seen these terms before.

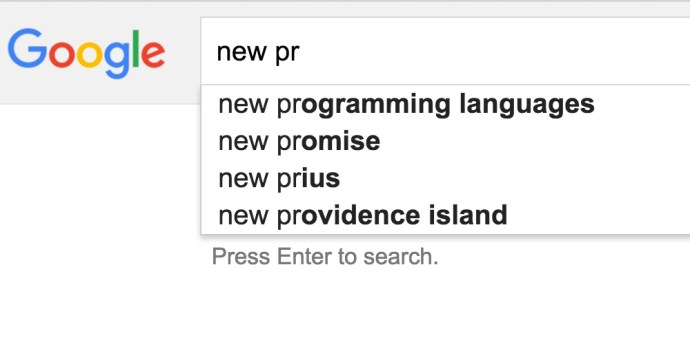
Here is a screenshot of how autocomplete and suggest looks like in Google.

suggest

If you want to learn more about how suggester works in Solr, here is a confluence article I found very helpful.

There are two definitions that I want to highlight, data dictionary and lookup implementation.

Lookup-Implementation: “The lookupImpl parameter defines the algorithms used to look up terms in the suggest index. There are several possible implementations to choose from, and some require additional parameters to be configured.”

Dictionary-Implementation: “The dictionary implementation to use. There are several possible implementations, described below in the section Dictionary Implementations. If not set, the default dictionary implementation is HighFrequencyDictionaryFactory unless a sourceLocation is used, in which case, the dictionary implementation will be FileDictionaryFactory”

Here I am going to share how to get the dictionary factory up and running and in this case, I will use the filedictionaryfactory which Solr will locate an external file where the suggestions are specified.

FileDictionaryFactory

“This dictionary implementation allows using an external file that contains suggest entries. Weights and payloads can also be used.

If using a dictionary file, it should be a plain text file in UTF-8 encoding. Blank lines and lines that start with a ‘#’ are ignored. You can use both single terms and phrases in the dictionary file. If adding weights or payloads, those should be separated from terms using the delimiter defined with the fieldDelimiter property (the default is ‘\t’, the tab representation).

This dictionary implementation takes one parameter in addition to parameters described for the Suggester generally and for the lookup implementation:”

I first created a suggestion file under the collection folder (techproducts). And here is how the file looks like:

$ cat ./example/techproducts/solr/techproducts/bwsuggester.txt
# This is a sample dictionary file.
acquire
accidentally\t2.0
accommodate\t3.0
alex\t4.0
test
test1\t1.0
test2\t2.0
test3\t3.0
ceshi
ceshi1\t1.0
ceshi2\t2.0
ceshi3\t3.0

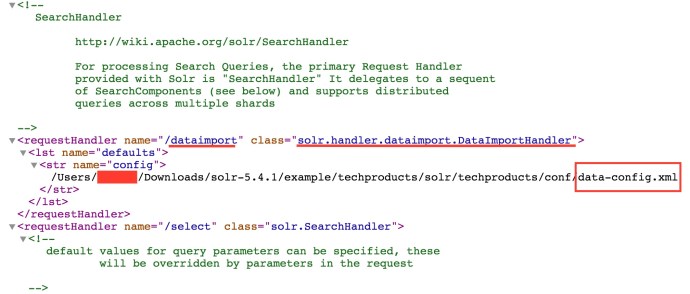
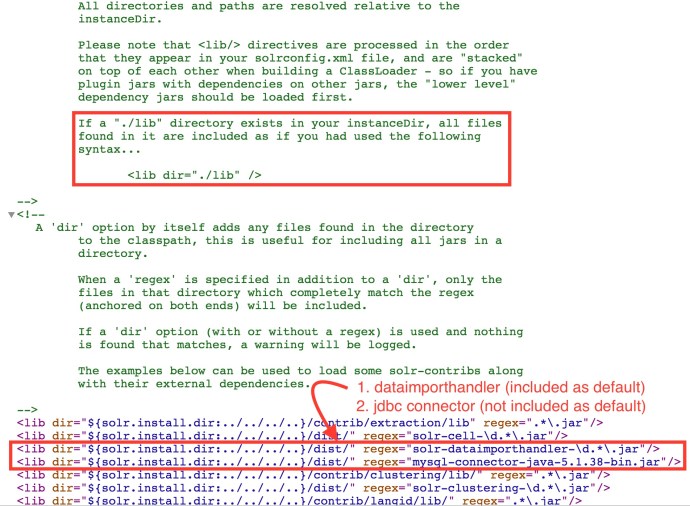
And then you need to modify the solrconfig.xml to use the filedictionaryfactory:

solrconfig
In the end, you can restart solr by issuing the commands:

bin/solr stop -all
bin/solr start -e techproducts

They should restart solr and take the latest configuration file into consideration.

Then lets take a look at the how to query the suggester using Solr API.

http://localhost:8983
/solr/techproducts/suggest?
suggest=true&
suggest.build=true&
suggest.dictionary=mySuggester&
wt=xml&
suggest.q=ceshi2

And here is how the result looks like:

ceshi.jpg

The good news is Solr is already using the external suggestion dictionary that we provided. But the bad news is that it did not parse out the weight correctly and more work need to be done.

Solr – Search Relevance

Relevance is the degree to which a query response satisfies a user who is searching for information.

There are two terms we probably want to highlight here.

Precision: The percentage of documents in the returned result that are relevant

Recall: the percentage of relevant results return out of all the relevant documents in the whole system.

For example, we have 100 documents in the whole system, a user conducts a query and 30 out of 100 are relevant and the the rest are irrelevant, which is 90 records.

Say a search algorithm returns only 10 records totally and 8 out of 10 are relevant. In this case, lets do the calculation:

Precision = 8 / 10 ~ 80%
Recall = 8 / 30 ~ 26%

Assume the software engineer is lazy and he/she just simply returned all the results, which is 100 documents completely. In that case, the recall is 20/20 ~ 100% because all the relevant documents have been returned but the precision is 20 / 100 ~ 20%, which is really low. 😦

“Once the application is up and running, you can employ a series of testing methodologies, such as focus groups, in-house testing, TREC tests and A/B testing to fine tune the configuration of the application to best meet the needs of its users.”