ANT – Use Reference as Property Values OR NOT

Looking at the source code of Apache Nutch, you can see it is built by Ant and except for the build.xml who defines all the targets..etc. There is another file in the project root folder called default.properties. This is the place where people declare the project variables and later will be referred to i the build.xml using a format like ${variable}. You can click here for more information about Ant properties.

Those variables won’t be included until it got called by

 <property file="${basedir}/default.properties" />

A interesting test you can do is trying to print the variable after each line of code in the build.xml. And you can see the variable won’t be valid until read in the configuration file.

ant_propertiesfile_debug

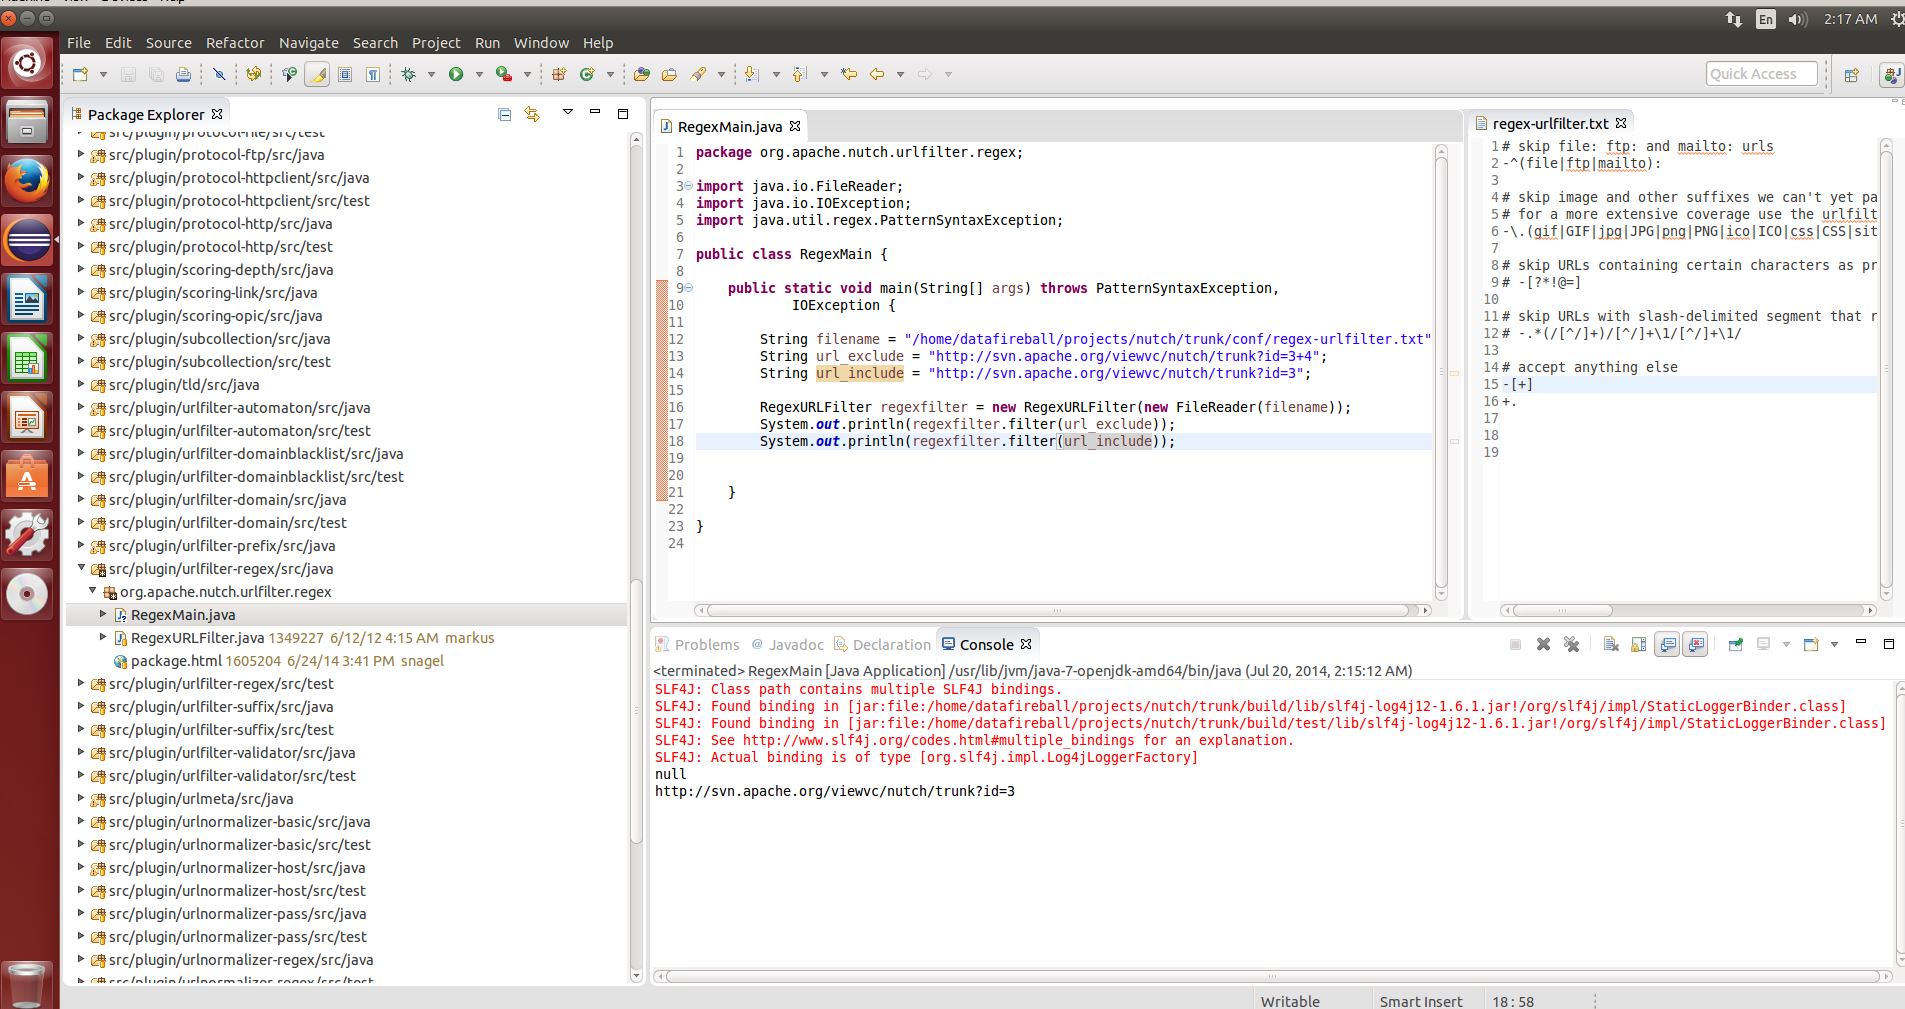
Also, as you can see from the screenshot below, whatever you declared properties won’t take effect until Ant load in the default.properties file. Or in another way, if you reference it too early, the variable has not been initialized and then will be printed as the plain text. As you can see when we tried to build the project, it failed to read in the name variable as the project name, then even if we pass the name variable in the ant command line, why it is still not working!nutch_ant_property_file_debug_print It is actually the way how Ant got implemented. When you look at the source code of Ant, for the attributes in the project tag like name and default attribute, it won’t parse and try to get the reference, but instead of passing the raw string directly.

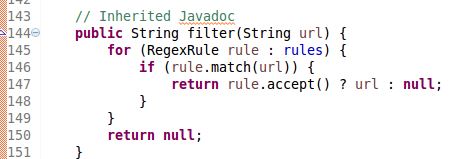
Here is a screenshot of the setname function of Ant Project class, but you will get a pretty good idea that Ant treats property and project attribute differently.

And_Project

Guess the conclusion is we have to hard code the project attributes without using references. 🙂


JAVA – HELLWORLD using Command line

I was following this tutorial, trying to understand how the build process works for Java. I first ran the hellworld example and then package the program into a jar file purely using command line.

First, here are a few arguments in command javac and jar that will be used.

Usage: javac <options> <source files>
-sourcepath <path>     Specify where to find input source files
-d <directory>         Specify where to place generate class files
Usage: jar {ctxui}[vfm0Me] [jar-file] [manifest-file] [entry-point] [-C dir] files ... 
-c create new archive
-f specify archive filename
-m include manifest information from specified manifest file
-C change to the specified directory and include the following file
(The . following -C images directs the Jar tool to archive all the contents of that directory)

# compile
javac -sourcepath src/ -d build/classes/ src/datafireball/HelloWorld.java
# package
jar cfm build/jar/HelloWorld.jar myManifest -C build/classes/ .

Terminal – My Terminal Prompt Is Too Long

When I created my virtualbox ubuntu machine, I happened to have a long user name, datafireball, which is 12 characters long, and again, I happened to have a long host name too which is datafireball-VirtualBox, which is 12+1+10=23 characters long. So whenever I open up a terminal, the prompt is at least username+@+hostname+:+currentdirectory+$+ space, which is 40 characters in this case… it totally take over more than half of my terminal available space. I did some google search and this post from nixcraft helped me a lot.

In the end, it is all about customizing the environment variable PS1 (prompt setting), in my case, I only need to run the command PS1=, four letters only and I won’t even have a prompt! Since I am doing that only in my session, so I can still get my settings back whenever I open another session. You can also make that change permanently by adding your own settings to profile.

terminalpromptps1

VI – why arrow keys not working properly in insert mode?

I use VI a lot to edit configuration file or modify code sometime. After I set up the Ubuntu box in virtualbox, I found that the arrow keys (up, down, left, right) are not working properly. Instead of navigating the cursor through the text, they are actually trying to insert characters letters like A,B… or..whatever letters that I don’t want.

Turned out that the VI that I am comfortable with is actually VIM, and usually VI is a softlink to VIM if they have VIM installed. In my case, VIM is not installed, then you just need to run “sudo apt-get install vim”. And problem solved. Here is the stackoverflow question that helped me.

VI_VIM

HBase – Set up HBase in Ubuntu and play with HBase Java API

To set up HBase on ubuntu, I would say the hardest part is to set JAVA_HOME. (Dude, there is nothing easier than setting up JAVA_HOME, yes, to make HBase work is that easy). What I did in the end is using openjdk-7 and added this line to my ~/.bashrc file, you can find your java home by tracing down those soft links of `which java` or `which javac.`. Also, what you just did only set up the environment variable for your user account, if you run HBase as root..etc. Make sure JAVA_HOME is set correctly. Also, make sure there is a bin folder within the path and you can see java and javac there.

export JAVA_HOME=/usr/lib/jvm/java-7-openjdk-amd64

After you start your hbase server, and probably checked it is working properly by running /bin/hbase shell to interactively play with HBase. Then you can start writing your java code to interact with HBase. Here is a screenshot that I took in my virtualbox 🙂 (lovely new development environment). Also, in Lars George’s github, who is the author of the O’Reily book “HBase The Definitive Guide“, there are a whole lot of Java code to help you get started with HBase API.

hbase_put_getGood Luck!


Nutch – How regex-urlfilter.txt really works!?

In a short sentence: Nutch will go through the content in regex-urlfilter line by line, within each line, it will check if the regular expression in that line matches the URL, if so, it will include or exclude the URL depending on what is the sign +/-, and SKIP THE REGEX(es) THAT BELOW THAT ONE! otherwise, it will keep trying all the filters and exclude the URL in the end if there there is not a single regular expression matches.

To be honest, my first assumption of how that regex-urlfilter.txt works was totally “wrong”. What I was thinking was “OK, whatever regex I put in there will all be applied to be used to filter the URL. And in the end, the URL will be excluded/included depending on the results of all the regex. Which is totally not the case how Nutch is implement. In Nutch, one URL is actually filtered by only one regular expression, ONLY ONE regular expression that first matches.

If you think you have a better time understanding the code instead of my emotional description, here is a snippet of the source code how the filter part.

nutch_regex_filter

As you can see, when it is looping through all the rules/regex, the whole method will return either URL(include) or null(exclude) whenever URL matches the rule depending on the “sign”. The source code of Rule object is also attached below to help you understand the accept and match method. It is nothing more than the java.util.regex whose usage is better explained here.

nutch_regex_rule

Here are a few examples to let you get started without going through the source code:

Say if you think you want to crawl that URLs that belong to the directory /browse of the website but you don’t want the URLs that contains question mark ‘?’ i.e. dynamic pages.  If you put:

# regex-urlfilter.txt
+^http://www.example.com/browse
-[?]

Then your crawler will not filter out those dynamic pages, because when Nutch start filtering after normalizing, it will first check if the URL, say http://www.example.com/browse?productid=2 start with http://www.example.com/browse, and the answer is yes, then it will just stop filtering and then categorize the URL as included. Of course, your regex “-[?]” will be totally ignored in this case. So to make this work, you can just switch the order like:

# regex-urlfilter.txt
-[?]
+^http://www.example.com/browse

Then it will be perfect. Also, theoretical analysis always feels weak if you ask “I have a big file of regular expression, will it work or not!”, and you don’t want to start crawling and realize it is wrong after unleashing the monster. You can set up Nutch in Eclipse and test it easily with literally a few lines of code:

nutch_regex_test

Now good luck!

Virtualbox – My New Development Environment : Eclipse in Virtualbox

As a developer, I constantly need to install different kinds of software, packages and sometimes, I even need to download binary software or build it from source. And as days go by, I end up in a situation that the software works on mine won’t work on my colleagues due to all kinds of different reasons. Also, I won’t try some software that needs a lot set up because I am afraid of breaking my current working equilibrium. This weekend, I set up a Ubuntu Virtual box 14.04 with Eclipse installed. After tweaking the 3D acceleration for a while, I have an environment that is ready for Apache Nutch development. And I can really rewind the clock whenever I think “shoot… which file did I changed? which environment variable did I change…It was working perfectly before..”.

You basically install Ubuntu on virtual box, then install Eclipse either from the market place or build from source. Here are a few links that helped me a lot:

1. How to install Eclipse from source
2. Why the GUI is super slow and how to fix it.
3. Wonderful tutorial of setting up Nutch in Eclipse
4. Make subclipse stop complaining

Then you are good to go!

virtualboxeclipsenutchinject

The snapshots feature in Virtualbox is already very handy. It is link the image version idea of Docker, but the GUI in virtualbox is much more mature than Docker.

VIRTUALBOX_SNAPSHOTS_NUTCH_HBASE


Raspberrypi – Hadoop Cluster New Gears Show off

Last weekend, I gave it a quick POC of evaluating setting up hadoop on a few raspberry Pis. However, there was one Pi who only has  256MB RAM and also, the accessories were not complete and it was not perfect as I expected. Then I went ahead and bought a few gears from Amazon, a power outlet that has 12 sockets with rotating connector which will totally handle the raspberry pi cluster, switch, laptop..etc. Also, I purchase another raspberry pi from Amazon, it is from the Canakit and contains a 2nd generation pi, power supply and a case, which I think is a nice bundle.


ImageImage

Docker on Windows/MacOS/Ubuntu

More information about Docker, click here. 

I tried to install Docker on my Windows box by installing docker2boot and it worked most of the cases, but I failed to open up the flask server from my chrome, seems like the OS is blocking the port. Then I tried to install Docker on my OS assuming the unix-based Mac OS might have a better luck, however, it was even a worse user experience and it cannot do anything due to `docker file doesn’t exist…etc`..

In the end, to have a complete user experience, I started a Ubuntu Desktop virtual box on my beefy windows machine and I finished the tutorial and can see the page hosted by a Docker container.


Image

The command to kickstart a container who hosts a flask server to return hello world

Image

I can see the hosted page by the docker container