Here is a fantastic tutorial from Pramod Narayana explaining how HDFS works.
I found the last one super helpful of how to export the metadata in namenode into a human readable format.
Here is a fantastic tutorial from Pramod Narayana explaining how HDFS works.
I found the last one super helpful of how to export the metadata in namenode into a human readable format.
“Let Eclipse type the code for you”, I have heard someone saying this a while back, however, as a Python programmer, looking at the length of a random Java class that easily go beyond hundreds of lines of code, I am scared.
Today, here is a how to use the `source` in Eclipse to help you generate most of your code.
First, we started a brand new Java project by creating two classes, the people which defines a class People with some basic demographic info as the attributes like name, address… And the application class to run the main function.
Actually you just need to type in private String firstname, and then for Mac user, use “option” + “command” + “down arrow”, you can simply copy and paste the line where the cursor is, then you simply need to replace the attribute name.
Now you have created 8 privates fields. However, due to security reasons, we have to specify all the attributes to be private only, then the only way to access the fields is by creating setter and getter methods. Isn’t that tedious? 8 * 2 ~ 16 different methods. In Eclipse, right click the class -> Source -> Generate Getters and Setters can dramatically save time for you.
Boom, 100 lines of got automatically generated for you! Even the comments.

Clearly, the Source option in the menu of the project is a great place to auto generate boilerplate code. Lets see what other options do we have here.

How about lets click all the “Generate Functions” and see what they do.
HashCode / Equals / Constructor using Fields / toString
this.firstname = firstname; lastname, age, address, city, state, country, zip, which is only about 60 ~ 70 characters.
Lets do the math..
60/4308 ~ 1.3% of the code was written by myself, and Eclipse manages to auto populate 98%+ of the code..
Now, I can clearly remember why some of my colleagues were rolling their eyes while I was trying to write Java apps in VI… 🙂 LOL
I can still clearly remember the early days in my career while I was trying to learn Java as a Python developer. One big barrier for me was getting the development environment to set up properly. Just the Java itself was not a good experience since I was using the company laptop, and the IT really cannot catch up with the latest Java version, in another way, just upgrading the laptop Java version will screw up tons of services. Then there is a tool Maven which is supposed to help you ease some of the pain of solving for dependencies, however, getting Maven up and running on Mac, set up all the environment variables and even work with m2e plugin in Eclipse was such a PITA without a mentor. Then I head down the route of Python…
Recently I am trying to pick up how to develop enterprise level RESTful API using Java and it gave me another opportunity to learn Java again, this time, I am more patient.
I am following this book which it has a workbook that you can follow and try the code.
First, I used the Eclipse installer to download both the Java EE and Java eclipse.
The Eclipse Java EE IDE for Web developers have tons of tools, plugins built in that dramatically save me time setting up the environment. And the version is Mars.1 Release(4.5.1). I have heard people complaining about Mars and some even suggest go back to Luna.. but I am comfortable so far.
Here is the Github repo where the source code sits. After I downloaded the repo, unzip and use the import maven feature into Eclipse, the projects looked fine with a few warnings.
And it failed after I run as maven build.
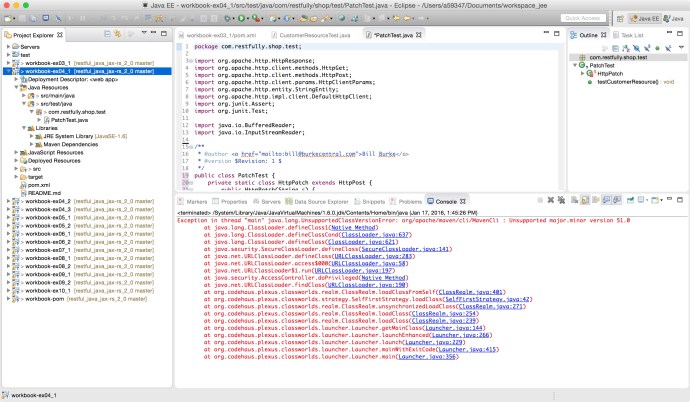
I found this Q&A on stackoverflow saying that there Maven version that I am using is probably higher than the corresponding Java version. In which case, I either need to downgrade my Maven or upgrade my Java to make them work together. And I choose the later.
After some research, I realize the Java environment in Eclipse is not as easy as “set one Java_home”. As everyone can see from the screenshot, there are a few places indicate that even if I went to oracle’s website and downloaded the latest Java 8. 66, somehow Eclipse is using Java1.6 to compile my code.
Now it is just a matter of change that to Java SE -1.8?
First, lets review how many Java versions do I have in the end, here is a screen shots of two directories where OS level Java JRE and user installed Java environment is.
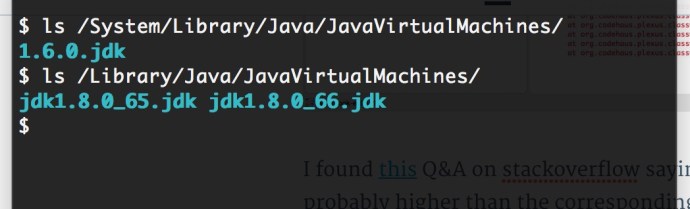
Here I have 1.6 JDK under the OS library, and 1.8 under the Library where I installed myself, two versions 65 vs 66.
In Eclipse Preference, there are two places where you can setup the default JRE to use when creating new projects:
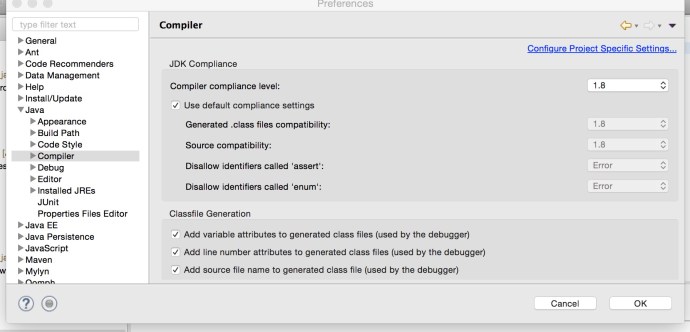
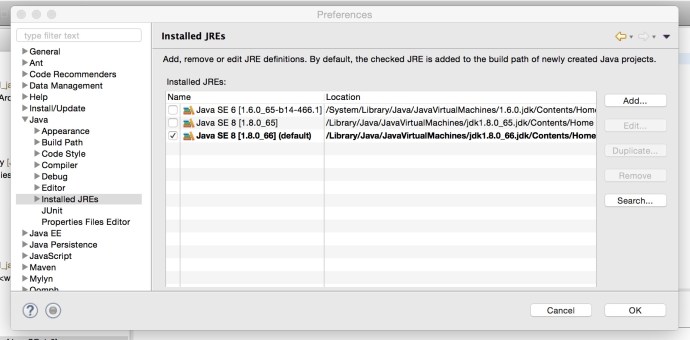
Here I have selected Java 1.8 both in the compiler and installed JRE to make sure I am using Java 8 installed Java 6 from now on.
So we just solved the problem of configuring the latest Java JRE as the default Java JRE for Eclipse when new project is created, how about the one that error out, we still need to manually change it. BTW, I think when you import existing projects, Eclipse won’t be smart enough to use 1.8 which is what you have just setup, you might still need to manually setup the Java JRE to point to 1.8.
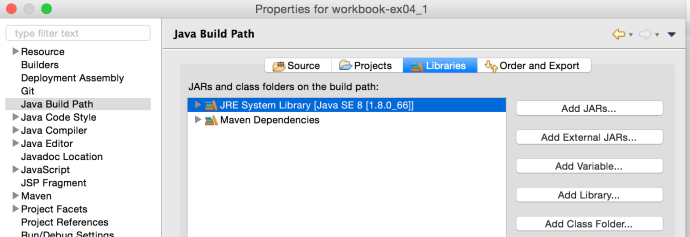
Right click the project, and select the Properties for this project, navigate to the “Java Build Path” where we can see JRE SE 6, is still there which need to be first removed, and the click add Library and we should be able to select JRE SE 8.
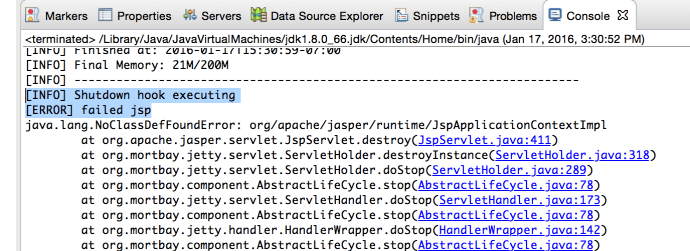
Now, run the projects as Maven and it worked and successfully Build the whole project.
There was a small glitch where it failed when closing the Jetty server, but it got resolved by adding one extra dependency in the POM which is:
<dependency>
<groupId>org.mortbay.jetty</groupId>
<artifactId>jsp-2.1</artifactId>
<version>6.0.0</version>
</dependency>
In the end, there is a term that I want to highlight called project Facets. Facets define characteristics and requirements for Java EE projects and used as part of the runtime configuration. After I fixed the Java JRE project, that project somehow shows error in the project explorer where I cannot find any red mark anywhere in the code.

Project Java Facets need to be changed from 1.6 to 1.8
Then someone says I need to go to the project Facts in the project property to change from 1.6 as 1.8 and it stopped complaining.
Sorry, this whole post absolutely is a bit confusing if you have come across the problem yourself but I wish it will be helpful to the ones who ran into similar problems.
I am researching which language and which framework/library to use to build a robust API service on top of big data, something like a data as a service, or even analytics as a service. I came across this Quora discussion which is very inspiring, here I will list all the libraries/frameworks people have mentioned and maybe have a 1 hour get-started introduction to each one of them.
Jersey – RESTful Web Services in Java, even as a Python developer, I constantly came across Jersey web application while working with those Apache projects. One can easily see how widely Jersey has been using in the Java world.
Here is the get started page of jersey that I followed along. MVN really made my life easier so I don’t have to spend too much time setting up the environment, dealing with dependencies..etc.

The first image has the Java code for building an API end point that any http get request will return “GOT IT”. The code was quite easy and Junit test also indicates the fact that test driven development is should be considered regardless of how small your task is.

Here is the how the final “simple service” runs like, there is also a wadl (web application description language) which is an XML file that demonstrate the application is running properly and all the related meta data.
Today, I spent a few minutes following a course from Lynda – Java EE Essentials: Servlets and Java Server Faces. It was amazing how easy it is to set up the environment and get a application up and running on your desktop. Also later on can easily be exported into a production environment.
Here are four screenshots that I have taken while following the tutorial. The structure might looks a bit intimidating but those are all auto generated. And the only parts you need to modify is the html file under WebContent and the Servlet.java under Java Resources. Also, 90% of the code in Servlet.java are auto generated too.
In a nutshell, a few clicks plus a few lines of customized Java code, you just build an API using Java servlet!

The inputForm.html where end user enter input argument

Source code for inputForm.html
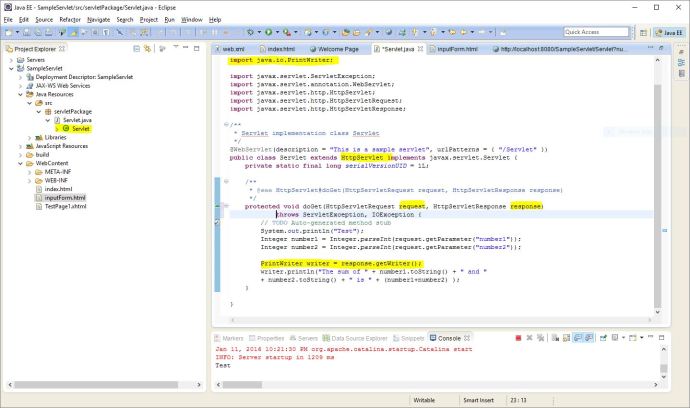
Source code for the Servlet.java

How the final output looks like
I come from a background of data analytics where I spend most of my time in the SQL world. Playing directly against the backend tables is fast and easy. However, assuming you or your analytics are the only users of the data, it really doesn’t matter which particular tool you use and once you are comfortable and you boss is ok with the productivity, that is it. However, if there is something that has a decent size of user groups, you might want to consider building a service on top of it, in this case, we use API to make it friendly to the developer and next, some developers can build a web page on top of it and it is friendly to the whole world. 🙂
I came across a fantastic framework while researching about different options to build an API, at least, when I type in “API” and specify the language by node.js into Google, that is the top 1 search result.
Following the “Get Started” tutorial, one can first install node.js and loopback in a few minutes, copy paste the tutorial and you can probably get up and running in less than 10 minutes.
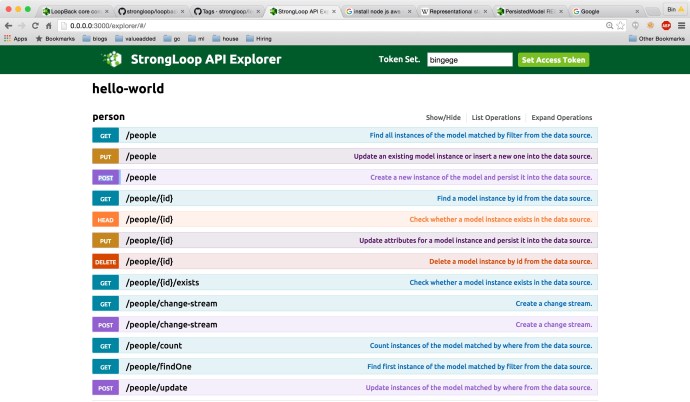
As you can see, I created the “model” people and specify a property firstname to get started. Loopback “automagically” created 13 operations so one can manipulate the data source like a boss – “CRUD” (create, read, update and delete).
The feature that I like a lot is that you can play with all the API operations interactively in the API explorer. You can expand the operation you like and type in the data part at your will and it will just work! or not, if you did n’t follow the right format.
 Here is a link to a documentation where all the operations, in this case, all the ones related to persistedmodel REST API are here. That will help you a lot if you think the limited information in the explorer is not good enough to get you started.
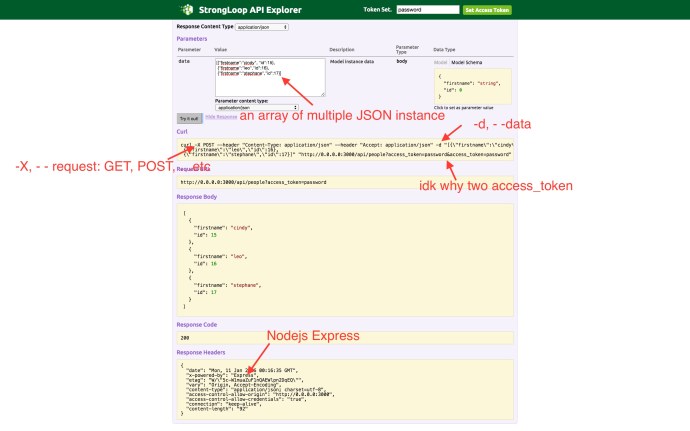
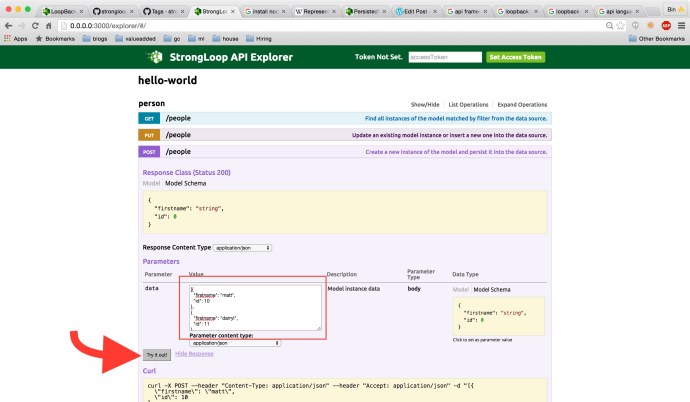
Here is a screenshot of how I “insert” three people instances into the database. As you can see, the explorer really did a good job giving your everything you need to write, debug and run a API call. They even give you the curl command so you can easily reproduce the same operation in your command line using curl.
There is also a fantastic tool called Arc where you have can did what I just did by Clicking buttons if you think GUI will make you a little more comfortable. You can take a brief look by visiting the get started page here.

The CDH is one of the most mainstream big data platforms which packages well all the related big data tools into one environment and make you safe hours installing everything from scratch.
Meanwhile, Cloudera Manager is also one of the benefit of using CDH because it really gives you a handy GUI for you to monitor and even configure the environment.
Cloudera uses tsquery to pull the time series data regarding certain metrics. Say for example, there is a metric called “cpu_user_time”, it has an interesting unit of measure like “seconds/second”. It took me quite a while to double check all the numbers to finally understand what it means, but it is basically the cumulative CPU time across the multiple cores or even nodes. Say you have 3 datanodes and 12 cores each. Assuming your job is really stressing the cluster and we have 3*12=36 cores running in parallel at the same time, then at that moment, we are supposed to have a “cpu_user_time” under your account that has a value of 36seconds/second. Of course, when talking about CPU usage, a percentage between 0% and 100% is probably more straight forward which 0% means completely idle and 100% means fully utilized. In that case you can write a tsquery to be something like this:
select cpu_user_time / getHostFact(numCores, 1) / {numberOfHosts} * 100
Here getHostFact(numCores,1) will return the number of cores and use 1 as default value is not available. I have not figured out how to retrieve the number of hosts/data nodes using tsquery but you should get the idea, 100 turns decimal into a percentage that is more user friendly.
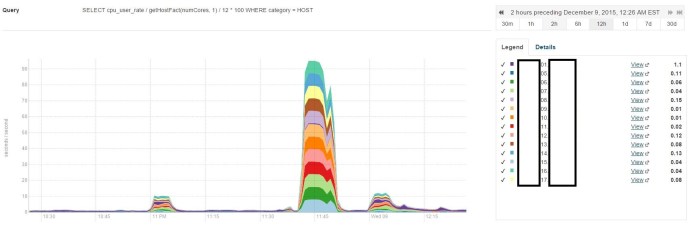
As you can see, I have 14 nodes in this environment and two of them acted as the name node and backup name node, that is why when I write my query, I divide by the number 12.
well. the next step is to do some scientific research figuring out what is the CPU usage across time, something like the integral of the CPU usage across time over the total timeline or simply the average if the distribution is even.
I am planning to write a query that pull relevant rows using the `in` keyword where the list is pretty long, like 20 different elements, what is even worse, I need to run this query against many different tables.
The query will look like this:
create table mytable as
select * from (
select * from table1 where mycolumn in (value1, value2, value3, value4 ..)
union all
select * from table2 where mycolumn in (value1, value2, value3, value4 ..)
union all
select * from tablen where mycolumn in (value1, value2, value3, value4 ..)
union all
... ) unionresult
Clearly, a professional developer will start thinking about how to optimize the query to remove the highly repetitive syntax. Clearly, there is a feature in Hive called “variable substitution” that will help me.
set mylist = (value1, value2, value3, value4 ..)
create table mytable as
select * from (
select * from table1 where mycolumn in ${hiveconf:mylist}
union all
select * from table2 where mycolumn in ${hiveconf:mylist}
union all
select * from tablen where mycolumn in ${hiveconf:mylist}
union all
... ) unionresult
Clearly, this approach will help whenever you think you need a variable. 🙂
Click here to access the free training

