RASPBERRYPI HADOOP CLUSTER 4-Install Hadoop

Here, I wrote a play book to distribute the configuration files to the cluster.You can access the playbook from my github account.

Then run the command, format the namenode and start_dfs.sh

Image


raspcluter_namenode

When you try to use HDFS, it will tell you the service is in safe mode and whatever you do, seems like you cannot turn off the same mode. I did some google and people say it is due to the replication number, in my case, I have four nodes, 1 namenode, 1 used as resource manager and two other nodes used as slaves/nodemanager/datanode. In which case, there will be at most 2 nodes to store data. However, the replication factor for HDFS is 3 out of box, which means the data will always be under replicated. Also, the resource is extremely limited on a raspberry pi whose memory is only 512MB.

Actually, when I was trying to change the configuration file of hadoop, so the big elephant will fit into the raspberry pi box. I noticed that the board that I was using as the name node is actually a board with 218MB. I remembered that I got this board when Pis first came out and I pre-ordered it for my friend Alex and myself. In this case, I need to switch the namenode probably with another data node so the namenode will have enough resource to get hell out of the safe mode.

raspcluster


  1. There are a few things that I might do in the future, maybe set up Fedora also on my beagleboard-xm which is more powerful than raspberry Pi…
  2. I can run a virtual machine in my laptop just to act as the namenode to drive the other PIs. I don’t know if I can read the img file from the current SD card and create a virtual machine on my box.

However, I can think I already got  a lot of fun from what I have done in this weekend. Myabe I will do that in the future or not… And “认真你就输了” (You lose when you get serious!) 🙂

RASPBERRYPI HADOOP CLUSTER 3-Cluster Management

To manage a cluster, you really don’t want your workload to be proportional to the number of computers. For example, whenever you want to install a software, never ever ssh into every box and do the same thing again and again on every box. There are some tools available for this, puppet and chef are the two most famous ones. There is also another solution called Ansible which is an agent-less management tool implemented in Python, which is actually the tool that I am using because it is (1) agent-less (2) light weight (3) python

yum install -y ansible

vi /etc/ansible/hosts
[cluster]
node[1:4]

ansible cluster -m command -a “yum install -y python-setuptools”
ansible cluster -m command -a “yum install -y python-pip”
ansible cluster -m command -a “easy_install beautifulsoup4”

ansible cluster -m command -a “yum install -y java-1.7.0-openjdk”

Image

This is a screen shot of the command that I run, “cluster” is actually the group name which is all the data nodes.


RaspberryPi Hadoop Cluster 2-Network Hardware

Since we are trying to build a cluster, regardless it is PIs or PC… we need network cable. I actually don’t have enough short CAT5 cables, I need to use the tools that I have to make a few and also fix the ones that have broken headers like this.Image

Actually, it is a lot of fun to make cables, you just need to have the right tool and curiosity, it will be fun, trust me. Here is a video from youtube that helped me a lot.

And here is a few pictures that I took.


Image


This is where the magic happens, pay attention to the silver tooth, which actually presses the copper pins of the header, which cuts the isolators of the wire and get them connected. Also, on the other side of the tool, the header will get clipped with the wire.


Image

A cheap network tester will save you a bunch of headache and you see the new cable works perfectly.

Image


All the tools that I have been using.

Photo Jun 07, 15 55 12


Final set up.


RaspberryPi Hadoop Cluster 2-Network Software

I have an extra router which is a DLINK – DIR-655, there are one input ethernet port and four output ethernet ports. In this case, you use a network cable to connect the one of the output ethernets of the home router to the input of this cluster router.  Now you have a local network, that I will connect the four raspberry PIs that I have to the physical ethernet ports and also connect my Macbook to the wireless of the cluster router. To make things easier, I reserved the IP addresses in the router DHCP settings, so whenever you plug or unplug the power/network cable.etc, your raspberry PI will also be assigned the same IP address since we created the MAC address to IP mapping in the router settings.

Image

Also, to make things easier, I made datafireball1, which supposed to be the master node can log into the other nodes password-less, which requires you to use ssh-keygen command to generate a key id_rsa.pub and copy that file to the .ssh folder every nodes, including the datafireball1 itself, and rename the file to authorized_keys. You probably want to ssh from datafireball1 to the other nodes first because it will ask you for the first time do you want to proceed or not and if so, add the all the nodes to the known_hosts. And from then on, you can log into the other nodes seamlessly.

A few notes that might help the others. Even the sshd service has been turned on as default but I did not see the .ssh folder, I have to manually create it for the first time. Also, you don’t need many keyboards or mouses to control all the raspberry PIs. Once you have the ssh set up. You can operate on your macbook which is a much more friendly environment.

Image

Hadoop The Definitive Guide Eclipse Environment Setup

If you like Tom Whites Hadoop the definitive guide book,  you will be more excited and satisfied to try out the code yourself. It is possible that you can use Ant or Maven to copy the source code into your project and configure it yourself. However, the low hanging fruit here might be just use git to clone his source code into your local machine and it will almost work out of box. here I took a few screen shots loading his code in Eclipse environment and hopes and be helpful.

1. Get Source Code.

Tom’s book source code is hosted in github, click here. You can submit issues or ask the author himself if you have further questions. I git cloned the project into my Eclipse workspace – a brand new workspace called EclipseTest.

Image


2. Load Existing Maven Project into Eclipse.

Then you need to open up eclipse, and click File -> Import -> Maven -> Existing Maven Projects. Since every chapter could be a separate maven project and I imported the whole book, every chapters and also the tests&example code for sake of time.

Image


When you try to load the maven projects, it might report errors complaining missing plugins .etc. Give it a quick try if you can just simply find the solution in Eclipse market place to make the problem go away, if not, then just keep importing with errors. In my case, I was missing maven plugin 1.5..etc. which lead to a situation that I have some problem building chapter4 only.. However, that is good enough for me since I can at least get started with other chapters or examples.

I also took a screen shot of the output file so you can have an brief idea of how the output should look like.

Image

3. Run Code.

Now you can test any examples that built successfully within Eclipse without worrying about environment. For example, I am reading Chapter7. Mapreduce types and formats which he explained how to subclass the RecordRead and treat every single file as a record. And he came up with a paragraph of code to concatenate a list of small files into sequence file – SmallFilesToSequenceFileConverter.java. I already run the start-all.sh from the hadoop binary bin folder. And I can see the hadoop services(Datanode, Resource Manager, SecondaryNameNode..etc.) are currently running. You need to configure the Java Run Configuration, so the code knows where to go for the input files and so does for the output files. After that you can just click run, and bang! code finishes successfully.

Image

Image

STUDY SOURCE CODE: EPISODE 5 – HADOOP.MAPREDUCE.JOBTRACKER

There is a huge difference between MapReduce1 and MapReduce2(YARN), in map reduce 1, they are using job tracker and task tracker to management the process, while YARN uses the resource manager, application manager. Etc to improve the performance.

Since MapReduce1 has already played its part in the Hadoop history for a while, we will study how the map reduce works from a perspective of studying history.

I downloaded the older version of hadoop release 1.2.1 from Here. You can also view the source code from Apache SubVersion online here:

When you set all of this up, and dive to the directory mapred.org.apache.ahdoop.mapred, you will be amazed at how many classes they have in that directory. There are about 200 classes in that directory. From this perspective, we can see this is the central place where all the map-reduce magic happens. Now let’s star this journey with the JobTracker who is the “central location for submitting and tracking MR jobs in a network environment”.  It has about 5000 lines of code. Since this is not some sort tutorial but nothing other than some random study notes by a Java layman. I will first post the basic structure of this class, like the content of a book based on the author’s comment, marked by the line number.

JobTracker:

  • 0 foreplay
  • 1500 Real JobTracker
  •                -propertis
  •                -constructors.
  • 2300 Lookptable JobinProg and TaskinProg
  •                -create
  •                -remote
  •                -mark
  • 2515 Accessor
  •                -jobs
  •                -tasks
  • 2909 InterTrackerProtocol
  •                -heartbeat
  •                -update..
  • 3534 JobSubmission Protol
  •                -getjobid
  •                -submitjob
  •                -killjob
  •                -setjobpriority
  •                -getjobprofile
  •                -status
  • 4354 Job Tracker Methods
  • 4408 Methods to track TT
  •                -update
  •                -lost
  •                -refresh
  • 4697 Main (debug)
  •                4876 Check the job if it has invalid requirements
  •                4995 MXBean implementation
  •                               -blacklist
  •                               -graylist
  •                5110 JobTracker SafeMode


STUDY SOURCE CODE: EPISODE 5 – HADOOP.MAPREDUCE.JOBSUBMITTER

In Tom White’s book, he mentioned in Chapter 6, Classic Mapreduce – He described from the macro perspective, the whole map reduce job could be mapped into 6 logical steps. Job submission, initialization, task assignment, execution, progress and status update and in the end, job completion.

We will start by looking at the job submission step first. Actually there is a class JobSubmitter in hadoop.mapreduce, and as the name indicates, this class handles how the job got submitted to the jobtracker from the client.

Image

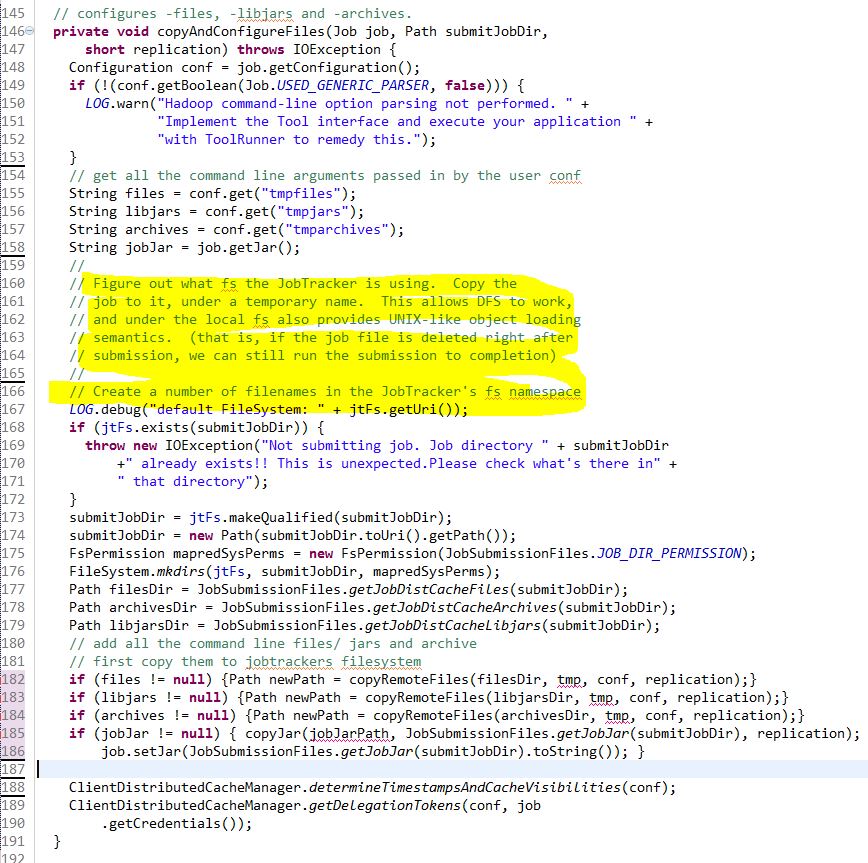
This method will get the source file system and destination file system and compare if they are the same ones by comparing host name and even port number.

Image

Clearly, in the process of submitting the job, there will be some files involved that need to be sent to the job tracker, like the code files, the jar files, the customized configuration file etc. And before sending the file out, we need to check if the job tracker is actually on the same machine with the client. In that way, we don’t need to send the data out. And the return object of the method is the new Path(old path if exists).

Image

Of course, after checking if the local file system is actually the same as the remote file system. The smart and cautious hadoop developers will copy the files to the job track file system. In this step, it will check and load the files, libjars and archives. I omitted several lines of code and trying to fit the whole method into one screen shot. So the reader can have a brief idea of how this method looks like.

Image

Now we are already half way through this class and I folded the rest of the class so you can have an overview of what is left in this class. As you can see, submitJobInternal might be the longest method in the code. And actually, the whole idea behind submitJobInternal is fairly straightforward. Maybe it will be helpful to understand if I categorize it into five words “1. Configure 2. Secret 3. Split 4. Queue 5. Submit”

(1). Configure:

Image

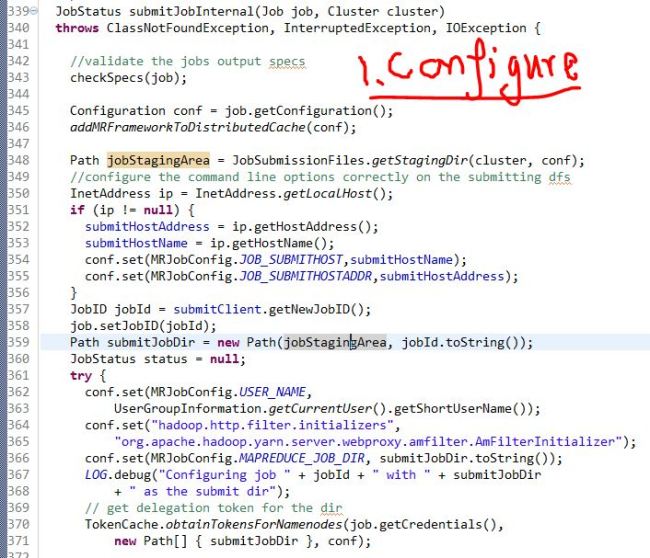
basically configure the job based on the client attributes, set up all the configuration properties like user name, job id, host address, etc.

(2). Secret:

Image

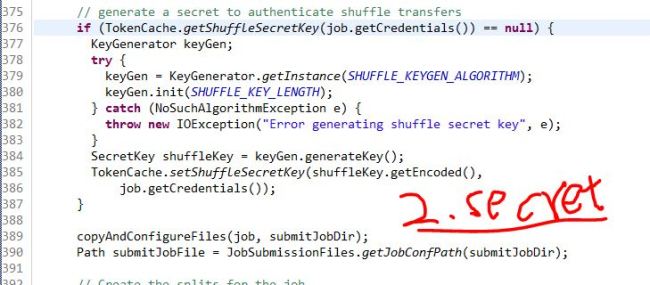
This job submission cannot happen with certain kind of credential behind it when distributing the job beyond only the jobid. It will get the delegation token for the job directory from the namenode and also generate a secret key.

(3). Splits

Image

This method splits the input job logically.

(4). Queue

Image

Set up which job queue the job need to be sent out and get the administration of that job queue.

(5). Submit

Image

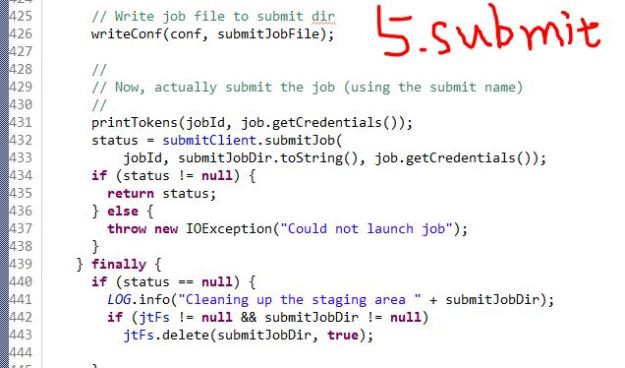
In this end, call the submitClient.submitJob method to submit the job to the jobtracker using the jobId, submission directory and the secret key/credentials. And after this is done, the staging table will get deleted and the job got submitted successfully.

Out of those five words, the Split is actually an interesting topic. Actually, there are three methods afterwards that are directly related to this concept. There are two scenarios when thinking about splitting input files as the input for mappers. If that is a job that has already been created, it will read in the number of mappers and split the input file based on that number. If that is a job that is new or doesn’t have the number of mappers specified, it will split in another way. After the splitting, it will sort the splitted file by size, so the file with the biggest size will get submitted first. 

Image

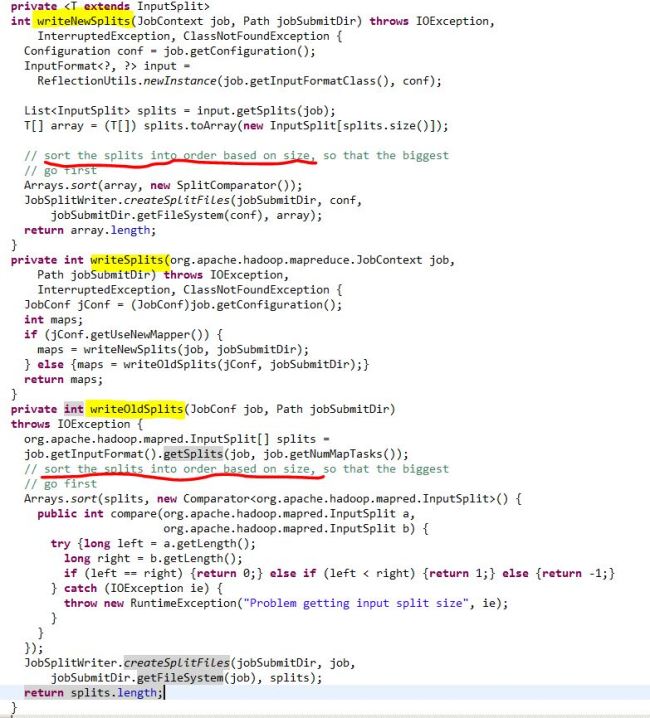
Note: The split is a logical split of the inputs, which means the files won’t be split physically into certain of chunks. And instead, each split file might just be a tuple which records the start line filename, number and offset.