STUDY SOURCE CODE: EPISODE 4 – HADOOP.FS.SHELL

Have you ever ask the question to yourself: “what is really going on behind the command hdfs -copyFromLocal”, how it split the file into chunks and store it in different data node?

To answer that question, you need to start with the command `hdfs`. After you find the code of hdfs shell command, it will look like something similar like this:

Image

That was the last part of the code, and it basically run a Java class corresponding to your shell sub command after hdfs. For example, the command that we are interested in “copyFromLocal” belongs to the subcommand dfs. And dfs maps to “org.apache.hadoop.fs.FsShell”. And if you go to the directory – shell, which is in the same folder as FsShell, you will see most of the commands that you are familiar with actually maps to a separate Java class. ‘Mkdir.java’ to ‘dfs -mkdir’, …. I took a quick look at the source code of FsShell.java. 

Image


As you can see, depending on your command, the shell instance (client) will read in the local hadoop configuration and set up a job based on the configuration. Then run the corresponding command.To me, there are a few haunting terms that how it end up mapping to the corresponding Java class, say ‘Mkdir.java’..etc. It is usually CommandFactory and also an abstract class to describe command ..etc, which I don’t understand at this stage and I will jump straight to the CopyCommands.java.

Image

As you can see, the commands CopyFromLocal and CopyToLocal are actually the wrapper of Put and Get. And if you trace down the path, you will find the Put command is actually using IOUtils.copyBytes. It is interesting to see in the end, real world usage will end up in the function that is belongs to the `utility tool kit`. So far, I am still confused that how does the job knows how to break the files down to chunks and which chunk sent to where.. I guess it might be determined by the filesystem configuration file and the jobclient make all the magics happen. In another way, behind that one liner ‘ToolRunner.run’, all the coordination happens smartly. And that might be the next focus point of learning the Java source code of Hadoop.


OMG – Java in Eclipse

  1. syso, CTRL+SPACE (stdout print)
  2. Alt + Up/Down (move lines)
  3. Alt+Shift+Up/Down (move hierachy)
  4. Alt+Shift+R (refactor)
  5. Ctrl+Shift+O (organize)
  6. Ctrl+1 (fix)
  7. Ctrl+Q (last edit)
  8. Alt+s, r (accessor)
  9. Ctrl+j (incremental search)
  10. Ctrl+h (Java search)
  11. Ctrl+O (show all methods)
  12. Ctrl+PageUp/PageDown (switch opened files)
  13. Ctrl+E (switch opened files)
  14. Ctrl+M (maximize window)
  15. Ctrl+3 (search cmds)
  16. Ctrl+F8 (switch perspective)
  17. Ctrl+L (jump to line)
  18. Ctrl+Shift+G (search infile reference)
  19. Mylyn
  20. Ctrl+Shift+num_/ or num_* (fold and expanding code)

STUDY SOURCE CODE: EPISODE 3 – HADOOP.HDFS.SERVER.DATANODE.BlockSender/BlockReceiver

How to read and write block from/to a datanode.

Lets start from the blocksender – who “Reads a block from the disk and sends it to a recipient.”

BlockReceiver_comment

There might be two methods out of all that interest people the most, sendBlock and sendPacket. Since sendBlock is actually using sendPacket, I will went through the code of sendPacket first.

BlockSender_sendPacket1

All the input arguments are fairly straightforward except for the “transferTo”, which “use transferTo to send data”. So what is “transferTo”? transferTo was added into hadoop by Raghu Angadi in this jira ticket. And he claimed that it might reduce the datanode CPU by 50% or more. Clearly, it is some sort of java function to transfer data in a much more efficient way. Here is a much detail explanation of how transferTo works. It basically moves the data from one fileChannel to another one directly without “copying” it. It is better than writing a for loop and move the data bits by bits from one channel to another.

BlockSender_sendPacket2

This paragraph of code above is how the data node actually sends data out, in two different mode. The “normal transfer” is basically using the “hadoop.io.IOUtils.readFully” to read the data using a while loop from the inputstream and write it to the output buffer.

If the flag “transferTo” has been turned on, it will go straight to the “socket” part of code. First write the header and checksum, then write the data part using transferToFully function. On the other hand, if the “transferTo” flag has been turned off, it will do the normal transfer first, send the data first to verify the checksum, then write the header/checksum/data together to the buf. Beyond of the codes here, there are some exception catch and logging code which I won’t explain here.


BlockSender_sendBlock

It is much easier to understand the “sendBlock” class after going through “sendPacket”, because it basically first determine what the size of `pktBufSize` should be. There is an interesting thing here. When the flag transferTo is true, the `pktBufSize` is only the sum of the `PacketHeader.PKT_MAX_HEADER_LEN` and `checksumSize * maxChunksPerPacket`. The first adder is basically a place holder large enough to hold the limited biggest header. However, the second adder is only the number of bytes for all the checksums. Yes, it doesn’t create a packet buffer big enough to hold the data. You might be so confused if have not followed through the `sendPacket`, actually when you are doing `transferTo`, the way how data got transferred is directly move data from one fileChannel to another fileChannel and in this case, you even don’t need to buffer to be used for the temporary buffer to hold the “copying” data. Now we can see it not only improves the CPU performances but also saves tons of space when transferring the data. Of course, if you are not using `transferTo`,  it will create a buffer that big enough to hold chunk data and checksum data for so so many chunks per packet.

After the buffer got successfully created, the javaNIO will allocate enough space to create pktBuf, and then send the block packet by packet.

In the end:

(1) Why is ‘transferTo’ so fast? Answer: DMA(Direct Memory Access)

(3) How buffer works in Java.

exercise_NIOByteBuffer


STUDY SOURCE CODE: EPISODE 2 – HADOOP.HDFS.PROTOCOL.BLOCK

A Block is a hadoop FS primitive, identified by a long.

If you go to the data directory of the hadoop datanode, you can usually see a whole bunch of files starting with blk_ followed by a long number, or similar file name but end with .meta. Also some other subdirectories that recursively include all the block files. These files are block files. If you open those files using text editor (VI), you can even see the plain data partially, if some data got compressed, you might see the binary format representation. Anyway, the Block is the unit of the data. Understanding the Block class will be helpful to understand how hadoop distribute data later.

This post will walk through the source code of hadoop.hdfs.protocol.block class.

Very first of all, block class extends the interface Writable and Comparable, which are the two classes that every key, value variable in the map reduce job should extend from. So let’s first take a look at the methods that Block implements from Writable and Comparable.

Image

Here there are basically three pairs of methods to read and write the fields, helper and blockid.

Image

These two methods indicates that a block might contain different content, but to judge if two blocks are the same, blockId is the only variable that matter. BTW, the `?:` statement really simplifies the code and interesting to read.

There are also a few routine java methods like the class accessor(setter/getter), constructor…etc. However, beyond that, there are a few methods which will use regular expression to extract the id/generationstamp from the file name which might worth mentioning here.

Image

And here is the screen shot of a data node with block file, block meta file, and current working directory highlighted by light yellow marker.

Image

You can write a test class, include the hadoop-core in the to pom file using Maven, and see if those regular expression functions will be able to parse out the blockid, and gentime.


Study Source Code: Episode 1 – hadoop.hdfs.DFSOutputStream.java

Whenever I talk to other people, I say “I love open source software and hate proprietary ones”. However, have you ever read the source code yourself? I rarely read the source code of any tools that I use, but I benefited so much whenever I took a look. Also, these days, our team got stuck with our hadoop environment. Some people complaint it is all screwed up but they cannot correctly identify what is going wrong.  Other people say everything is doing fine but they also cannot face the fact that all the Hive queries take way much longer than everyone expected. Based on two things that I mentioned above, I decide to take a look at the source of Hadoop/HDFS …etc. I am more like a Python programmer and my only knowledge of Java is no more than `System.out.println()` and `java -jar` to run the jar file. However, since I have already follow this tutorial to set up the hadoop maven project in Eclipse, I think it will be a good start.

These series of posts are more about some random study notes about how I try to understand the nut and bolt about the hadoop and wish I will figure out what is really going on behind the screen of `hdfs dfs -copyFromLocal source destination`..etc

Today, it is all about the DFSOutputStream.java, the reason that why I started with this class is from the book by Tom White – “The Definitive Guide of Hadoop”. He described the process behind hdfs write. And DFSOutputStream is one of the most important classes involved in this process. To describe the role of DFSOutputStream in a nutshell, the comments at the beginning of the source code is the most authoritative one.

Image


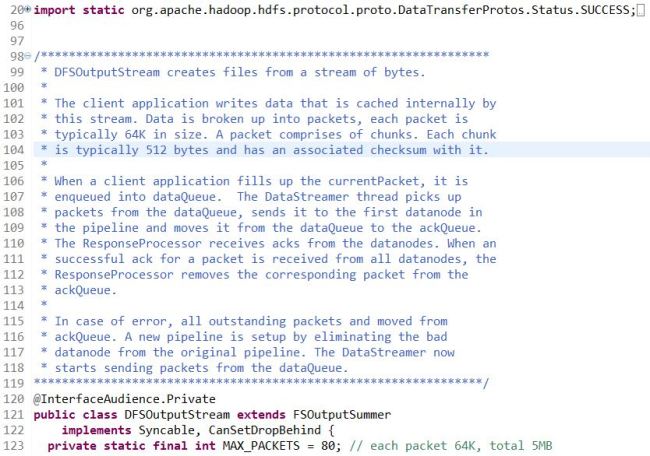
5 MB = 5 * 1024KB = 5120 KB = 80 Packets * 64 (KB/Packet) = 80 Packets * 512 (B/Chunk) * (128 Chunk/Packet).

As we can see from the class definition. DFSOutputStream is a subclass of FSOutputSummer, or DFSOutputSream extends class FSOutputSummer – “This is a generic output stream for generating checksums for data before it is written to the underlying stream“.

Keep going down the code, we can see there are many attributes declared which might be interesting too take a look at first.

Image


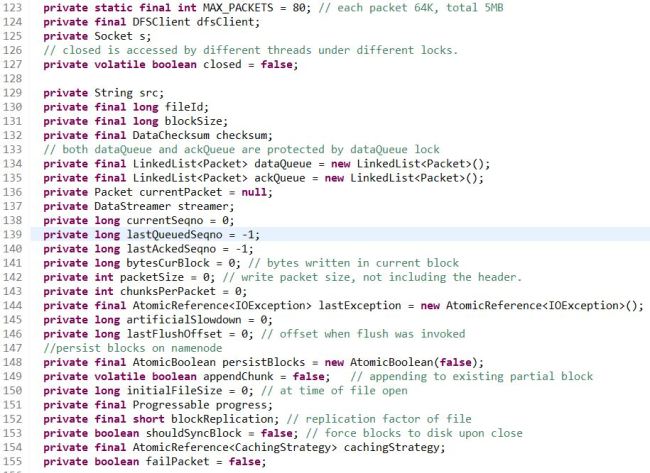
  • MAX_PACKETS=80, PACKET=64KB -> 5MB, also there is an another attribute “chunksPerPacket”, each packet doesn’t have to be completely filled up to be sent out. At most you can have 128 chunks per packet.
  • There are three variables that are super interesting, “dataQueue” and “ackQueue” which are both LinkedList type whose elements are Packet class. Also, another variable “streamer” is the object who will grab available data nodes from the pipeline and distribute the user write data to different data nodes.
  • Another few variables who are either user arguments: ‘fieldId, src, ..’ or variables to describe the queuing behavior ‘currentSeqno, lastQueuedSeqno, …’.

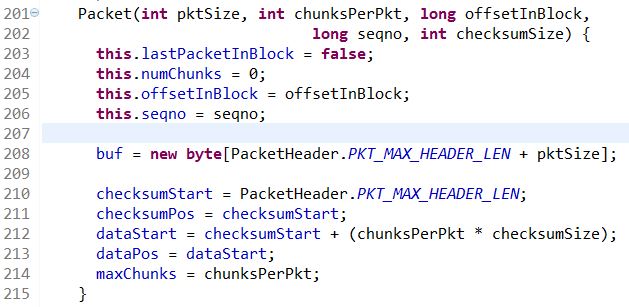
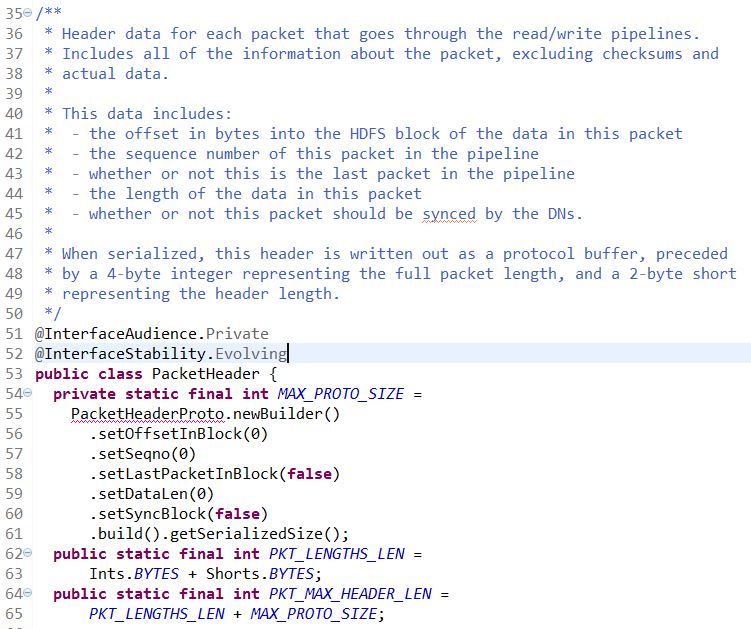
After the variables, here comes the definition of the most important class type ‘Packet’. There are two constructors for the class `Packet`, one is used to create a heart beat packet, and the other one is used to create a new packet. ‘pktSize’ is teh maximum size of the packet, including checksum data and actual data, chunksPerPkt is the max number of chunks per packet(128), ‘offsetInBlock’ is the offset in bytes into the HDFS block, our default block size is 128MB.

Image


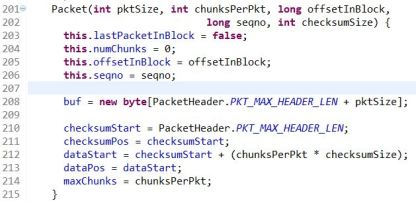
Here, we might need to take out a paper and draw the buffer to help understand how a packet really looks like. First, packet need to declare a buffer whose length is the sum of PKT_MAX_HEADER_LEN and pktSize. The variable PKT_MAX_HEADER_LEN is defined in another class called `hdfs.protocal.datatransfer.PacketHeader`.

Image


Instead of trying to dive into another class, I will just paste the related code here and keep the scope inside the class `DFSOutputStream`,  basically, the order of is 1.header, 2. checksum 3. data….when I was first looking at the graph-ish description of the buf at the beginning of the class. I was thinking the checksum and data was inconsistent, somehow cut off by some data represented by underscore. Well, I guess the reason that they put underscore there is because the checksum and data might not fully populate every bytes and they start from the beginning and might leave the later part empty…

After the Packet has been constructed, there are three methods containing the word ‘write’:

  1. writeData(byte[] inarray, int off, int len), which will read the input data from the buffer inarray, validate the size of the input, make sure it will not exceed the limit set by the constructor. (dataPos + len <= buf.length). Then use System.arraycopy to copy the input content to the packet buffer.
  2. writeChecksum(byte[] inarray, int off, int len), it has almost exactly the same code structure as the writeData function.. but this method is used to write Checksum to the packet buffer.
  3. writeTo(DataOutputStream stm) which “Write the full packet, including the header, to the given output stream.”, in the writeTo function, it first get the absolute length of the data and checksum, then build the pktLen by adding up the data and check, PLUS an extra bytes.. not sure what used for. Then it build the header based on several header information. (1). pktLen, (2). offsetInBlock, (3). seqno, (4). lastPacketInBlock, (5). dataLen, (6). syncBlock which matches the comment in the PacketHeader class. After the header get successfully built, the interesting parts comes. How to arrange the position of these three parts, header, checksum, data before sending. If the checksumPos doesn’t equal to the dataStart, which means that there is a gap between the checksum and actual data in the buffer. Then the code will move the checksum to the right so the checksum and data are right next to each other and will leave more room for the header. After all of this, there are a few “assert” to check everything is fine and send out the contiguous full packet to the output stream.

So till here, we went through the source code of DFSOutputStream-Packet definition which is very inspiring to help understand how the atomic packet looks like which sending the data. And after we are done with it, we will take a close look at what is the “DataStreamer”. From the number of code lines, there are 2000 lines of code in total for DFSOutputStream, and there are about 1000 lines dedicated to define the data streamer, I will say it is a good example of how important this subclass matters.

First, let’s take a look at the DataStreamer constructor:

DFSOutputStream_datastreamerconstructor

To build the DataStreamer, you need: (1) last block of the file to be appended (2) status of the file to be appended (3) number of bytes per checksum

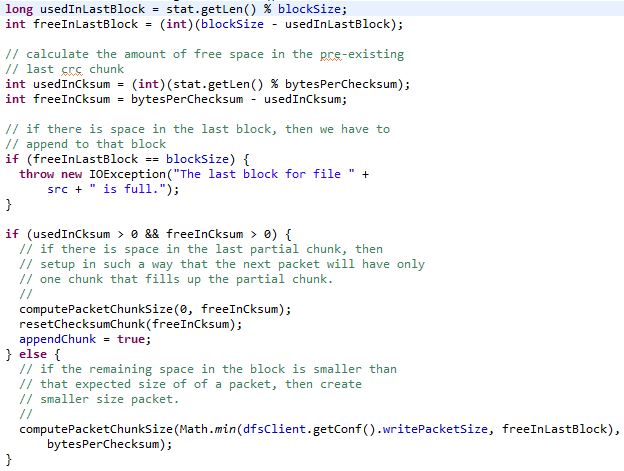
The DataStreamer constructor is very interesting, it first read in the information of the previous written block, and do some math calculation of whether there is enough free space in the previous block. Here we take a few parameter just to prove the concept. For example, we assume the blockSize is 128MB, which is the default value for CDH. And assume we are loading a file with size of 2GB, which is 2048 MB. And the variable bytePerChecksum is 512Bytes as default. Lets walk through these few lines and try to do some calculations:

DFSOutputStream_constructorcheckfreespace

stat.getLen() will be 2000MB, say blockSize is 128MB, then

usedInLastBlock = 2000 % 128 = 80MB, in another way, it is 15 complete blocks plus another block whose complete size is 128MB and only 80MB got populated. Then freeInLastBlock turns out to be (int)(blockSize – usedInLastBlock) =(int)(128-80)=48MB.

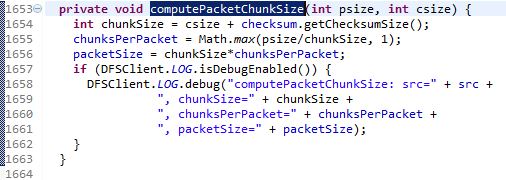
say bytesPerChecksum=0.5 MB which is 512Bytes. Then usedInCksum = (int) (2000%0.5)=0, then freeInCksum = 512 – 0 = 512. Then there will be a if statement to check “if there is space in the last partial chunk, then set up in such a way that the next packet will have only one chunk that fills up the partial chunk.”. However, there is a function that we need to take a look before moving on called “computePacketChunkSize”.

DFSOutputStream_computePacketChunkSize

This function will calculate the packetSize based on psize and csize. You can populate these variables with a few random numbers to just have a go with how this function works. But after all of this, it will trigger another function called ‘setPipeline(lastBlock)’…

To Be Honest, I am Running Out of Patience, and Really Think I Cannot Finish All the Codes This Afternoon. But I Won’t Leave This Very First Post Unfinished, I Went Through the Functions and I Think “transfer” is the Most Interesting One to Me. And I will Also Take a Look At the Other Functions Later!

DFSOutputStream_transfer

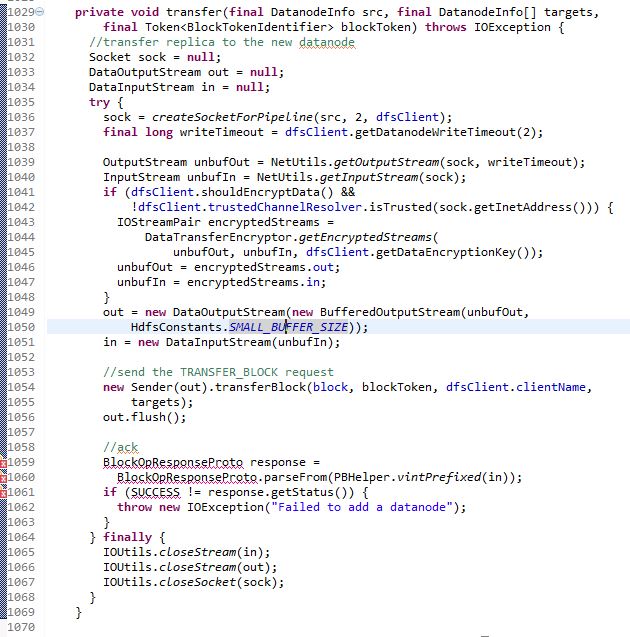
Sender(out).transfer(block, blockToken, dfsClient.clientName, targets);

out.flush();

Done!


Kickstart configuration


kickstartconfigurator

ssh -Y Enables trusted X11 forwarding. Trusted X11 forwardings are not
subjected to the X11 SECURITY extension controls. You need to have XQuartz/X11 installed.

On the server, you run system-config-kickstart, it will actually open up the app window on your local mac using ssh tunnel. Score!

For windows user, you can run the command: export DISPLAY=yourlocalcomputerip:0.0  and if you have some tool like reflection… it will work too.

Mongodb – Move Collection to Another Mongo Server File Size Analysis

You can check the stats of a mongodb collection by using the command below:

db.<collection>.stats()

> db.seCrossReferences.stats()
{
“ns” : “result.<collection>”,
“count” : 256292,
“size” : 3049450896,  # which is about 2.8GB
“avgObjSize” : 11898.346011580541,
“storageSize” : 4109500416,
“numExtents” : 18,
“nindexes” : 1,
“lastExtentSize” : 1071394816,
“paddingFactor” : 1,
“systemFlags” : 1,
“userFlags” : 0,
“totalIndexSize” : 8323168,
“indexSizes” : {
“_id_” : 8323168
},
“ok” : 1
}

Then you can export/dump the data using mongoexport or mongodump, the syntax for mongodump is as follows, it will dump the binary data out of mongo and save to a directory:

################### MONGODUMP ####################################

mongodump –db <dbname> –collection <collectionname> –out <outputpath/name>

It turns out that the size of the dumped folder is about the same size as what is showed in the db.<collection>.stats(), which makes sense because the dumped result is in binary format, result.bson.

Then you can use gzip to make it into a tar ball where the file size is only 177MB, which is less than 7% of the original file.

You can also dump the file to standard output and gzip on the go in one liner:

mongodump –db <dbname> –collection <collectionname> –out – | gzip -9 > <outputfilename>.gz

it took 6 minutes in total to dump and gzip the file, -9 flag make sure it is the best compression rate, but after all, the file size is 171 MB which is almost the same.

################### MONGOEXPORT ####################################

mongoexport will export the mongodb data to a human readable file JSON/CSV. The command syntax is similar and lets take a look:

mongoexport –db <dbname> –collection <collectionname> –out <outputfilename>.json

The exported json format file is 2.9 GB in this case and it took about the 7 minutes also.

mongoexport –db result –collection seCrossReferences | gzip > seCrossReferences.json.gz

This takes about 10 minutes but… the exported zipped file is 144MB…

In conclusion, I think maybe mongoexport + zip is a better solution, because:

1. its output is json/csv which could be used for something else except for moving database.

2. the output has a smaller size

############# IMPORT DATA #######################################
mongoexport + mongoimport
mongoimport –db –collection –file .json –type json

mongodump + mongorestore
http://docs.mongodb.org/manual/reference/program/mongorestore/

Scrum – Agile Software Development

Scrum is an iterative and incremental agile software developmentframework for managing software projects and product or application development. It defines “a flexible, holistic product development strategy where a development team works as a unit to reach a common goal”. It challenges assumptions of the “traditional, sequential approach” to product development. Scrum enables teams to self-organize by encouraging physical co-location or close online collaboration of all team members and daily face to face communication among all team members and disciplines in the project.

A key principle of Scrum is its recognition that during a project the customers can change their minds about what they want and need (often called requirements churn), and that unpredicted challenges cannot be easily addressed in a traditional predictive or planned manner. As such, Scrum adopts an empirical approach—accepting that the problem cannot be fully understood or defined, focusing instead on maximizing the team’s ability to deliver quickly and respond to emerging requirements.

Reference: http://en.wikipedia.org/wiki/Scrum_(software_development)