HBase – Contribution – mvn site

In the previous post, I created a patch without really testing as required in the recommended workflow. Actually, I was running the command mvn site as suggested and failed to build successfully without knowing why. Today, I spent sometime and noticed it was due to the lack of memory for the Virtualbox Ubuntu box 2G (only 1 G for the OS and barely any left for the build). After I upgrade the memory allocation to be 4G, it managed to build successfully and, actually the performance of the VM generally was much better in general :). More details are included in the following content.

First off, I was trying to reproduce the build fail by git cloning a brand new HBase master branch. Without any modification, I ran mvn site in the home directory and it failed after 10 minutes of build with the error message clearly in the log.

Then I did a quick check by calling the ‘free -m’ command and we only had 2GB memory in total allocated to this VM and 1.3G at that time available.

This slideshow requires JavaScript.

After I smoothly shutdown the VM, I went to the setting of the Ubuntu VM and changed the memory from 2048MB to 4096MB.

mvnsitememory3

Then I booted the VM back and double checked the memory was upgraded. Then the rest is simply to run the same command ‘mvn site’ in the HBase home directory and this time, it finished without any problem, and actually the whole process took about 36 minutes to finish the complete site build.

After the site built, one can go to the target/ folder in the HBase home directory and you can actually see the complete site there. For example, since I have only modified the documentation, actually only a few places in the REST chapter of HBase Book. You can see the typos have been successfully fixed in the web version.

This slideshow requires JavaScript.

In the end, I updated my progress in the HBase ticket letting them know the typos have been fixed. And now is just a matter of waiting for any committer to come in, review and apply the patch. 🙂

HBase – Contribute to JIRA documentation

Today I was following the Apache HBase documentation, nowadays rebranded to be Apache HBase Book. It was a really good documentation but like any other documentation, I ran into a few typos in the documentation which I would love to be fixed.

Then I quickly noticed that there is actually a section in the documentation regarding how you should report an issue in the JIRA system and at the same time, you can assign the ticket to yourself, DIY and potentially integrate into the master branch.

Here is a ticket that I have created regarding a few typos in the REST chapter in the book where a few forward slashes are missing between the port and table name. Then a guy asked me do I have my patch, ok, so the first question is “what on earth is a patch?” 🙂

After carefully reading this documentation,  I realize that it is a fork, a changed version of the Apache HBase source code. Then I started the journey of following the suggested workflows trying to get my first patch.

The first step is to git clone the master branch of HBase source code, it is nothing more complex than copy a link from github and run a git clone command anywhere on your local file system. That process was pretty time consuming for the first time. It almost took me around 5 minutes to download 228MB source code to the Ubuntu VM that is running on my Windows gaming machine.

gitclonehbasemaster

After downloading all the files, I took a quick look at the source code and realize one can easily get lost there and it will be really hard to locate what you want, even the folder where contains the source code of the HBase book.

I did a quick Google search and a grep command really helped me out locating where the REST chapter is located in the source code. I took a slice of a fairly unique text in the REST chapter and hopefully loop through all the files and locate the one that contains it, which supposed to be the file that I need to edit.

greprnw

Now, one can easily tell that the REST section is located in a file that is under the hbase/src/main/asciidoc folder. Inside that folder, there are a folder for each chapter and the one that I am interested in under the external_apis.adoc file.

Hoorey! The moment I opened up this file, I realized it is another thing that I have to learn because this documentation is using a slight different text document format called “asciidoc“.  I am amazed at how powerful, or how complex this whole asciidoc syntax is but my first reaction is. I pulled up the web version of the book and put it side by side with the asciidoc and it should help you quickly have an idea what ASCIIdoc is.

asciidoc_rest

I have a question that why not use something that is more mainstream or straighforward like Markdown or Latex, but anyway, it is another day thing and lets fix our problem first.

It is not a rocket science project to really add in 6 slashes to the right place :), I quickly did that and did a git add and git commit with a commitment message.

Going through the checklist one by one, it says “If you have made documentation changes, be sure the documentation and website builds by running mvn clean site.”

I then switch back to the home directory of HBase and run mvn clean site with the “.” (dot). However, it gave me an build failure error after two minutes and then I reran the command mvn clean site without the dot. I learned from maven’s website that we have three stages in the lifecycle of a project, deployment, clean and site which I guess the mvn clean site is just to make sure we are in a good shape.

And then again, it took me ONE hour to run into another problem:

mvncleansitefail

I am so surprised that I have only changed a few slashes but there problems i constantly ran into, I have a concern that it might just be the build environment that I have which is different comparing with the build system that HBase is using. in this case, I will simply assume it is a correct fix and add a patch.

The patch is simply a delta/diff file that shows what you have changed and what is different.

hbase15685path

After following a tutorial, I attached that patch file to the JIRA ticket and it changed the status to “Patch Available” which I assume people will review and let me know if I made it or not.

patchavailable

Hadoop File Type

I came across these two fantastic blog posts HFile and SequenceFile+MapFile+SetFile+ArrayFile. This post will be a hands on workshop working with each file type, write some code to read and write maybe along with a few benchmarks.

SequenceFile

The Java doc did a good job explaining the ins and outs of SequenceFile, I first came across SequenceFile was when I started working with Apache Nutch. After Nutch crawls the data, it will be stored on the file system as some weird binary files, and afterwards, I learned that most of the Nutch’s code was implemented using lots of Hadoop components (maybe they were both written by Doug Cutting) and the crawled data format is by default SequenceFile.

I followed the quick start tutorial of Nutch and managed to crawled a few links under the domain nutch.apache.org. There are several “dbs” in the crawl folder including crawldb (crawling status/progress), linkdb (links) and segments (all the detail content). Lets take a look at the current crawldb and here are a few screenshot of how the data looks like there.

This slideshow requires JavaScript.

Quoted from John Zuanich’s blog post “The MapFile is a directory that contains two SequenceFile: the data file (“/data”) and the index file (“/index”).”, we know the crawldb folder itself is a MapFile. And both data and index are sequence files themselves.

The good news is that even in the plain binary format, we can tell the header part of the files matches the documentation of SequenceFile.

  • version – 3 bytes of magic header SEQ, followed by 1 byte of actual version number (e.g. SEQ4 or SEQ6)
  • keyClassName -key class
  • valueClassName – value class
  • compression – A boolean which specifies if compression is turned on for keys/values in this file.
  • blockCompression – A boolean which specifies if block-compression is turned on for keys/values in this file.
  • compression codec – CompressionCodec class which is used for compression of keys and/or values (if compression is enabled).
  • metadata – SequenceFile.Metadata for this file.
  • sync – A sync marker to denote end of the header.

Now let’s write some code to read in the data file and deserialize it into human readable format. Then we can verify if that matches exactly what the Javadoc told us.

Here is another blog post from Anagha who shared the code around MapFile. And after I executed her code against the crawldb, i realized that it looked like MapFile but it is actually a file type called “Nutch Crawldatum”. In the end, I decided to find another source of SequenceFile which is by creating a table in Hive stored as SequenceFile.

I created a table stored as SequenceFile and then saved the backend data file to my laptop. And then use the following Java code to read the SequenceFile. Here are two screenshots of how that looked like:

This slideshow requires JavaScript.

Now we managed to see how the SequenceFile looks like and even how to access the SequenceFile using Java. The next step will be why we use SequenceFile considering it is nothing but a file format for storing key value pairs which only supports append operation. Then what are the benefits, this stackoverflow question can probably help answer some of the questions.

MapFile

Quoted from the Javadoc

A file-based map from keys to values.

A map is a directory containing two files, the data file, containing all keys and values in the map, and a smaller index file, containing a fraction of the keys. The fraction is determined by MapFile.Writer.getIndexInterval().

The index file is read entirely into memory. Thus key implementations should try to keep themselves small.

Map files are created by adding entries in-order.

I think this explanation is pretty straightforward but there is one thing we need to point out is it is “in-order”.


Solrcloud – Load Lucene Index

In the previous post, we managed to load Lucene index straight into a standalone Solr instance, now lets try to do the same thing for a Solrcloud.

First, we generated four Lucene indexes using code similar like this, however, to make sure we don’t screw up, I modified the code a little bit to make sure the id field is unique.

Now we have four indexes sitting on my local system that wait to be loaded.

scloadlucene7

Then I started a Solrcloud with 4 shards, 1 replica (or no replication) running on my laptop using the techproducts configuration set where the field id and manu already exist.

Here is the API call behind the scene to set up the cluster.

http://localhost:8983/solr/admin/collections?
action=CREATE&
name=gettingstarted&
numShards=4&
replicationFactor=1&
maxShardsPerNode=1&
collection.configName=gettingstarted

Here is a screenshot of four nodes running in our gettingstarted collection.

scloadlucene1.jpg

Now the next step is to simply replace the index folders of each Solr shard by the index folders that we generated. In the previous post, we went to the solrconfig.xml and modified the dataDir to point to a Lucene index folder, and it seems like you don’t have to move the data at all. However, when I look in each shard, there is not even a solrconfig.xml.

scloadlucene8 So we can tell the there is only one configuration set for this collection regardless of how many nodes we have and it is stored in the zookeeper folder for this collection. I will have another post diving into zookeeper but now, lets do it in an easy way, let the collection using the same dataDir as it did and replace the index with our generated index.

rm -rf example/cloud//node1/solr/gettingstarted_shard1_replica1/data/index
cp -r /tmp/myindex/shard1/index/ example/cloud//node1/solr/gettingstarted_shard1_replica1/data/index

Here is the command to delete the index and repopulate using my index. And just do the same for the rest of the nodes.

In the end, the easiest way is to run the reload command to make sure Solr is running against the latest indexes.

You can either go to each node in the Solr web GUI and click the button one by one.

scloadlucene3.jpg

Or you can issue a http request to the Solr collection admin API.

scloadlucene4

And now, we can see all our documents 4 * 10 million ~ 40 million records is searchable.

scloadlucene5.jpg

Fast Search! Happy Search!


Solr – Load Lucene Index

In Hive, there is an idea called schema on data, you can first use whatever tool you want to generate a file following certain format (CSV, ASV, TSV, Avro), then you can create an external table pointing to the data sources. Some people even call it schemaless because you really don’t have to create a table before having data. The data even doesn’t have to be retransformed and after you create the table, the data can stay exactly where it is. Imagine you have a huge dataset, write a dataloader to transform and feed into the database will double the disk space in nature and Hive you don’t have to. This really makes Hive powerful and scalable.

Thinking about Solr, it is a database in essence just somehow has a different file format – inverted Index (Lucene Index). Based on my knowledge, here is a short list of approaches to load data into Solr.

In the end, all the approaches are somehow going through the Solr update API and writing to Solr Index. So there is always a layer in the middle which might become a bottleneck when the need is bigger than the API threshold. In this case, people might start asking, what if I already have a huge data in Lucene format, is it possible to load? If so, what if I can transform my data into Lucene much faster using parallel processing (Spark, Mapreduce), does that mean I can overcome the bottleneck of indexing API? The short answer is yes and this post is a proof of concept of how to write your own lucene index and load into Solr.

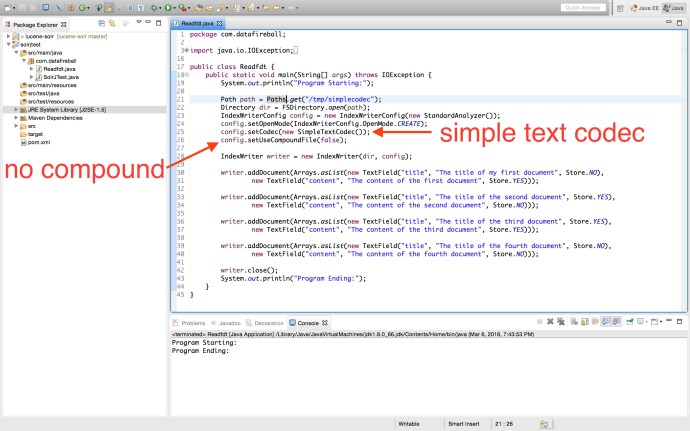
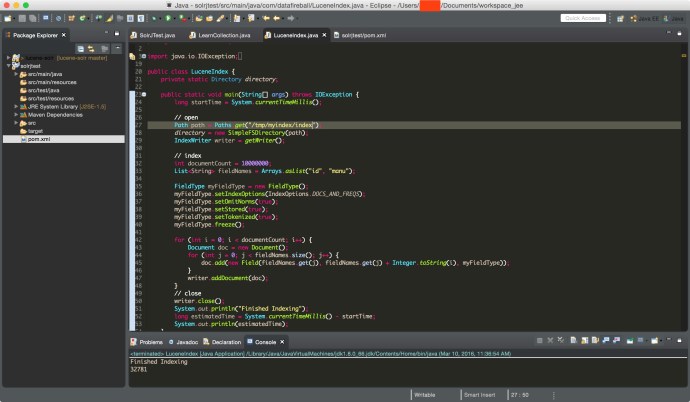
Here is a screenshot of the Java app I wrote to index 10 million dummy documents into a Lucene index, you can find the source code here.

eclipseluceneindex

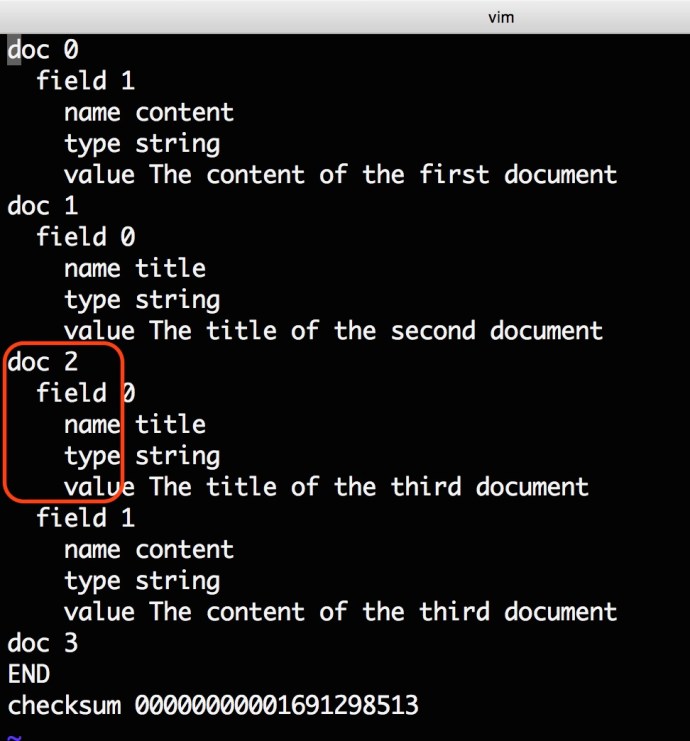
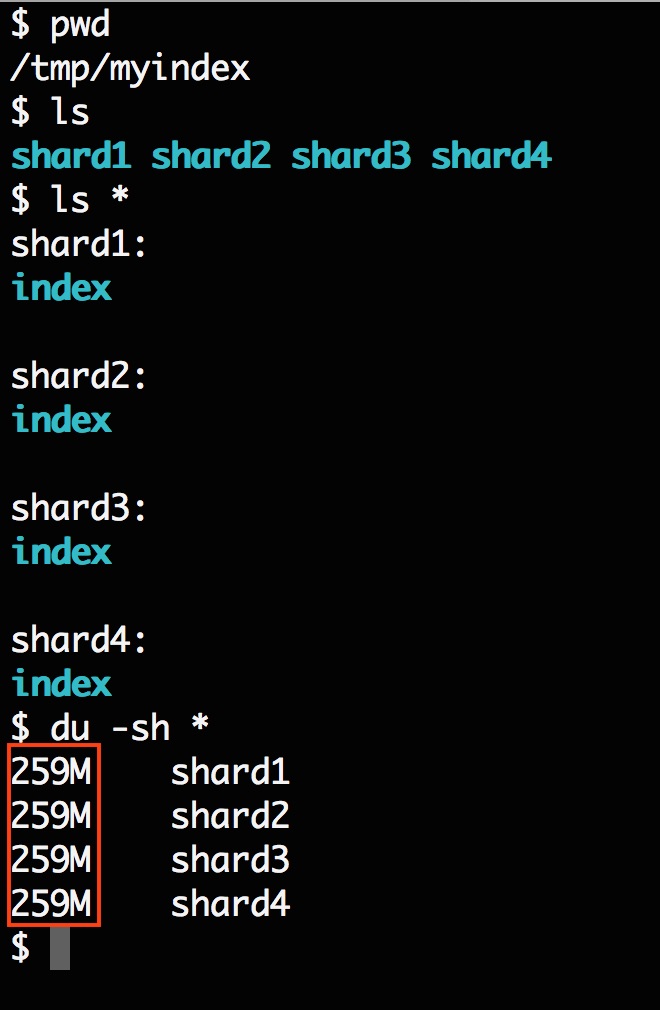
Here is another screenshot showing how the index finally looks like in the end on my local file system.

tmpmyindexindex

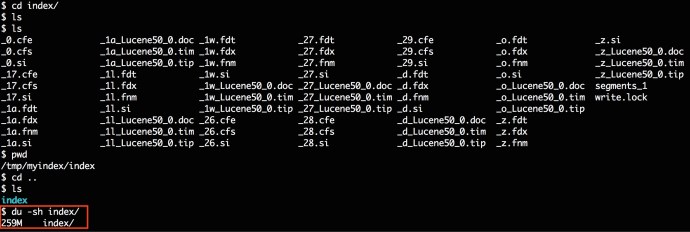
At a high level, it took 30 seconds to write 10 million records into a local Lucene Index and the Index folder is 260MB.

Now lets take a look at how easy it is to load the data into an existing Solr core.

The loading part can be summarized into 3 steps:

  1. making sure you have a Lucene index 🙂
  2. modify schema.xml (managed-schema) to include existing field in your Lucene index
  3. modify solrconfig.xml to point <datadir> to where Lucene index is sitting
  4. restart solr

Step1: Lucene Index

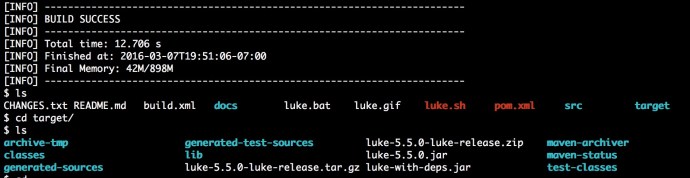
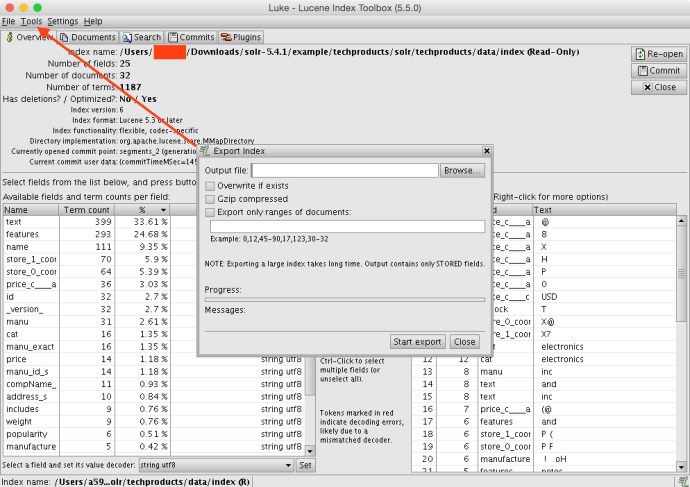
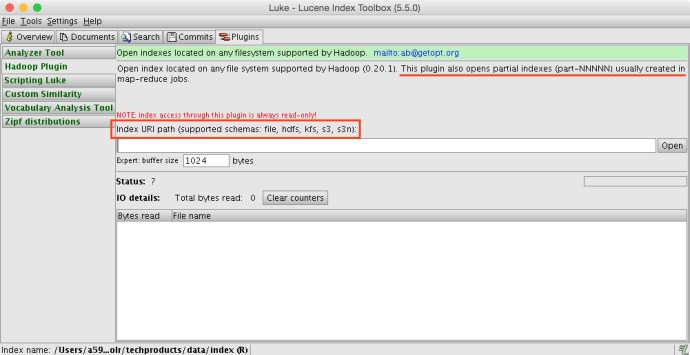
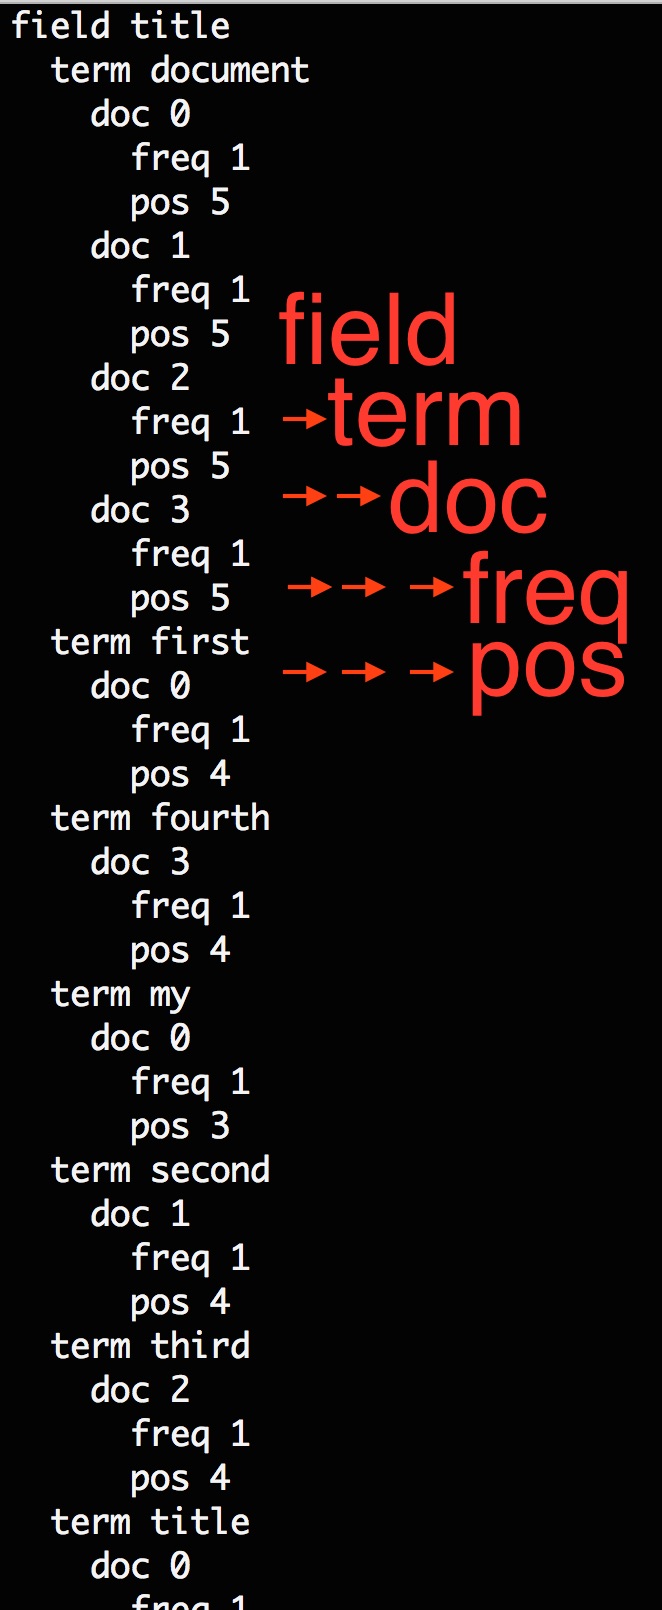
I have just shared how to write a Lucene index, if you already have one, you can use Luke to inspect the Index, understanding if it is a legit index and what are the fields and corresponding types.

In my example, there are only two fields which is id and manu and both of them are string types. This is how my index looks like in Luke.

myindexluke.jpg

Step2: Schema.xml.

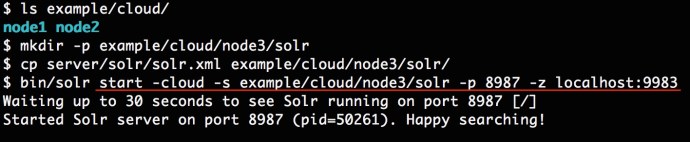
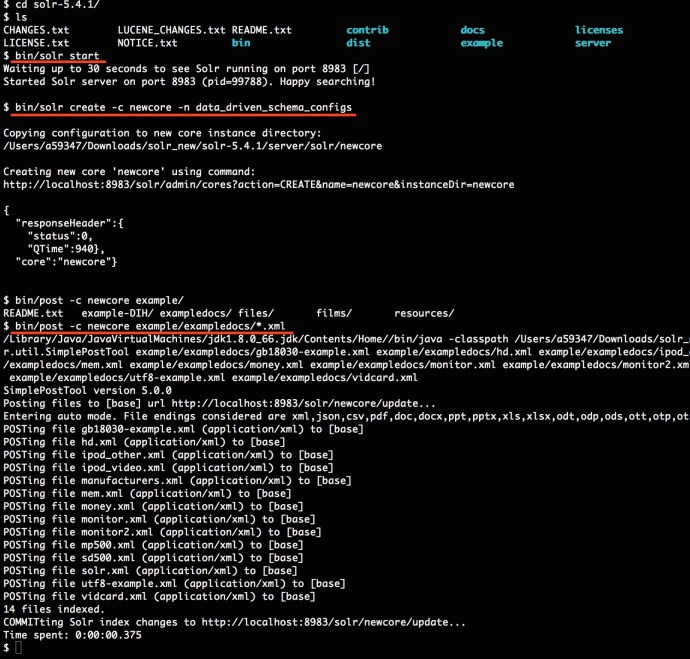
To make sure we don’t skip any step, I am just download a fresh Solr and start a brand new core using the data_driven_config.

Here is a screenshot of how I did it.

brandnewsolr

And now we have a bunch of random documents in our newcore and the schema should have recognized all the fields.

Here are the existing documents.

loadlucene5

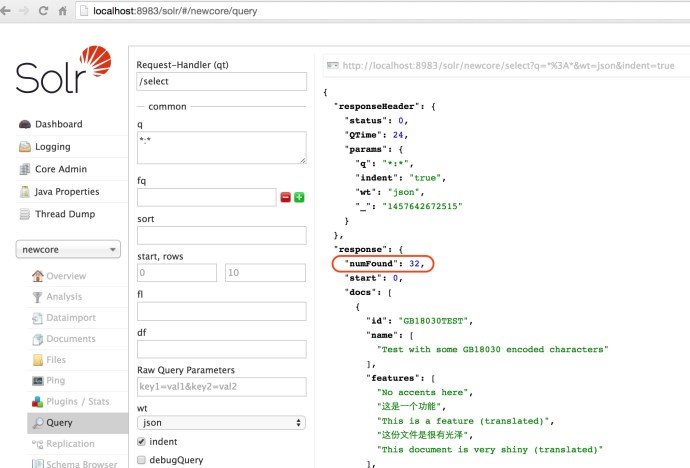
The post tool managed to index 32 documents. And in this case, I am using the configuration set named “data_driven_schema_configs”. As you can tell from the name, this schema configuration is data driven which is smart enough to add new fields into schema.xml based on whatever data got posted to it.

Here is a screenshot of how the default managed-schema looks like and how it looks like after posting documents.

The funny part is you won’t even see a schema.xml, but the file “managed-schema” is supposed to play the role of defining the schema, you can find more information about nitty gritty details about managed-schema from here.

Here are a few screenshots of the interesting managed-schema even didn’t show up in the files tab in Solr web app but it is there in the file system.

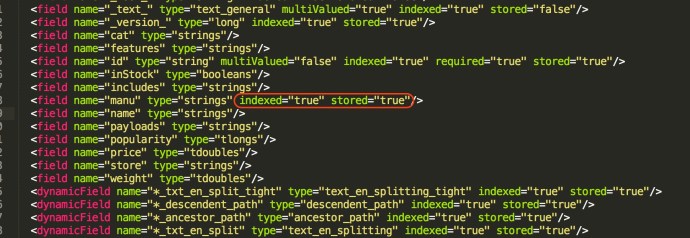
After all of this, we realized that the example documents actually contains the fields id and manu but it is not stored nor indexed. However, in our Lucene index that we are going to load, we made those two fields both indexed and stored. It will be interesting to see what if the schema doesn’t match the index but for now, lets move on by modifying the manu field to be stored and indexed.

loadlucene4.jpg

Step3: Solrconfig.xml

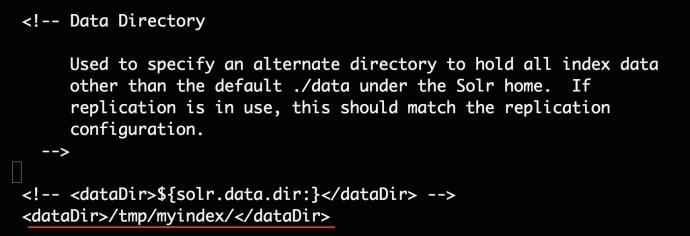
Now we have corrected the schema and then need to change Solrconfig making sure the core is pointing to where our Lucene index is.

You need to locate a tag called dataDir and change the value, for more information about dataDir, you can visit this wiki page.

loadlucene7

Step4: Restart Solr

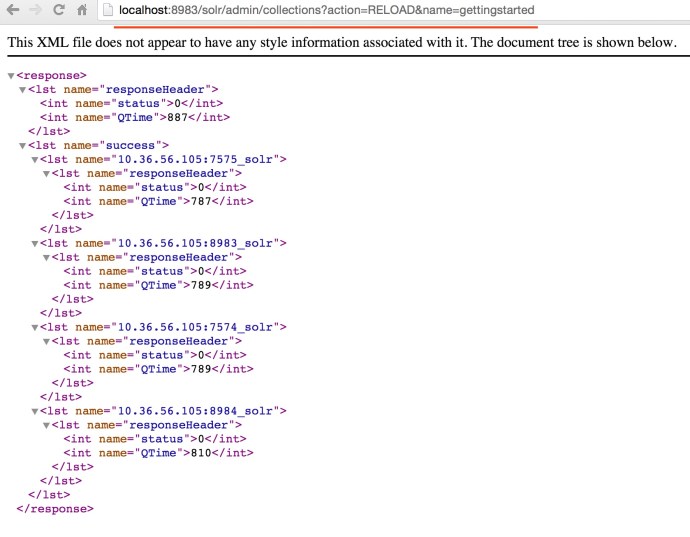
Now we are done modifying both configuration files, however, how to take effect? people were saying you can use the ADMIN RELOAD API. However, it has also been mentioned in the Wiki that:

Starting with Solr4.0, the RELOAD command is implemented in a way that results a “live” reloads of the SolrCore, reusing the existing various objects such as the SolrIndexWriter. As a result, some configuration options can not be changed and made active with a simple RELOAD…

  • IndexWriter related settings in <indexConfig>

  • <dataDir> location

Bingo, there is exactly the configuration that we changed, so we have to restart the Solr instance to take effect.

bin/solr stop && bin/solr start

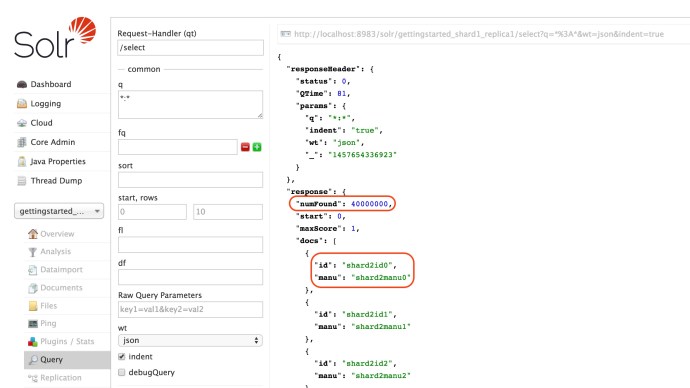
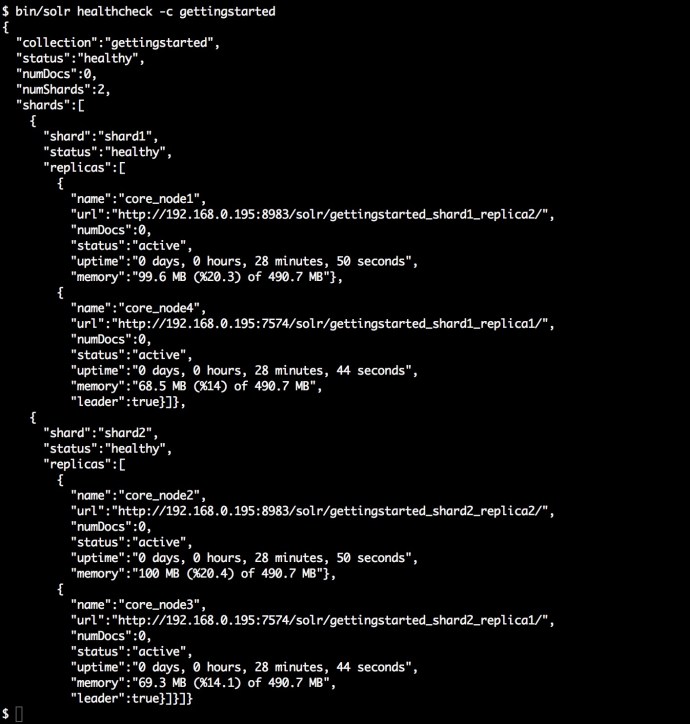
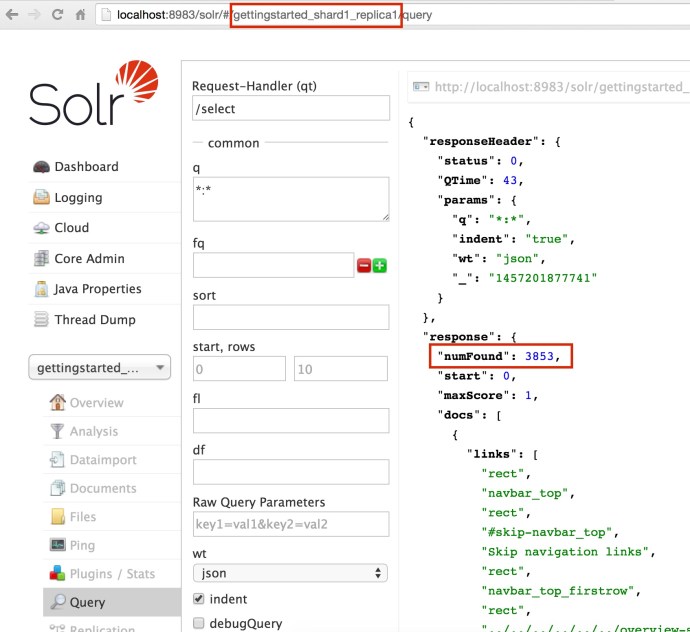
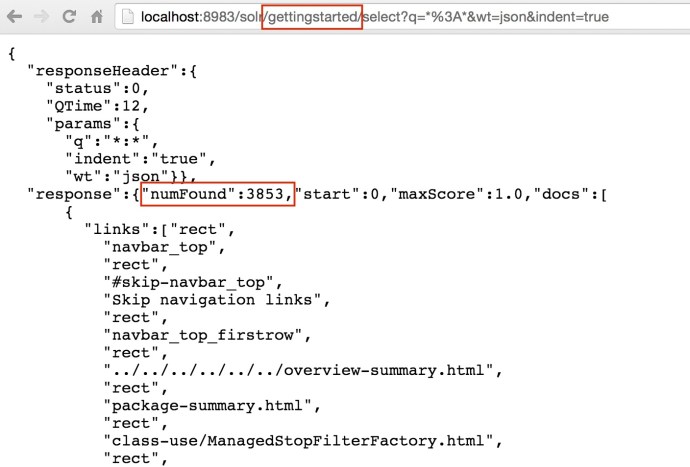
Now lets take a look if our 10 million indexes got loaded or not.

loadlucene8.jpg

Mission Accomplished!

TODO:

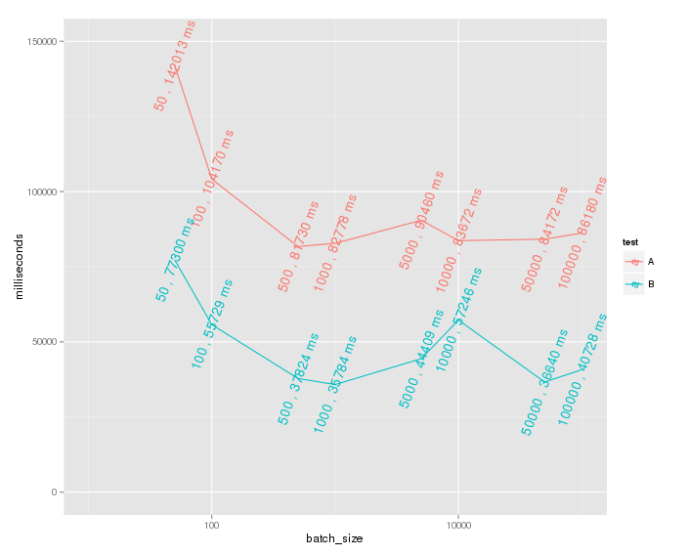
  1. benchmark against other indexing approaches SolrJ, CSV…
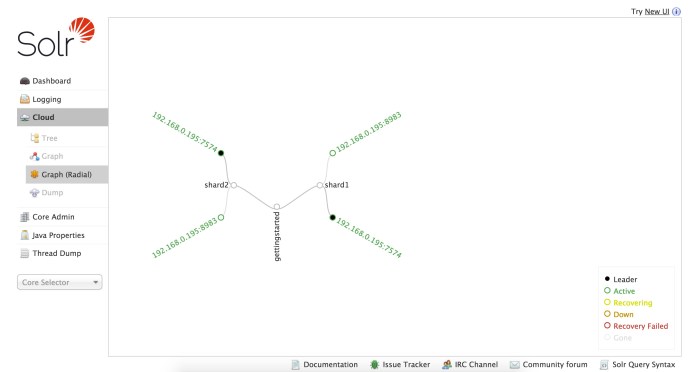
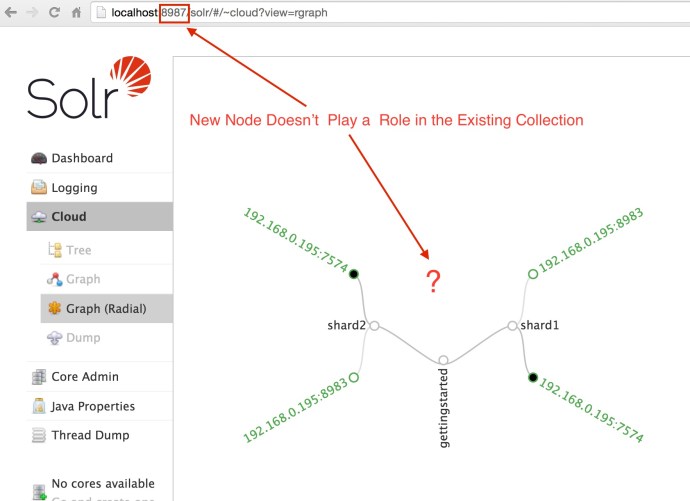
  2. load lucene index into Solrcloud

References:

  1. can-a-raw-lucene-index-be-loaded-by-solr
  2. very-basic-dude-with-solr-lucene
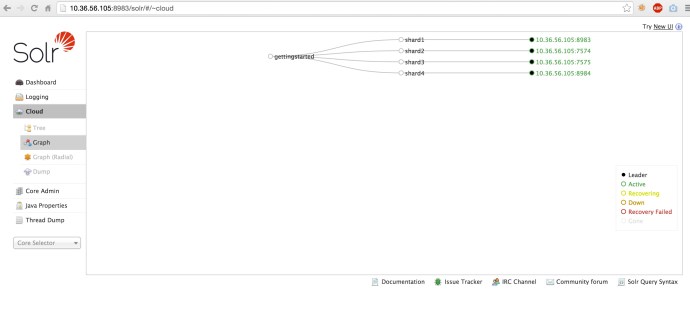
Solrcloud – API benchmark

This is a post where I brought up a 3 node solrcloud on my laptop with default settings, and then benchmarked how it takes to index 1 million records using SolrJ.

You can view the SolrJ benchmark code on my github and I also wrote a small r program to visualize the relation between index time and batchsize. You can view the source code here.

benchmark.png

In this case, there are three nodes running in the Solrcloud and three shards with one replica each. So we have 3 * 2 = 6 cores in the end and two cores each node.

This is how the solrcloud graph looks like for the gettingstarted collection. And you can also see when I log into localhost:8983, which is node one, I can only see two cores which is shard2 and shard3 there.

In the end, we got a sense of how fast this API could be using one thread and it is around 12 dps (Documents Per Second). However, the question is can this be improved?

There is a presentation on Slideshare from Timothy Potter that I found really inspiring and helpful.

He claims that the performance could be improved by optimizing the number of shards and at the same time, replica is expensive to write to, and in this case, I don’t want replication.

Then I reran the solr cloud gettingstarted example and set the number of shards to be 4, (it has to be in a range between 1 and 4) and replication factor to be 1 which means no replication.
I reran my code and put together the benchmark data together.

benchmark

Clearly, we can see the performance dramatically increase and the now the record is 30K dps. I think the next step will be researching what is the optimized number of shards to use.

Luke – Lucene Index Inspector

There is a project called Luke has been designed and maintained by several different parties and now the most active version is maintained by Dmitry Kan hosted on Github. The set up is super easy and you must be really amazed at how much this handy tool can bring to you.

First, we need to download Luke by issuing a git clone command:

git clone https://github.com/DmitryKey/luke.git

Then change the directory to the repo and you should realize it is a Maven project since it has a POM.xml file there 🙂 There is a bash script luke.sh which is the script you should use to run Luke, however, if you run the script directly, it will error out saying that unable to find the LUKE_PATH environment variable. If you take a quick look at luke.sh, you will realize it is demanding a jar file with all the dependencies included – luke-with-deps.jar. 

You can easily generate that jar file by issuing the following command:

mvn package

This command should take a minute and you will see it started downloading all the dependencies.

lukemaven

Then we are good to go!!!! issue the command `.luke.sh` and you should see a screen like this:

luke1

I have to admit aesthetically speaking, this definitely isn’t the most beautiful application on Mac, but know what this tool does, you will forgive it 🙂

First, you need to change the path to point to any index folder with Solr service turned off, I feel like when you tried to open a index folder which a running Solr service is using, it will complain about index locking. Or you can force to unlock and at the same time set readonly mode so you can read the index.

Anyway, for a brand new Solr installation, you can issue the command  “./bin/solr start -e techproducts” which will not only start a Solr instance but index a few records. We will use the generated index file as an example to illustrate how Luke works.

Like what I have done to most applications, I went to preference and changed the theme of the application from yellow to grey so it looks a bit modern…. Before I dive into too much detail, you can first go the Tools option and export the whole index into an XML file.  In that case, you can open the XML format of your index and see what is fun there.

exportindex

There is a tab in Luke called search where you can simulate how the search part really works but with lots of customization capability like text analysis, query parser, similarity and collector. I post the screenshot of Luke search here along with one from Solr web app search. So you can easily see they have exactly the same search result but Luke absolutely gives you more flexibility if you want to understand what is going behind the scene.


There is also a really cool feature in Luke Plugins called Hadoop Plugin, it is capable of reading partial index file generated by Map Reduce, something like part-m-00x. Here is a screenshot:

hadoopplugin.jpg

In the end, I highly recommend using Luke when you work with Solr and Lucene.

Good luck search!

References:

  1. Luke Request Handler
  2. DmitryKey Luke 
  3. getopt Luke
  4. Google Luke

Lucene – SimpleTextCodec

This blog post from Florian is fantastic! I followed his tutorial with a few modifications of the code and got it working!

Here is a screenshot of it working!

eclipsesimpletextcodec.jpg

In the code, I configured the index writer to use SimpleTextCodec instead of the default one. So what does SimpleTextCodec do then? In the Java doc, there are only two lines of description which indicates the purpose of this package:

plain text index format.

FOR RECREATIONAL USE ONLY – Javadoc

Clearly, when your index is in plain text format, the access to the index won’t be as efficient as the object serialization and at the same time, the disk usage is not optimized and your index disk usage can easily go through the roof. However, it is really fun to take a look at the raw index file and understand how that works at a high level.

First, when the program finishes, the files in the index folder are different from the ones that the standard Lucene codec or Solr generated.

  • _0.fld    
  • _0.inf    
  • _0.len    
  • _0.pst    
  • _0.si     
  • segments_1
  • write.lock

If you read the Java code carefully, there are four documents got indexed and each document has two text field, since it will be interesting to learn the difference between stored field and indexed field, I tried all the permutations of index and store.

Now lets take a look at _0.fld.

fld

The fld file contains all the stored field information, all the documents are inserted record by record and there is a numeric document id started from 0 and increasing one at a time.

Followed by the doc is the field tag, clearly, for document 1 and document 2, we stored the first field for doc 0 and the second field for doc 1. And for doc2, we have stored both fields and for doc3, neither field has been stored.

Within each field tag, there are three tags which is the name of the field, the field type and field value.

In a nutshell, the fld file bascially transformed all the indexes into a much organized way, however, the whole point of index is the inverted index, so where is the inverted index? There is another file called _0.pst, which contains all the inverted index and the pointer information.

Here is a screenshot of part of the pst:

pst

If you are familiar with how the Index and Search works in Solr/Lucene, you should know that all the documented turned out to be inverted index after the text analysis, and when use issues a search, the search term will also first be processed by a compatible text analysis and then turned out to be a search term, which is the field name and the term value itself. As you can see from the screenshot, once you have provided the field and search term, you should easily locate which documents that search term have appeared.

Say for example, the search term is the word “third”, we know it only appeared in doc2 and the frequency is 1 which means it has appeared only once in that document and meanwhile, the position is 4. Now, lets switch back to the fld file and see how it looks like there.

pstfld

Frequency will be used for calculating the score and the position can easily help you locate the document and the value in fld.

Well, there isn’t really that much to cover and this SimpleTextCodec really illustrate how the indexing part works.

In the end, this is how the segment info file looks like:

segmentinfo.jpg


Solrcloud – .fdt (1)

In the previous post, we managed to start up a Solrcloud cluster and indexed a few thousand documents, we know they got distributed, we know they got splited, but how the indexes look like in each node. This post might not be helpful for those who are seeking for actions items, but for the ones who is really curious into how Lucene works, this should be helpful.

Solr in a nutshell is a transformation of data into an inverted-index format. Inverted-index is basically the book index page where it is search term oriented and suited for quick look up. Now let’s look into the index folder of each shard. To find the directory path of index, you can get on Solr web app and you should see the absolute path in the shard overview session.

solrcloudindexdir.jpg
Looking into the index folder, there are a few files with file type extensions that are not commonly used or seen. You can take a quick look of the file extension definition here. But clearly, the _k.fdt is the first file and happened to be the biggest file in this directory which I assume it should store some valuable information there.

solrcloudindex.jpg

When you open the file in VI.

fdtbinary.jpg

After a few hours of research, to understand the Solr index file is actually starting to get out of the domain of Solr, and it is getting to the core of Lucene.

I have asked a stackoverflow question here and people pointed me to the package description of lucene.codec. I will temporarily mark this post as the first step towards to the success. And need one or even more posts to cover this topic.

SolrCloud – Quick Start

“SolrCloud is designed to provide a highly available, fault tolerant environment for distributing your indexed content and query requests across multiple servers. It’s a system in which data is organized into multiple pieces, or shards, that can be hosted on multiple machines, with replicas providing redundancy for both scalability and fault tolerance, and a ZooKeeper server that helps manage the overall structure so that both indexing and search requests can be routed properly.” – Solr Wiki

I am following the tutorial “Getting Started with Solr Cloud” and felt it will be beneficial to add a few images with some comments to help the ones like me who feels like “driving”.

When you first started the two nodes Solr Cloud, you can see a topology graph of the Cloud by visiting the web admin. In the graph below, starting from the root – “gettingstarted”, one can easily see that collection got split into two shards, shard1 and shard2. And each shard, instead of split, got replicated twice and each replication is sitting on a different node. And out of the two replications/nodes/servers, one out of two has been marked as Leader while the other one is active. In this case, it happens to be the Leaders of both shards happen to be on the same machine 7574.

solrcloudradialgraph

Since we are simulating a Solr Cloud using once machine, behind the scene it is actually running two separate JVMs.

You can even extract more information from the process like port number, jvm memory size, time out time and even zoo keeper information. solrtwojvms

The following screenshot is the output of the command “bin/solr healthcheck” where gives you a quick summary of what is going on about the cluster at a high level.

solrhealthcheck

The next step is to index a few documents and see how it looks like in the SolrCloud.

$ bin/post -c gettingstarted docs/
/Library/Java/JavaVirtualMachines/jdk1.8.0_66.jdk/Contents/Home//bin/java 
-classpath <solrpath>/dist/solr-core-5.4.1.jar 
-Dauto=yes 
-Dc=gettingstarted 
-Ddata=files 
-Drecursive=yes 
org.apache.solr.util.SimplePostTool docs/
SimplePostTool version 5.0.0
Posting files to [base] url http://localhost:8983/solr/gettingstarted/update...
Entering auto mode. File endings considered are xml,json,csv,pdf,doc,docx,ppt,pptx,xls,xlsx,odt,odp,ods,ott,otp,ots,rtf,htm,html,txt,log
Entering recursive mode, max depth=999, delay=0s
Indexing directory docs (3 files, depth=0)
POSTing file index.html (text/html) to [base]/extract
...
POSTing file VelocityResponseWriter.html (text/html) to [base]/extract
Indexing directory docs/solr-velocity/resources (0 files, depth=2)
3853 files indexed.
COMMITting Solr index changes to http://localhost:8983/solr/gettingstarted/update...
Time spent: 0:00:44.416

Using the bin/post SimplePostTool, I easily indexed 3853 documents. And now lets see how it looks like SolrCloud.

solrcloudquery

http://localhost:8983/solr/gettingstarted_shard2_replica1/select?q=*%3A*&wt=json&indent=true

This is really interesting, what is really going on here after I ran the post command:

  1. When the SimplePostTool was issued, we really did not specify how to split the documents and which shard it need to go. And the only thing you need to specify is the collection name. Cloudera really hide the complexities from the end users.
  2. After all the 3853 documents got properly indexed, I went to the Leader of each shard and from the overview window, you can see how the documents got split into each shard, Shard1: 1918, Shard2: 1935 and they add up to (1918+1935) = 3853.
  3. When I issued a query from the webapp inside one of the cores, it actually make an API call to that specific core – localhost:8983/solr/gettingstarted_shard2_replica1, however, the returned result are 3853! that is everything in this collection. Clearly, even if your query are issued against one shard, the query are actually across the whole SolrCloud.
  4. I also tried to change the core name to be the collection name because end user really don’t know how many replications or how many shards we have behind the scene. And actually most people probably don’t care at all. After I change it from core name to the collection name, it still returned the complete result correctly.

    http://localhost:8983/solr/gettingstarted/select?q=*%3A*&wt=json&indent=true

solrcloudcollectionquery
Now we have started a two node Solr Cloud, indexed some documents and saw how it got split into shards and how to query against individual core or even the whole collection.

Now lets try to add one extra node to the solrcloud and see what happens.

solrcloudaddnode
Now we have a new node up and running and we now can see 3 Solr java processes from the top command. However, if you have worked with Hadoop before, when you add a new node to the cluster, there is some logic going in the background will slowly rebalance the whole cluster, and propagate the data from the existing node to newly added nodes. However, if you think add new node in SolrCloud will do that type of rebalance out of box, you might be wrong.

As you can see, when you log into the new node, there is not a single core there, and when you look at the collection graph, the new node was not added as default and it is still the same graph we have seen before.

solrcloudnode3cloud

To some people, they don’t really care about shard, core, node…etc. And the only thing they want if when the service is slow, I will add more servers to it and that should solve the problem.

Again, thanks to the community who came up with such a fantastic tutorial. It was really informative and fun. Hopefully this post is helpful to someone. In the coming posts, we will look more into:

  1. how the sharding and routing part really works in SolrCloud
  2. if there is a hands-free solution like the Hadoop auto-balancing
  3. how map reduce fit into the picture to bulk load large amount of indexes.

🙂